DSCVR Canvas Tutorial/Guide Ep1: Build Your First DSCVR Canvas (Booklet App) With Nextjs
1.0 Introduction
1.1 Overview Of Guide/Tutorial’s Goal
Helping Developers Understand DSCVR Canvas Development Lifecycle To Build Their First DSCVR Canvas with Nextjs
In this ultimate guide for DSCVR Canvas development, I will take you by hand to guide you on how to build your first DSCVR Canvas.
Yeah at the end of this guide, you will go from zero knowledge of DSCVR Canvas to deploying your first Nextjs-powered DSCVR Canvas.
In this guide, You will learn to develope a simple Nextjs App and then convert it to work natively within DSCVR web3 social media platform leveraging the power of Canvas and in the future episodes, we will move to more advance DSCVR Canvas Apps/dApps development.
Don’t worry if you have never heard of DSCVR Canvas or some of those aforementioned tech stacks before (nothing to fear 😀). I will cover them step by step with you all the way.
So, what are you waiting for? Grab your Canvas Dev hat and let Dev away (lol 🤨).
Meanwhile, even if you have never developed a Nextjs App before and just starting entirely, you are also covered too, because I ensured this is actually step-by-step with helpful resource recommendations for beginners and at the end,
you will have access to the full code repo to play around with and even have assignment to submit to horn your DSCVR Canvas development skills further.
1.2 Stuck? Get Support✋
I understand based on experience with developers that things can always break or get difficult to figure out, especially for beginners.
That is why you can get support for this content in just 2 steps:
STEP 1: Comment your questions below this guide to get support if get stuck (please avoid questions out of the context discussed here or they won’t be responded to)
STEP 2: Then join Discord below to alert me to check your questions (doing this ensures I can be aware of your comment to check and respond ASAP).
PLEASE avoid posting questions in Discord directly because I may not respond there. Asking here under the post directly as a comment and getting a response helps to ensure other developers going through the same issues can access the solution without repeatedly asking the same questions on Discord.
Join dProgrammingUniversity Discord Server – I have created a dedicated channel #Solana (under the BLOCKCHAINS category).
So, feel free to ask questions below in the comment section if you are stuck with this guide.
Follow me on Twitter
DISCLOSURE:
We may hold, invest, trade or receive rewards/grants/bounty/tokens from reviewed/discussed web3 projects/affiliates (before, during or after this content was published).
DISCLAIMER:
All our contents at dProgramming University are for educational purposes only and do not constitute financial, trading, investment or development advice.
Please do your own research (DYOR).
By using or following the whole or part of this content, you agree that we are not liable for any losses that you may suffer thereafter.
2.0 Introduction To DSCVR.One Platform
Yeah, I know that you are here to start deving😜 away with DSCVR Canvas, so feel free to skip to 3.0 if already familiar with the platform.
But, for a total newbie to DSCVR, it is important to know what it is all about first before building on it.
2.1 What is DSCVR Explained
DSCVR in a simple term is a web3 version of social media platforms like X(Twitter) with a lot of web3 goodies like points, NFT, lootboxes, airdrops and more.
DSCVR is pronounced "Discover" and has grown since launched on Solana in 2023 to having hundreds of thousands of monthly unique users.
If you like to go in-depth into DSCVR, then I will suggest that you check out the ExploreWeb3 platform for detailed info about it at https://exploreweb3.xyz/projects/dscvr.
If you want to start using DSCVR,
You can follow me (and use my link to register) via:

3.0 Understanding DSCVR Canvas
Let us take a quick dive into DSCVR Canvas, core concepts and benefits of including DSCVR Canvas in your toolbox to distribute your App/dApp.
3.1 What is DSCVR Canvas Explained for Beginners
DSCVR Canvas is a web assembly-powered client that can unwrap apps/dApps natively on the DSCVR web3 social media feed, allowing users to directly interact with the apps/dApps features like click button, fill form, navigate to multiple pages in the app within the platform without the need to visit the app site outside of their DSCVR feed.
DSCVR Canvas allows a DSCVR user to come across an NFT mint and mint it, play a game, donate, purchase, bet, claim airdrop, vote and a lot more right inside DSCVR feed without the usual way of having to click on the link to visit the NFT mint website and other apps/dApps first.
3.2 DSCVR Canvas Examples
Let us see an example of DSCRV Canvas below:
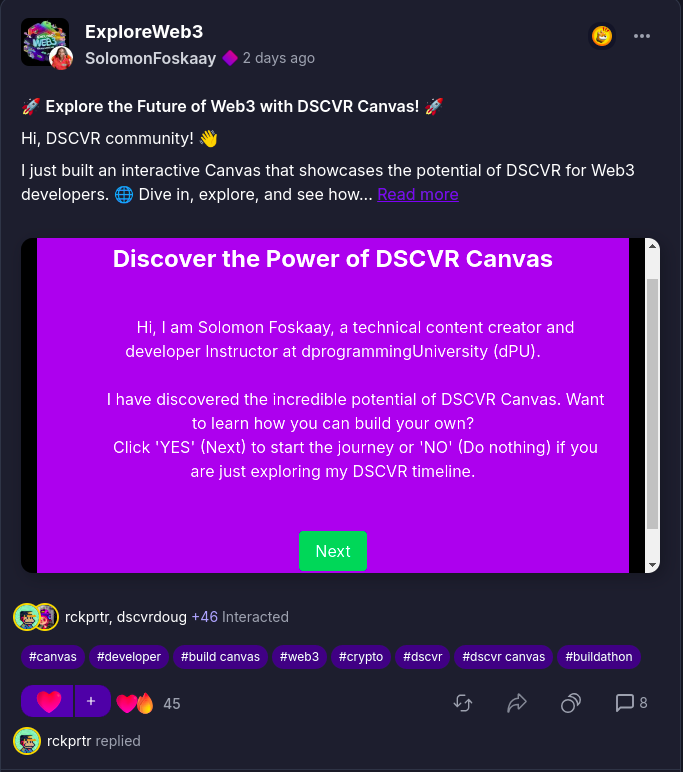
I created a Nextjs app to briefly help people learn about DSCVR Canvas while also using it to propose a Canvas guide series and get feedback if people would like to see me start a development series on it (you are now reading the first episode from that proposal😀).
Usually, I would post the link “https://dscvr-canvas-tutorial-proposal.vercel.app/” on DSCVR and anyone interested in it will have to click the link first and visit the website outside of their DSCVR feed before they can interact with whatever I put there as seen below.

But with the power of Canvas, the link after being posted transforms into the full Nextjs app itself, and anyone can interact with it directly within the DSCVR feed without the need to visit the link outside the DSCVR platform.
See it below and will suggest, that you see the post where I added it at “Explore The Future Of Web3 With DSCVR Canvas” and interact with it yourself.
Interacting with it gives you the actual experience of how a DSCVR Canvas works.
3.3 What is the difference between DSCVR Canvas and Solana Blinks?
DSCVR Canvas and Solana Blinks are similar in terms of the use case which is to serve as a client within platforms they are been integrated into so users can access apps/Apps features without leaving the platform where they encounter the link,
But they are different because DSCVR Canvas only allows apps/dApps to be unwrapped within the DSCVR platform,
while Solana Blinks allows them to unfurl within X(Twitter) and other blinks-enabled platforms including the DSCVR platform itself.
3.4 Benefits of Using DSCVR Canvas For Your Project?
There are multiple benefits considering our previous understanding of DSCVR.
Some of the benefits of using DSCVR Canvas are below but not limited to:
- Easy of use – user can easily access your app/dApps features via DSCVR Canvas
- Accessibility and adoption – making your project available to users on social media like DSCVR exponentially increases exposure of people to it without the need to leave their familiar platform.
- Early feedback: DSCVR users can be your test ground for feedback from the community before launching the project fully outside the platform.
- Easy Integration – Unlike Solana Blinks with a stricter API format that must be followed to unfurl successfully on blinks-enabled platforms like X(Twitter), DSCVR Canvas is much easier to work with. It requires just adding metadata and can instantly turn existing apps/dApps to Canvas on DSCVR.
4.0 Essential Tools and Resources for DSCVR Canvas Development
Below are essential tools and resources you need to build and develop DSCVR Canvas.
4.1 DSCVR Canvas Documentations
It is always recommended to go through the official documentation:
4.2 DSCVR Canvas Client SDK
If you would like not just to unwrap your app via Canvas but also want to take full advantage of the DSCVR platform API.
To do things like performing transactions on-chain, access info of users interacting with your DSCVR Canvas or even been able to allow safe opening of external links within your Canvas, then DSCVR Canvas client SDK and API is essential for you to familiarize yourself with :
4.3 DSCVR Canvas Solana Wallets
The following Solana wallets are compatible with DSCVR Canvas to ensure users can interact with the Blockchain directly via your Canvas on DSCVR:
4.4 DSCVR Canvas Testing and Inspection Tools
When developing DSCVR Canvas, you can easily test it by:
- Paste the Canvas link in the DSCVR post editor and even without posting it, the Canvas will be rendered and you can interact with it to detect any issues even without posting it to your feed yet.
- Post in a private DSCVR portal that you created to limit people who can have access while still in development
4.5 DSCVR Canvas Specifications
The specifications are essentials that must be part of your app/dApp for the link to be transformed into a Canvas when shared on DSCVR:
1. Add Metadata to your App/dApp
HTML Tag:
<!-- Indicates that the application is a Canvas -->
<meta name="dscvr:canvas:version" content="vNext">
<!-- Open Graph Image for previewing the Canvas -->
<meta name="og:image" content="https://my-canvas.com/preview-image.png">
Metadata Tag for Frameworks like Nextjs:
other: {
    "dscvr:canvas:version": "vNext",
    "og:image": "https://my-canvas.com/preview-image.png",
  },
2. Add a Content Security Policy
This is required to successfully load external resources within your DSCVR Canvas safely.
See how to set up the DSCVR Canvas Content Security Policy here.
3. Use DSCVR API and Client SDK if need to interact with the DSCVR platform within your app/dApp.
4. Other interesting DSCVR Canvas specifications and guidelines to help build a working Canvas are below:
DSCVR Canvas Development Guidelines
4.6 DSCVR Canvas Common Issues And Fixes
When developing or adapting your app/dApp for DSCVR Canvas, there are some commonly known issues that might arise, below are some of them with suggested fixes:
ERROR 1: Links not clickable
SOLUTION:
I simply use the “<Link>” tag in Nextjs instead of “<a href>” to handle internal links making it work fine.
But, you might need to implement the DSCVR Canvas Content Security Policy for more robust link management for internal and external links easily.
ERROR 2: Localhost not unwrapping to Canvas on DSCVR for testing
SOLUTION:
As a developer, you usually start with localhost before deployment, so it could be frustrating to see that localhost not working.
To solve the issue, open a new terminal in your IDE and put in this command to create an SSH tunnel which helps create a random temporary Cloudflare subdomain to access your project:
pnpx cloudflared tunnel --url http://localhost:3000
NOTE: Ensure you have another terminal already running your localhost dev server before running the above command so you can point it to the port of your running local dev server like 3000 or 3001 etc.

Then, copy the generated quick tunnel link as seen in the screenshot above and check if is displaying your Nextjs app site same as your localhost.
If no issues, keep it running, then copy and paste the same tunnel link on the DSCVR post editor and it will instantly be unwrapped to Canvas for you to test and interact with even without posting it.
You can watch the video for this episode above for a visual walkthrough if still not getting it to work.
4.7 Limitations of DSCVR Canvas
DSCVR Canvas are awesome and helps make apps/dApps interactive for users but it still has a lot of issues and requires more improvement.
So, when developing Canvas for DSCVR, keep them in mind (though they will all likely be solved in future even before you read this):
- Non-Platform-Agnostic: this means that, unlike Solana Blinks, this is just like Telegram mini-apps for Telegram. It currently works only within the DSCVR platform, so ensure the platform have the type of audience you are aiming for before building Canvas.
- Testing DSCVR Canvas Locally: Localhost Canvas URL does not unfurl/unwrap to Canvas when posted on DSCVR. So, you need to follow the solution as aforementioned on issues and fixed.
5.0 Pre-Requisites For DSCVR Canvas Development
Before diving deep into developing your first DSCVR Canvas with Nextjs,
let’s quickly set up the required developer environment.
5.1 Nextjs-Powered DSCVR Canvas Requirement
Meanwhile, having knowledge of the following will be helpful:
- Nextjs Development – As I mentioned earlier if you have never developed with Nextjs javascript framework before, then I have a Full-stack Web3 Frontend Development FREE Course you can take to help get started with it for free.
- DSCVR.one – it is free, create a DSCVR account if you don’t have it yet and familiarize yourself with the community to help guide better on what Canvas to build that will likely get more interactions. Also, you need to have an account to test and finally share your DSCVR Canvas when done.
5.2 Setting Up Development Environment for DSCVR Canvas
Installing necessary tools and software
You will need to have the following installed on your computer. For this guide, I am using Linux OS (Ubuntu):
- Nodejs
- Node Package Manager – I prefer using PNPM over NPM and Yarn (use your preferred choice)
- IDE – VSCode
- DSCVR Canvas Client SDK (Essential if want to set CSP and interact with DSCVR API which we will not do yet in this DSCVR Canvas Tutorial/Guide episode 1 but would come in handy for future advanced DSCVR Canvas development episodes)
6.0 VIDEO: Creating Your First DSCVR Canvas (Booklet App)
I have a step-by-step- video for this guide.
Watch me go through the Build Your First DSCVR Canvas (Booklet App) With Nextjs in the video below:
7.0 Creating Your First DSCVR Canvas (Booklet App)
As promised earlier, I will not conclude this guide without you building your first Nextjs-powered app that can be unwrapped to Canvas on the DSCVR platform successfully.
Here we are, let get started building Canvas.
Shall we?🤔
A step-by-step guide to creating, and hosting a DSCVR Canvas Nextjs App that allows users to read through bit-sized information (like a booklet) directly on the DSCVR feed without the need to visit the app website.
In future episodes, we will then move on to building more advanced Canvas projects using the DSCVR Canvas client SDK and API.
7.1 Install Nextjs For DSCVR Canvas Setup
Create a folder named
dscvr-canvas-demo-bookletOpen it and inside the “dscvr-canvas-demo-booklet” folder, right-click to open in “Terminal”
In the terminal, type command
code .This will open the “dscvr-canvas-demo-booklet” project folder in VSCode

In VSCode, open a new “Terminal” (Let’s call it “Terminal 1”) and install Nextjs following the instructions below:
Install Nextjs using the default setup with the command:
pnpx create-next-app .Select details as:
✔ Would you like to use TypeScript? - Yes
✔ Would you like to use ESLint? - Yes
✔ Would you like to use Tailwind CSS? - Yes
✔ Would you like to use `src/` directory? - No
✔ Would you like to use App Router? (recommended) - Yes
✔ Would you like to customize the default import alias (@/*)? - No
Then confirm all packages installed with the command:
pnpm iYou should see something like this in your terminal:
Lockfile is up to date, resolution step is skipped
Already up to date
Done in 651ms
Run the Nextjs “dscvr-canvas-demo-booklet” project with the command (open second terminal “Terminal 2”):
pnpm devOpen the project in your browser:
http://localhost:3000

(if this port is busy)
it will use other available ports like

http://localhost:3001
NOTE:
Moving forward, kindly leave “Terminal 2” running the “pnpm dev” server as above and continue to use “Terminal 1” for other commands below to ensure you don’t have to kill the server and restart multiple times to install other packages.
7.2 Create A Link To Test DSCVR Canvas Localhost
In the previous section under issues and fixes, I told you that you can not use your Localhost directly on DSCVR to unwrap your app/dApps to Canvas.
To do that, you need tunnelling.
So, open another Terminal, let’s call it “Terminal 3” and use the command below in “Terminal 3” to activate a Cloudflare tunnel:
pnpx cloudflared tunnel --url http://localhost:3000To confirm all is set and done, click on the randomly generated tunnel link to ensure it loads your localhost app correctly:

In the above screenshot, I got “https://filled-ad-prevention-crawford.trycloudflare.com/” as the random tunnel link to use.
Visiting it displays your localhost site but now with a normal domain-based link instead of a localhost port link like localhost:3000.

7.3 Turn Nextjs App To DSCVR Canvas
If you share your randomly generated tunnel link from above, on the DSCVR platform, it will render as a normal link and the user will need to click it to be taken to the website.
So, to have it transformed to Canvas when posted on DSCVR, we need to add some metadata tags to the Nextjs.
NOTE: You can add this to a specific page if you do not want your whole Nextjs app to be rendered as Canvas on DSCVR.
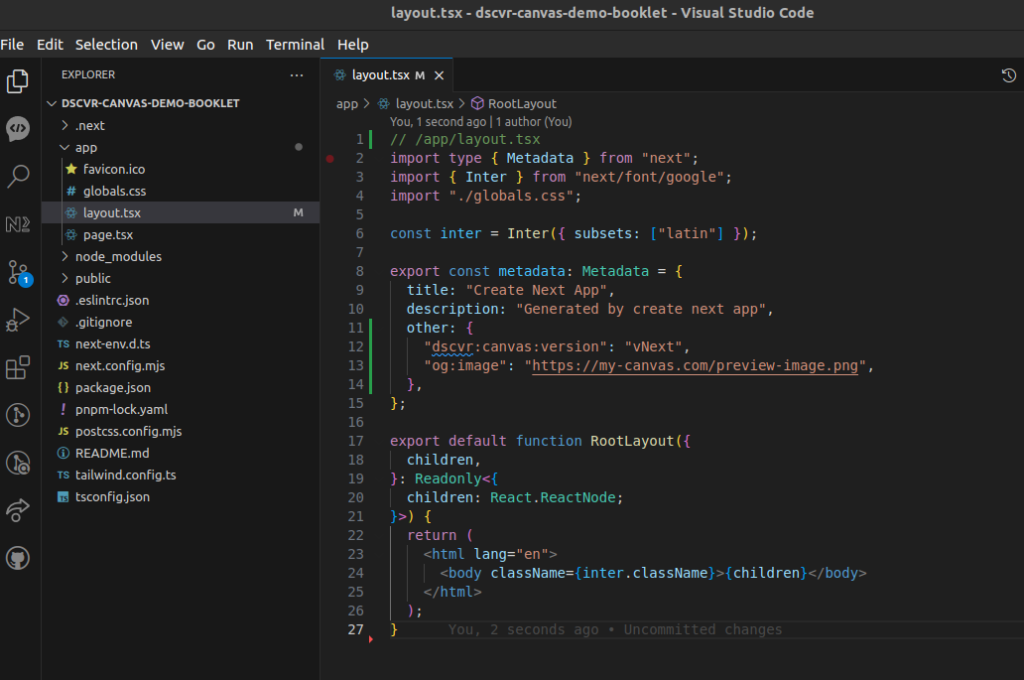
For full app rendering, we will simply add it to the “layout.tsx” which automatically applies it to all pages within Nextjs.
To add DSCVR Canvas HTML tag metadata to Nextjs, do the following:
Open “layout.tsx” file:
/app/layout.tsxAdd the following to your metadata (if not existing create a metadata and add it:
other: {
    "dscvr:canvas:version": "vNext",
    "og:image": "https://my-canvas.com/preview-image.png",
  },
You will likely have your code previously as:
// /app/layout.tsx
import type { Metadata } from "next";
import { Inter } from "next/font/google";
import "./globals.css";

const inter = Inter({ subsets: ["latin"] });

export const metadata: Metadata = {
  title: "Create Next App",
  description: "Generated by create next app",
};

export default function RootLayout({
  children,
}: Readonly<{
  children: React.ReactNode;
}>) {
  return (
    <html lang="en">
      <body className={inter.className}>{children}</body>
    </html>
  );
}
After adding the DSCVR Canvas metadata code to your Nextjs app layout.tsx code, it will look like this:
// /app/layout.tsx
import type { Metadata } from "next";
import { Inter } from "next/font/google";
import "./globals.css";

const inter = Inter({ subsets: ["latin"] });

export const metadata: Metadata = {
  title: "Create Next App",
  description: "Generated by create next app",
  other: {
    "dscvr:canvas:version": "vNext",
    "og:image": "https://my-canvas.com/preview-image.png",
  },
};

export default function RootLayout({
  children,
}: Readonly<{
  children: React.ReactNode;
}>) {
  return (
    <html lang="en">
      <body className={inter.className}>{children}</body>
    </html>
  );
}
That is all it takes to turn your Nextjs app into DSCVR Canvas and for you to confirm it,
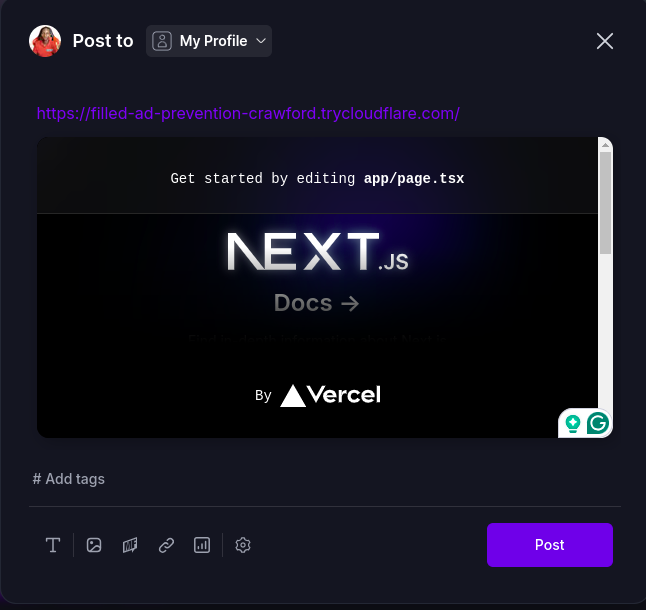
simply go to DSCVR and try to create a post, in the post editor, copy-paste the tunnel link and it will immediately transform to Canvas and render the Nextjs app.
If you try using localhost:3000, it won’t unwrap to Canvas on DSCVR as seen in the screenshot below:

But when using the tunnel link, the Nextjs app unfurls/unwraps to Canvas on DSCVR instantly even without the need to post it,
Just paste in the editor and see it in action as seen in the screenshots below:

When the user clicks on the Canvas play button, it unlocks access to interact with your DSCVR Canvas as seen in the screenshot below:

8.0 Build A Nextjs Powered DSCVR Canvas Booklet App
Yeah, let’s transform our Nextjs to a booklet app where we will teach others about the basics of DSCVR Canvas using Canvas.
8.1. Booklet App Homepage Code
You can replace your default Nextjs homepage “/app/page.tsx” code with:
// /app/page.tsx
import Card from "../components/Card";

export default function Home() {
  return (
    <main className="flex min-h-screen items-center justify-center p-4">
      <Card
        title="Discover the Power of DSCVR Canvas"
        content={`
          Hi, I am Solomon Foskaay, a technical content creator and developer Instructor at dprogrammingUniversity (dPU).

          I have discovered the incredible potential of DSCVR Canvas. Want to learn how you can build your own?
          Click 'YES' (Next) to start the journey or 'NO' (Do nothing) if you are just exploring my DSCVR timeline.
        `}
        nextLink="/what-is-dscvr-canvas"
      />
    </main>
  );
}
8.2. Booklet App Card Component Code
You may need to create a new “components” folder if not existing in the root folder of your Nextjs app already.
Create a new component file “Card.tsx” and copy-paste the code below in it to handle the display of the Booklet App as a card:
// /components/Card.tsx
import React from 'react';
import Link from 'next/link';

interface CardProps {
  title: string;
  content: string;
  nextLink?: string;
  backLink?: string;
  restartLink?: string;
}

const Card: React.FC<CardProps> = ({ title, content, nextLink, backLink, restartLink }) => {
  return (
    <div className="p-6 bg-purple-600 rounded-lg shadow-lg text-center">
      <h2 className="text-2xl font-bold mb-4 text-white">{title}</h2>
      <p className="mb-6 text-white whitespace-pre-wrap">{content}</p>
      <div className="flex justify-around">
        {backLink && (
          <Link href={backLink}
            className="bg-blue-500 text-white px-4 py-2 rounded hover:bg-blue-700">
                Back
          </Link>
        )}
        {restartLink && (
          <Link href={restartLink}
            className="bg-red-500 text-white px-4 py-2 rounded hover:bg-red-700">
            Restart
          </Link>
        )}
        {nextLink && (
          <Link href={nextLink}
            className="bg-green-500 text-white px-4 py-2 rounded hover:bg-green-700">
            Next
          </Link>
        )}
      </div>
    </div>
  );
};

export default Card;

8.3. Booklet App What Is DSCVR Canvas Page Code
Next is creating multiple pages, each to handle a page of the Booklet app as the user navigates through the booklet to learn about DSCVR Canvas.
The first page is the home page done previously and the next page will lead to “What is DSCVR Canvas”.
To do that, create a new page route in the /app folder as “what-is-dscvr-canvas” and add the following code to it:
// /app/what-is-dscvr-canvas/page.tsx
import Card from '../../components/Card';

export default function WhatIsCanvas() {
  return (
    <main className="flex min-h-screen items-center justify-center p-4">
      <Card
        title="What is DSCVR Canvas?"
        content={`
          DSCVR Canvas is a framework that allows developers to embed custom applications directly into DSCVR’s social feeds.

          It opens up opportunities to reach a wide audience and build innovative Web3 experiences.
        `}
        nextLink="/benefits"
        backLink="/"
      />
    </main>
  );
}
8.4. Booklet App Benefits Page Code
Next is creating the benefits of the DSCVR Canvas page.
To do that, create a new page route in the /app folder as “benefits” and add the following code to it:
// /app/benefits/page.tsx
import Card from '../../components/Card';

export default function Benefits() {
  return (
    <main className="flex min-h-screen items-center justify-center p-4">
      <Card
        title="Why Build with DSCVR Canvas?"
        content={`
          With DSCVR Canvas, you can distribute your apps easily within a growing DSCVR decentralized social platform.
          It also allows direct web3 wallet interaction within your Canvas App/dApp.

          DSCVR boasts of having over 500k unique users monthly, making it an ideal place for innovative Web3 projects.
        `}
        nextLink="/examples"
        backLink="/what-is-dscvr-canvas"
      />
    </main>
  );
}
8.5. Booklet App Examples Page Code
Next is creating examples of what can be built with the DSCVR Canvas page.
To do that, create a new page route in the /app folder as “examples” and add the following code to it:
// /app/examples/page.tsx
import Card from '../../components/Card';

export default function Examples() {
  return (
    <main className="flex min-h-screen items-center justify-center p-4">
      <Card
        title="What Can You Build with DSCVR Canvas?"
        content={`
          The possibilities are vast:
          Games, Utility apps, DeFi, Blinks and a lot more.

          Whether simple or complex app,
          Canvas makes distribution within DSCVR easy.
          Did I remember to mention - its FREE? -
          Yeah 100% FREE exposure for your App/dApp at lunch.
        `}
        nextLink="/build-dscvr-canvas"
        backLink="/benefits"
      />
    </main>
  );
}
8.6. Booklet App Build DSCVR Canvas Page Code
Next is creating the how-to-build DSCVR Canvas page.
To do that, create a new page route in the /app folder as “build-dscvr-canvas” and add the following code to it:
// app/build-dscvr-canvas/page.tsx
import Card from '../../components/Card';

export default function HowToBuild() {
  return (
    <main className="flex min-h-screen items-center justify-center p-4">
      <Card
        title="Building Your First DSCVR Canvas"
        content={`
          There are two ways to build a Canvas:
          1. Convert an existing app/dApp into a Canvas.
          2. Build from scratch.
          Both methods are straightforward and require just a few modifications.
        `}
        nextLink="/join-journey"
        backLink="/examples"
      />
    </main>
  );
}
8.7. Booklet App Join Journey Page Code
Next is creating the final stage with calls to action page.
To do that, create a new page route in the /app folder as “join-journey” and add the following code to it:
// app/join-journey/page.tsx
import Card from '../../components/Card';

export default function JoinJourney() {
  return (
    <main className="flex min-h-screen items-center justify-center p-4">
      <Card
        title="Ready to Start Building DSCVR Canvas?"
        content={`
          I am considering creating a DSCVR Canvas development series on dProgrammingUniversity (dPU) after I discovered no DSCVR Canvas development guides on Google/Youtube except for the official docs.
          It will be 100% FREE with step-by-step Nextjs apps DSCVR Canvas guides (Articles and Videos).

          Each episode, we will build & deploy together a Nextjs powered DSCVR Canvas (From basic to advance with acces to the code repos)

          So, If you would like to help make this a reality, here is what you can do (Kindly Comment below):
          1. Suggest a name for the episode series.
          2. What would you like to see/build together in the series.
          3. Tag at least 3 friends to spread the word.
          4. Optionally, tag the DSCVR team and share why you think this initiative is worth supporting with a grant.

          DISCLOSURE: You have been interacting with my Nextjs App via DSCVR Canvas without need to visit the site - Awesome (share me your experience with this Canvas as part of your comment)!

          Looking forward to kick start this journey with you.
          Thanks!
        `}
        restartLink="/"
        backLink="build-dscvr-canvas"
      />
    </main>
  );
}
After adding all the Booklet app pages and card components above you should have a structure similar to my screenshot below:

9.0 Testing Your Nextjs Booklet App DSCVR Canvas
Yeah, now that you have your Booklet app ready, it is time to test.
Similar to what we did previously, all you need to do is copy-paste the tunnel link (not localhost) into the DSCVR post editor and interact with your Canvas even without posting it for others to see yet…
You should now see the Canvas change from:
to the Booklet below:
next page:

and so on.
10.0 Deploy Your DSCVR Canvas Booklet App
Considering the fact that the tunnelling link used above is temporary and also immediately rendered unreachable once you put your PC off.
We need something that will be online 24/7 to ensure anyone can continue to interact with our DSCVR Canvas anytime,
To achieve that, the Booklet app needs to be hosted and deployed on a frontend server provider platform like Vercel, Netlify or any other of your choice.
I used Vercel to host this free as you can access the one I used as an example previously below:
https://dscvr-canvas-tutorial-proposal.vercel.app
NOTE: Check the video I may include deployment to vercel (not promising and if the video becomes lenghty when recording, I will exclude the deployment part, so kindly do not be dissapointed if not included)
10.0 DSCVR Canvas GRANTS/BOUNTIES/HACKATHONS:
10.1 How To Get DSCVR Canvas Grants, Bounty and Support for DSCVR Canvas Developers
Unlike Solana Blinks, there are fewer opportunities in terms of grants, hackathons and bounties to support your development of DSCVR Canvas but it still exists and some you may check out below:
Note: Most grants, hackathons or bounties listed below might have closed when you check them, so kindly check the DSCVR platform for new active ones.
Also, you can comment below to alert me of new and current ones to add up to the list below.
- Build a Canvas on DSCVR Bounty (ending in 1 week)
- Canvas Buildathon: Blinks (ending in 2 weeks)
- DSCVR Buildathon – Canvas Embedded Apps Fest 🎉 (ending in 2 weeks)
11.0 DSCVR Canvas Tutorial/Guide Ep1 Booklet App Project Repository and Exercises
The repo for the project done in this guide can be accessed below (Please remember to give it a STAR):
dPU Nextjs Booklet DSCVR Canvas App Codes Repo
11.1 EXERCISES
Do the following exercise to solidify your learning:
- Star and fork the above repo
- Clone to your PC
- Create a new branch
- Make changes (customize) to the Booklet content to let users know who you are and what you do – maybe even hint about next project you are excited on and want the DSCVR community to know about.
- Push your changes to the “Main” branch of your own repo from the new branch – Don’t send PR to the dPU repo you forked above, instead push to your own “Main” branch of your forked version of the dPU repo above.
- Host it on Vercel, Netlify or any other of choice
- Share it on your DSCVR feed.
11.1.2.Submission:
Things to submit for reiew:
- Share your experience making those changes alongside
- Share your DSCVR Canvas post link (mean the link where you embeded your Canvas on DSCVR)
- Share your forked repo link
Then, submit all above details for a check as a comment under this post (do not post it in dPU discord or send me a DM, will not attend to such please).
Remember, after posting as a comment under this post, you can then send me a reminder in the dProgramming University discord server under the “Support” section above in the #Solana channel for me to check your submission ASAP.
12.0 Conclusion
It was an interesting ride and glad you made it to this point.
Congrats👏 once again and it’s time to take positive advantage of the opportunities opened up to developers with the introduction of DSCVR Canvas.
WHAT NEXT?
I aim to create intermediate and advanced DSCVR Canvas development content and share them in future guides with you.
Thus, kindly use the social media share button to share this guide if you have found it helpful or will be helpful to some developers in your social media sphere. And join the discord to stay in the loop.
Thanks for your time, it’s been a wonderful ride with you all this while.
SOLOMON FOSKAAY
Founder, dProgramming University (dPU).
Twitter: SolomonFoskaay
DSCVR: SolomonFoskaay