Solana Blinks Development Ep1: Ultimate Guide To Solana Blinks Development For Developers
1.0 Introduction
1.1 Overview Of Guide/Tutorial’s Goal
Helping Developers Understand Solana Blinks Development Lifecycle To Build Their First Solana Blinks
In this ultimate guide for Solana Blinks development, I will take you by hand to guide you on how to build your first Solana Blinks (Solana Actions and transform them into Blinks).
Yeah at the end of this guide, you will go from zero knowledge of Solana Blinks to deploying your first Solana Actions and unfurl it into a Solana Blinks both on Devnet and also on Mainnet.
In this guide, You will learn to develope a simple Solana Memo Blinks on Devnet and Mainnet and in the future we will move to more advance Blinks develpment.
Don’t worry if you have never heard of Solana Actions or some of those aforementioned tech stacks before (nothing to fear 😀). I will cover them step by step with you all the way.
So, what are you waiting for? Grab your Blinks Dev hat and let Dev away (lol 🤨).
Meanwhile, even if you have never developed on solana Blockchain before and just starting entirely, you are also covered too, because I ensured this is actually step-by-step and at the end,
you will have access to the full code repo to play around with and even have assignment to submit to horn your Solana Actions and Blinks development skills further.
1.2 Stuck? Get Support✋
I understand based on experience with developers that things can always break or get difficult to figure out, especially for beginners.
That is why you can get support for this content in just 2 steps:
STEP 1: Comment your questions below this guide to get support if get stuck (please avoid questions out of the context discussed here or they won’t be responded to)
STEP 2: Then join Discord below to alert me to check your questions (doing this ensures I can be aware of your comment to check and respond ASAP).
PLEASE avoid posting questions in Discord directly because I may not respond there. Asking here under the post directly as a comment and getting a response helps to ensure other developers going through the same issues can access the solution without repeatedly asking the same questions on Discord.
Join dProgrammingUniversity Discord Server – I have created a dedicated channel #Solana (under the BLOCKCHAINS category).
So, feel free to ask questions below in the comment section if you are stuck with this guide.
Follow me on Twitter
DISCLOSURE:
We may hold, invest, trade or receive rewards/grants/bounty/tokens from reviewed/discussed web3 projects/affiliates (before, during or after this content was published).
DISCLAIMER:
All our contents at dProgramming University are for educational purposes only and do not constitute financial, trading, investment or development advice.
Please do your own research (DYOR).
By using or following the whole or part of this content, you agree that we are not liable for any losses that you may suffer thereafter.
2.0 Understanding Solana Actions and Blinks
Let us take a quick dive into Solana Actions and Blinks, core concepts and relations between Solana Actions and Blinks.
2.1 What are Solana Blinks Explained for Beginners
First I need to quickly clarify that Solana Blinks is an acronyms of Solana Blockchain Links 😜
Solana Blinks is a platform-agnostic client that can unwrap Solana Actions across multiple platforms on the internet, allowing actions like pay, vote, donate, mint and a lot more to be executed by users instantly and directly within the platform they encounter the link without the need to visit any other website or leave the current blinks-enabled platform they saw the blinks.
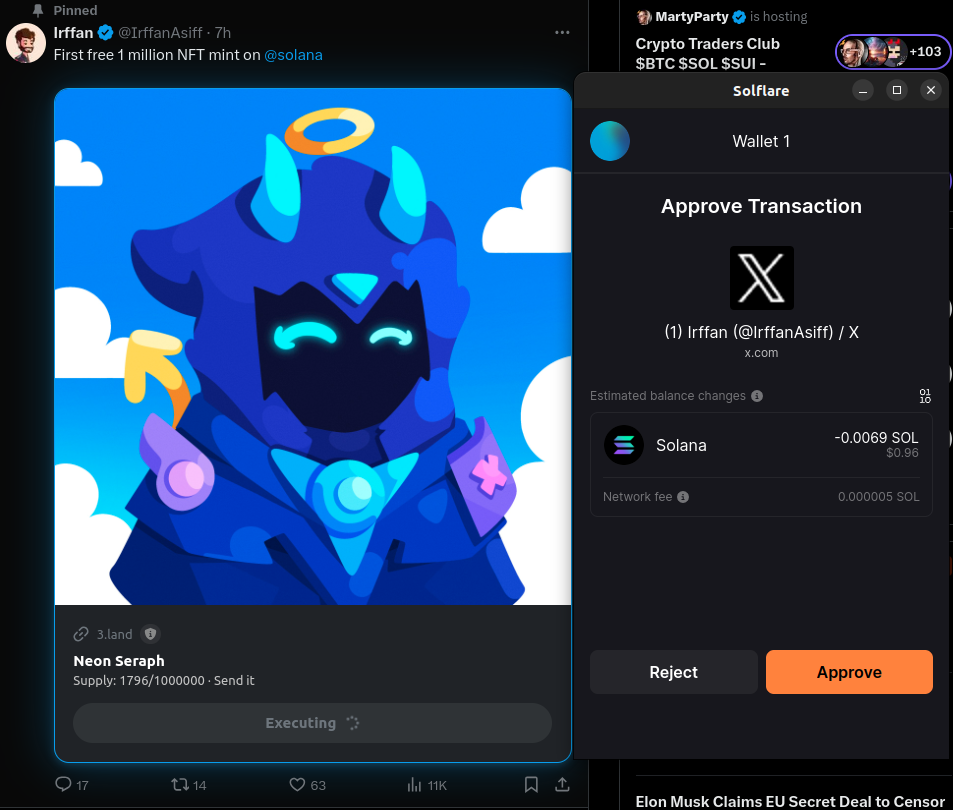
Solana Blinks allows a X(twitter) user come across an NFT mint and mint it right inside X without the usual way of having to click on the link to visit the NFT mint website first.
Here is an example of an NFT I minted on X(Twitter) using Blinks without the need to visit the mint website and instantly got the NFT minted into my Solflare wallet (this is FREE mint but the same works for premium Mints – meanwhile, click the image to give it a try if still available for Free minting and could be an opportunity to test Solana Blinks out if you have not done so before – NFA – DYOR!):
2.2 Who Developed Blinks?
Blinks was developed by Dialect Labs,
In collaboration with the Solana Foundation.
2.3 What are Solana Actions?
Solana Actions represent the basic primitive actions that can be performed on Solana Blockchains.
Each actions can allows user to perform specific task like vote on an on-chain proposal, mint an SPL token and NFT, do transfer from one Solana wallet to another, burn SPL tokens and a lot more.
Spoiler - Solana Actions is a rebranding of previously popular Solana Blockchain payment premitive known as Solana Pay.
Solana Actions help developers create API compliant with those on-chain Actions which can then be shared and interacted with by user.
2.4 Who developed Solana Actions?
Solana Actions was developed by Solana Foundation
2.5 What is the relationship between Solana Actions and Blinks?
Solana Actions links carry the power of the actions that can be executed on Solana Blockchain in an API format
which is then interpreted by Solana Blinks in a way that turns those actions into an interactive GUI (Graphical User Interface) within the platform it was been shared
like X(Twitter), Discord etc. so that the user does not need to click the link and go the another website to execute the actions aside from their current platform.
2.6 How Solana Actions differ from traditional Solana Programs (Smart contracts)?
Solana Actions is different from the traditional Solana programs (smart contracts) because it actually creates an API for the Solana program
which makes it possible for whatever a Solana program is meant to do, to be easily accessible via Blinks.
Thereby increasing the accessibility to Solana program features across the internet.
2.7 Benefits of using Actions and Blinks in Solana Development?
There are lots of benefits considering our previous understanding of Blinks and Actions.
Some of the benefits of using Actions and Blinks in Solana development as a developer are below but not limited to:
- Easy of use – user can easily access your Solana program features via Solana actions and blinks
- Accessibility and adoption – making Solana blockchain actions available to users on social media and other Blinks-enabled platforms exponentially increases exposure of people to the blockchain without the need to leave their familiar platform.
3.0 Concepts of Solana Actions and Blinks
Yeah, let us do a bit of digging into visualising the concept of Solana Actions and Blinks
3.1 Solana Actions and Blinks Lifecyle
This will help understand how they come together to give better and smoother experiences to users anywhere they are on the internet.
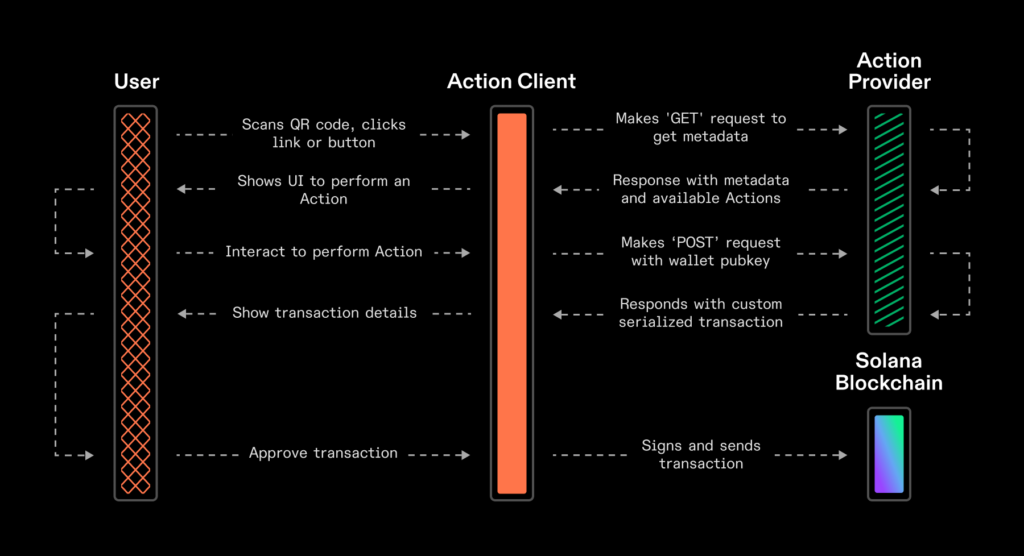
Beyond the visual are other essentials like the specification of the Solana actions to unfurl to Blinks and using the actions.json file.
All will be explained as we move on in this Solana Blinks development guide.
3.2 Real-world Use Cases for Solana Blinks
Real-world Use Cases for Solana Actions and Blinks
Some but not limited to:
- DeFi applications
- NFT marketplaces
- Gaming and social platforms
4.0 Essential Tools and Resources for Solana Actions and Blinks Development
So, let us have a quick dive into essential tools and resources you need to build and develop Solana actions that then successfully unfurl and turn to Blinks.
4.1 Solana Blinks Documentations
Considering Solana Actions and Blinks is like a join-venture between Dialect Labs and Solana Foundation, there exist multiple pieces of documentation you can consult:
4.2 Blinks-enabled Solana Wallets
The following Solana wallets are compatible with Blinks:
4.3 Solana Blinks Chrome Extension by Dialect
One of the easiest ways to access blinks on blinks-enabled platforms like X (Twitter) and others is using the Blink Chrome extension by Dialect.
Click to Download Solana Blinks Extension By Dialect
4.4 Solana Blinks Testing and Inspection Tools
When developing Solana Actions, you can use Blinks inspector tools to check if it will successfully unfurl to Blinks on Blinks-enabled platforms.
4.5 Solana Blinks Explorer
Blinks explorer platforms allow you to access Solana Blinks easily. You can also submit your blinks to be featured as am currently working on it:
Check Solana Blinks Explorer
4.6 Solana Actions And Blinks Specifications
The Solana Actions specification are essentials that must be part of a request/response interaction flow to be successful:
1. Solana Action URL scheme providing an Action URL
2. OPTIONS response to an Action URL to pass CORS requirements
3. GET request to an Action URL
4. GET a response from the server
5. POST request to an Action URL
6. POST response from the server
4.7 Solana Actions and Blinks Common Issues And Fixes
When developing Solana Actions for Blinks, there are some commonly known issues that might arise, below are some of them with suggested fixes:
ERROR 1: CORS HEADER Error
SOLUTION: Must use CORS HEADER or it won’t render or execute actions (for both GET and POST requests – thanks to the Solana Actions Package has a valid CORS HEADER pre-configured- just import and use it in the GET/POST endpoints). You will see this practically under the Blinks development section below.
ERROR 2: OPTIONS Error
SOLUTION: Solana Actions uses OPTIONS response to do a preflight test before the actual request (just to simulate if the actual request will fail or pass like does it have valid CORS HEADER etc.) – more in https://solana.com/docs/advanced/actions#options-response
4.8 Limitations of Solana Blinks
Blinks are awesome and help make Solana actions interactive for users anywhere they are online as long as the platform is blinks-enabled but it still has a lot of issues and requires more improvement.
So, when developing actions for blinks, keep them in mind (though they will all likely be solved in future even before you read this):
- Single-session and non-persistent: means if user reload a page where they are currently in the middle of an interaction or transaction with a blink, the initiated session will be lost and refreshed entirely new.
- Limited supported platforms: Solana Blinks support was launched with X(Twitter) only but it is now gradually extending to more platforms.
- Testing Solana Actions and Blinks Locally: Localhost actions urls unfurl to blinks, but might not get properly validated. If you want validation, the Dialect team suggested using a tool like ngrok (https://ngrok.com/) which creates a tunnel to your local server, gives you a temporary URL that can simulate actual deployment to test your Solana actions Blinks unfurling done properly
5.0 Setting Up Development Environment for Solana Actions and Blinks
Before diving deep into developing your first Solana Acions and Blinks,
let’s quickly set up the required developer environment.
5.1 Installing necessary tools and software
You will need to have the following installed on your computer. For this guide, I am using Linux OS (Ubuntu):
– Nodejs
– IDE – VSCode
– VSCode Extension (Thunder Client for API requests)
– Solana Web3.js Package (will install this later after project setup)
– Solana Actions Package (will install this later after project setup)
5.2 Essential Things To Have In Solana Actions API Route File
I want to prepare your mind on how your Solana Actions file should be structured and what I expected to contain to be successfully unfurled to Blinks.
1. GET Request Route
– holds metadata of the solana actions to be unfurled into Blinks like Title, Label, Description, Image etc
– holds CORS HEADERS
2. OPTIONS “HTTP METHOD”
May also include OPTIONS for preflight testing.
3. POST Request Route
– handles the transaction that tells Solana blockchain which action to be executed.
For example, Mint NFT, Vote for a DAO proposal, Add a Memo etc.
– Solana transactions usually contain 5 things:
1. Solana actions to execute
2. Contains fee payer (either the user or gass relayer) paying for the transaction to be executed (good we can easily access this via the Solana web3.js package)
3. Cluster (Mainnet, Devnet or Testnet) – is required to have access to Block hash on the cluster
4. Recent Block Hash
5. Returns the payload (including CORS Headers) and must be in base64 to make it easier for clients like Wallet to deserialize them for Blinks in frontend.
6.0 VIDEO: Solana Blinks Development Tutorial/Guide
I have a step-by-step- video for this guide.
Watch me go through the Build Your First Solana Blinks in the video below:
Part 1:
Part 2:
7.0 Creating Your First Solana Actions And Blinks
As promised earlier that I will look not conclude this guide without you building your first Solana Actions and unfurling it into Blinks.
Here we are, let get started building Blinks.
Shall we?🤔
A step-by-step guide to creating basic Solana Actions that send and publish a message (Known as a Memo) to the Solana blockchain via a Blinks
7.1 Install Nexjs For Solana Actions Setup
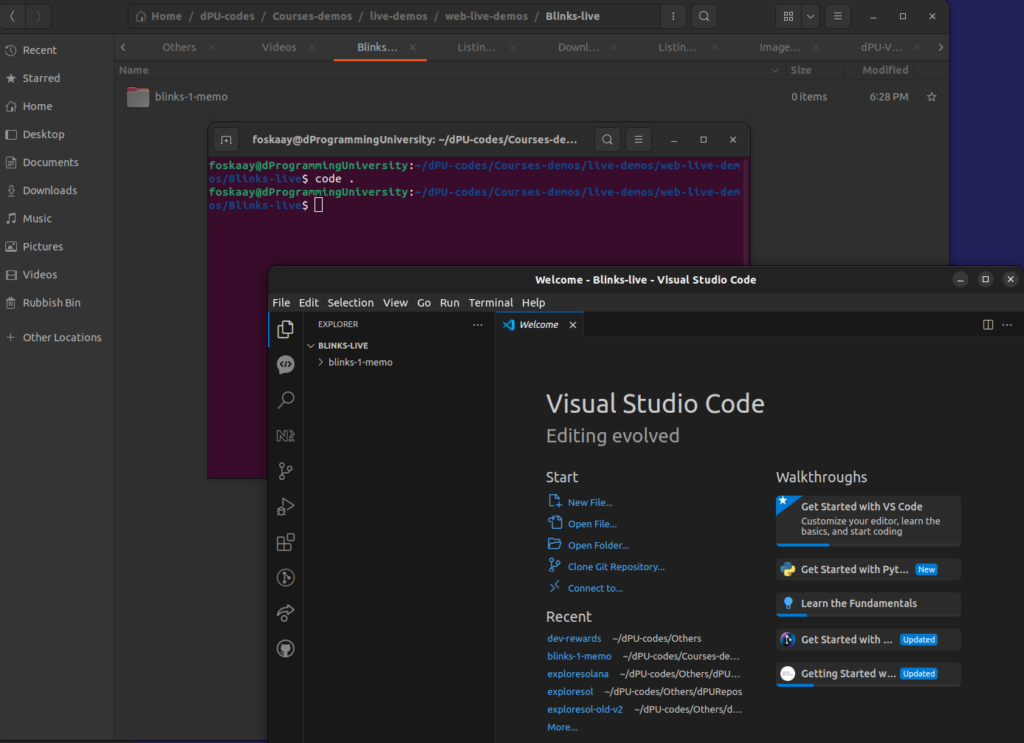
Create a folder named
blinks-1-memoOpen it and inside the “blinks-1-memo” folder, right-click to open in “Terminal”
In the terminal, type command
code .This will open the “blinks-1-memo” project folder in VSCode
In VSCode, open a new “Terminal” (Let’s call it “Terminal 1”) and install Nectjs following the instructions below:
Install Nextjs using the default setup with the command:
pnpx create-next-appSelect details as:
✔ Would you like to use TypeScript? - Yes
✔ Would you like to use ESLint? - Yes
✔ Would you like to use Tailwind CSS? - Yes
✔ Would you like to use `src/` directory? - No
✔ Would you like to use App Router? (recommended) - Yes
✔ Would you like to customize the default import alias (@/*)? - No
Then confirm all packages installed with the command:
pnpm iYou should see something like this in your terminal:
Lockfile is up to date, resolution step is skipped
Already up to date
Done in 651ms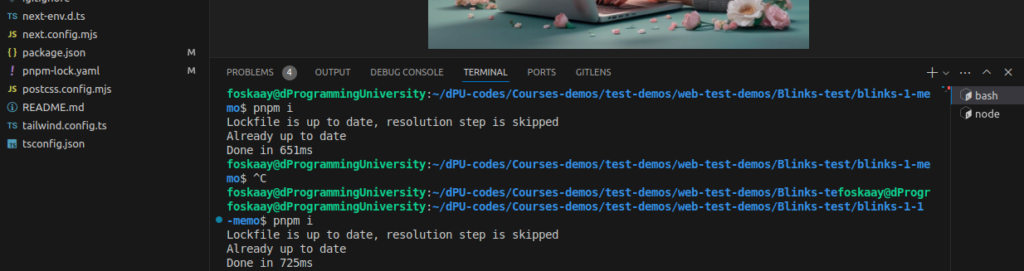
Run the Nextjs blinks-1-memo project with the command (open second terminal “Terminal 2”):
pnpm devOpen the project in your browser:
http://localhost:3000

(if this port is busy)
it will use other available ports like

http://localhost:3001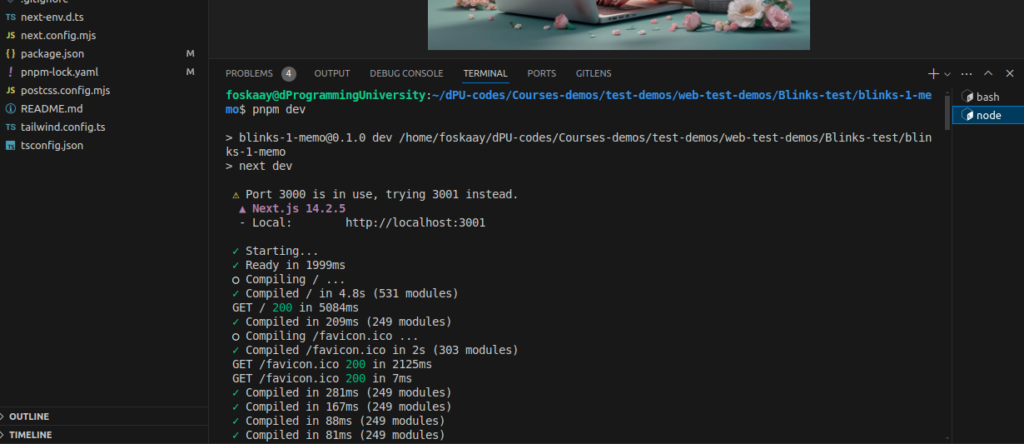
NOTE:
Moving forward, kindly leave “Terminal 2” running the “pnpm dev” server as above and continue to use “Terminal 1” for other commands below to ensure you don’t have to kill the server and restart multiple times to install other packages.
7.2 Install Solana Actions Package and Solana Web3.js Package
Remember in the previous section, I told you that we would be installing 2 packages for building Solana Actions and Blinks.
So, use the command below in “Terminal 1” to install Solana Actions and Web3.js packages:
pnpm i @solana/actions @solana/web3.jsTo confirm all set and done, can re-run:
pnpm i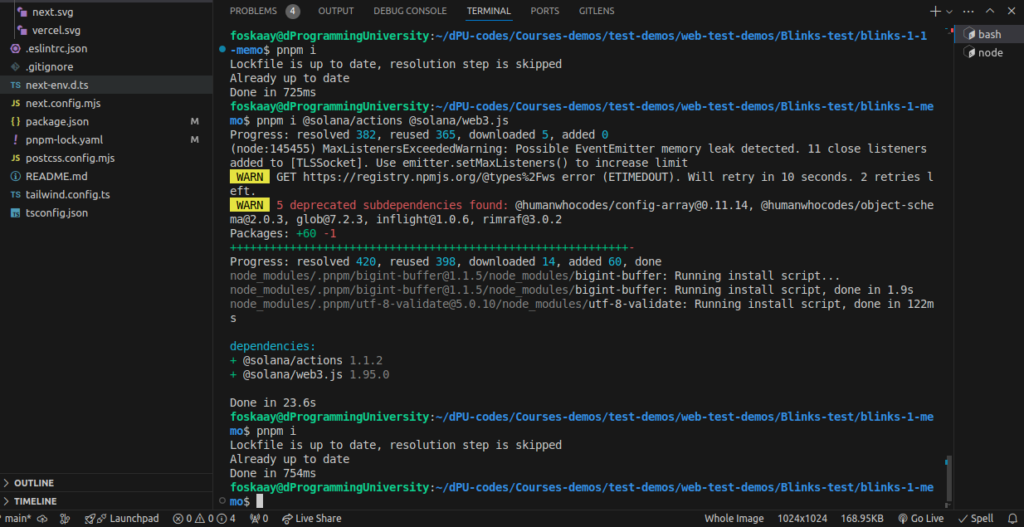
7.3 Setup Solana Blinks’ Actions API Route
It is time to create the actual code for our Memo Blinks Solana Actions.
Create a new “api” route folder in the /app directory (if no api folder is present already in your code):
/app/apiCreate a new “actions” folder in the API route folder:
/app/api/actionsCreate a new “memo” folder in the actions API route folder:
/app/api/actions/memoCreate a new “route.ts” file for the memo actions:
/app/api/actions/memo/route.tsYou should now have folder structure as since in my project screenshot below:
7.4 How To Create Solana Actions GET and POST API Route For Blinks
Remember in the previous section, I told you that we would need to set up GET and POST request API routes for building Solana Actions that can be successfully unfurl to Blinks.
6.4.1. – Solana Blinks Actions GET Request
Remember the essentials previously discussed and this is expected to hold the metadata for the Solana Blinks you are creating.
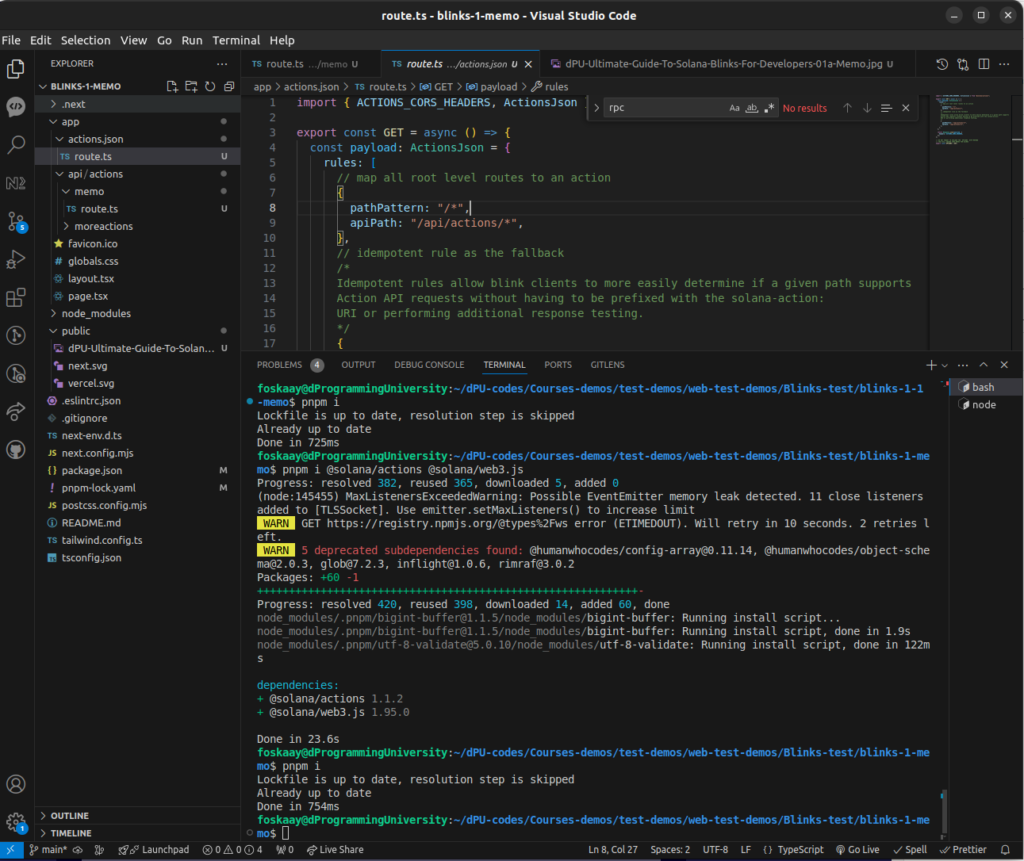
Create the Solana Actions GET request API route code as below for the Memo Blinks (/app/api/actions/memo/routes.ts):
First import from the Solana Actions NPM package and solana web3.js package:
/**
 * Solana Blinks Actions Example 1: Memo
 */

import {
  ActionPostResponse,
  ACTIONS_CORS_HEADERS,
  createPostResponse,
  MEMO_PROGRAM_ID,
  ActionGetResponse,
  ActionPostRequest,
} from "@solana/actions";
import {
  clusterApiUrl,
  ComputeBudgetProgram,
  Connection,
  PublicKey,
  Transaction,
  TransactionInstruction,
} from "@solana/web3.js";
Then declare the blinks’ actions GET API route as below:
export const GET = async (req: Request) => {
const payload: ActionGetResponse = {
title: "dPU Blinks Example 1 (Memo Blinks)",
icon: new URL(
"/dPU-Ultimate-Guide-To-Solana-Blinks-For-Developers-01a-Memo.jpg",
new URL(req.url).origin
).toString(),
description:
"Simple On-chain Memo Blinks: Send a message on-chain using Solana Memo program via Blinks - Join the 'Ultimate Guide To Solana Blinks For Developers' series at dProgrammingUniversity.com/solana-blinks-guides",
label: "Send Memo",
links:
{
actions: [
{
label: "Send Memo1",
href: req.url,
},
{
label: "Send Memo2",
href: "https://dprogramminguniversity.com/solana-blinks-guides",
}
]
}
};
return Response.json(payload, {
headers: ACTIONS_CORS_HEADERS,
});
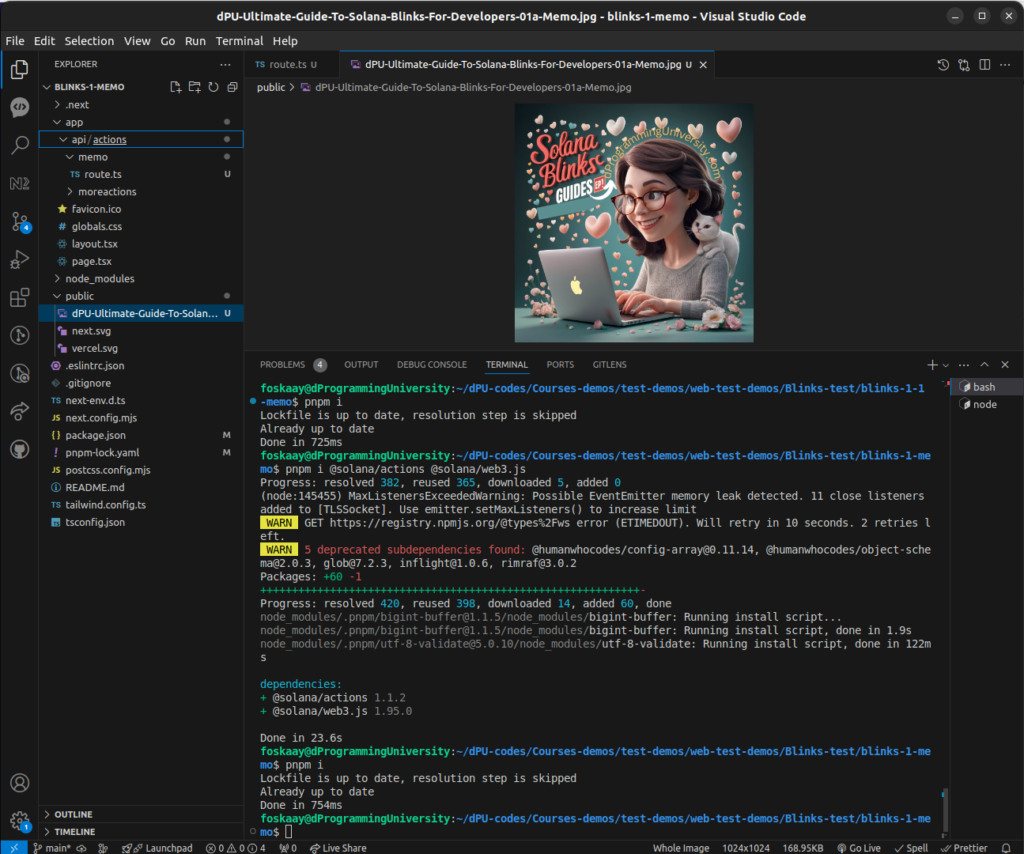
};Add a featured image for the Blinks.
To add Solana Blinks’ image, you need to do the following:
- Get the image ready – based on my experience not standard, I recommend at least 1024x1024px image.
- It can be in different formats like jpg, png or even .gif (for animated images)
- Add it inside the “public” folder (/public directory)
- Ensure the image name is the same as referenced in the “icon section of the GET request code to render the image in your blinks (feel free to name it as desired – just ensure they are the same).
- The reference in the “icon” image can be an absolute path link or a relative path link (I used a relative path link in the GET code above).
7.4.2. – Solana Blinks Actions OPTIONS
Remember the essentials previously discussed and this is expected to hold the OPTIONS for preflight testing which helps to pre-confirm if the Actions conform to the expected API format including CORS HEADERS.
Let’s add the Options code below after the GET request codes above:
// DO NOT FORGET TO INCLUDE THE `OPTIONS` HTTP METHOD
// THIS WILL ENSURE CORS WORKS FOR BLINKS
export const OPTIONS = GET;
7.4.3. – Solana Blinks Actions POST Request
This is expected to hold the Solana transaction that will interact with Solana Blockchain to execute the actions requested by users from the Blinks.
Create the Solana Actions POST request API route code as below for the Memo Blinks:
export const POST = async (req: Request) => {
  try {
    const body: ActionPostRequest = await req.json();

    // Validate to confirm the user publickey received is valid before use
    let account: PublicKey;
    try {
      account = new PublicKey(body.account);
    } catch (err) {
      return new Response('Invalid "account" provided', {
        status: 400,
        headers: ACTIONS_CORS_HEADERS, //Must include CORS HEADERS
      });
    }

    // Solana Blockchain Cluster (Set Mainnet "mainnet-beta" or Devnet "devnet")
    // If your RPC not present, it will use default devnet RPC provided to us via web3.js "clusterApiUrl("devnet")"
    // NOTE: "clusterApiUrl("devnet")" is not for mainnet use - for mainnet production launched Blinks, get your own RPC
    // For testing on mainnet - use "mainnet-beta"
    const connection = new Connection(
      process.env.SOLANA_RPC! || clusterApiUrl("devnet")
    );

    const transaction = new Transaction().add(
      // note: `createPostResponse` requires at least 1 non-memo instruction
      ComputeBudgetProgram.setComputeUnitPrice({
        microLamports: 1000,
      }),
      new TransactionInstruction({
        programId: new PublicKey(MEMO_PROGRAM_ID),
        data: Buffer.from(
          "this is a simple memo message from dProgrammingUniversity.com Student",
          "utf8"
        ),
        keys: [],
      })
    );

    // set the end user as the fee payer
    transaction.feePayer = account;

    // Get the latest Block Hash
    transaction.recentBlockhash = (
      await connection.getLatestBlockhash()
    ).blockhash;

    const payload: ActionPostResponse = await createPostResponse({
      fields: {
        transaction,
        message: "Post this memo on-chain",
      },
      // no additional signers are required for this transaction
      // signers: [],
    });

    return Response.json(payload, {
      headers: ACTIONS_CORS_HEADERS,
    });
  } catch (err) {
    console.log(err);
    let message = "An unknown error occurred";
    if (typeof err == "string") message = err;
    return new Response(message, {
      status: 400,
      headers: ACTIONS_CORS_HEADERS, //Must include CORS HEADERS
    });
  }
};
7.4.4. – How To Setup Solana Blinks Actions.json File
This is expected to be placed in the root folder of your website where you have the Solana actions API routes.
The first step here is to create another folder “actions.json” inside the “/app” directory:
/app/actions.jsonNext, create a “route.ts” file in the “actions.json” folder:
/app/actions.json/route.tsthen, create the Solana actions.json file code inside “/app/actions.json/route.ts” :
import { ACTIONS_CORS_HEADERS, ActionsJson } from "@solana/actions";

export const GET = async () => {
  const payload: ActionsJson = {
    rules: [
      // map all root level routes to an action
      {
        pathPattern: "/*",
        apiPath: "/api/actions/*",
      },
      // idempotent rule as the fallback
      /*
      Idempotent rules allow blink clients to more easily determine if a given path supports
      Action API requests without having to be prefixed with the solana-action:
      URI or performing additional response testing.
      */
      {
        pathPattern: "/api/actions/**",
        apiPath: "/api/actions/**",
      },
    ],
  };

  return Response.json(payload, {
    headers: ACTIONS_CORS_HEADERS,
  });
};

// DO NOT FORGET TO INCLUDE THE `OPTIONS` HTTP METHOD
// THIS WILL ENSURE CORS WORKS FOR BLINKS
export const OPTIONS = GET;
Your project should now look similar to this:
8.0 Testing and Transforming Solana Actions into Blinks
Yeah, let us get to test our Solana Actions and Blinks codes.
7.1. – How To Test Solana Actions Locally on a Solana Devnet
You can use the “Thunder Client” VSCode extension installed earlier to test within VSCode
Or
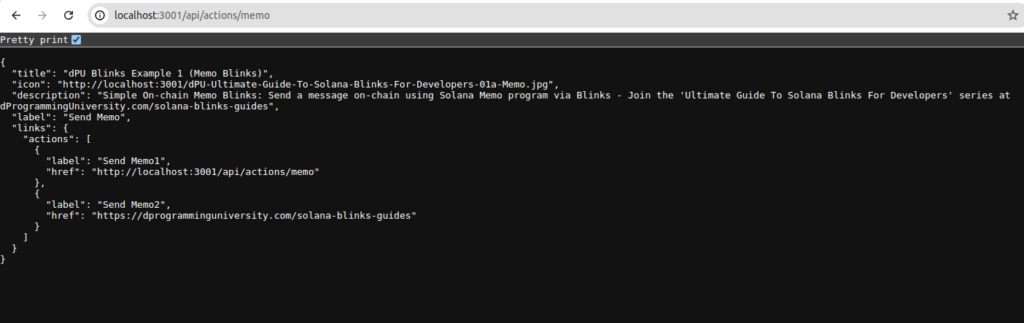
Simply go to your browser to access the GET request route endpoint via:
http://localhost:3000/api/actions/memo

or

http://localhost:3001/api/actions/memo
As seen below screenshot, you will get a response in JSON format from the GET request endpoint but can’t render it there as blinks, so we will use the Dialect blinks platform for that:
8.1.1 How To Test Solana Actions and Blinks
Using Dial.to and Blinks.xyz/inspector for testing Solana Actions and Blinks
To test your Solana actions, I recommend you try blinks.xyz/inspector as seen below:
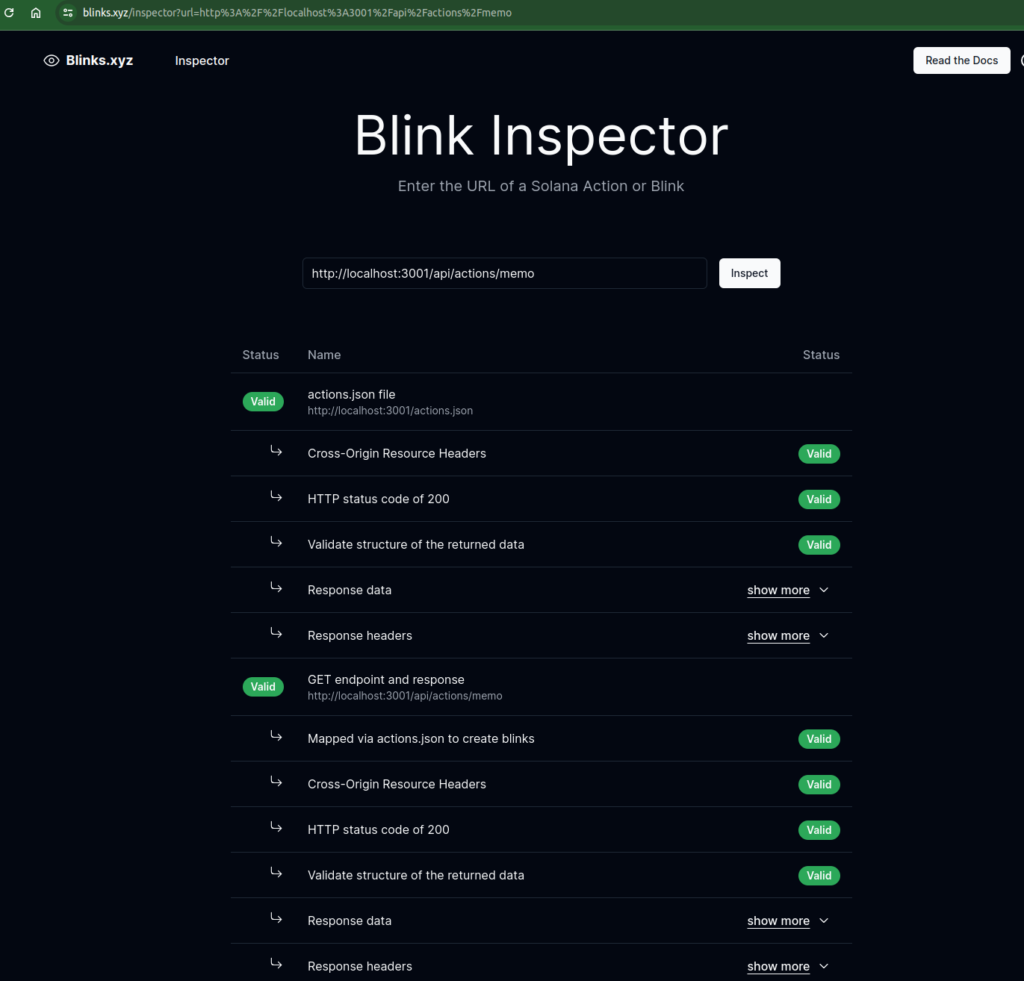
But this does not help to unfurl to actual Blinks, instead help ensure you can easily test your Solana actions and identify issues for fixing if any.
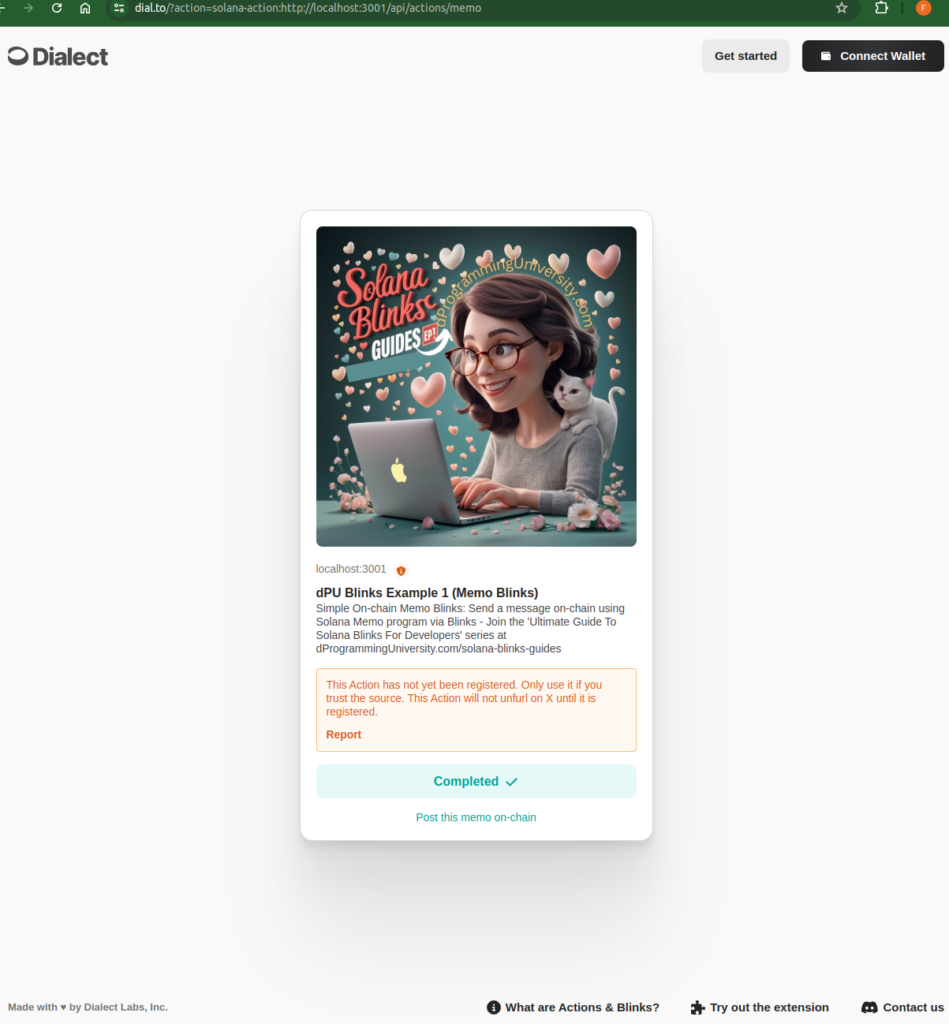
To actually unfurl this to see how it will display as Blinks, then we would turn our focus to Dialect’s official Blinks tool
dial.to as seen below:

If you copy the Actions URL as seen in the above URL, it will display as above on blinks-enabled platforms like X(Twitter), Telegram, Discord and others.
You can interact with the button to ensure everything works fine as expected and used the “inspect” tool in the browser to see whats the issues incase there are error.
Also, the tool itself can point out issues for you but for now, it seems to only work with live sites with a domain, not localhost sites (except you are using things like ngok to route your localhost like a normal hosted website).
Next step:
Connect the wallet before testing the actions buttons.
Also, ensure you are on the right Solana network for the wallet.
Presently if you recheck our Memo actions code, we are pointing to Solana “devnet” cluster and since the Dial.to website is “mainnet”, the buttons might work but the transactions won’t be successful even if you set your wallet to devnet.
So, let’s adjust the code to mainnet so the dail.to the mainnet-focused wallet can also work with it.
8.2. – How To Test Solana Actions Locally on a Solana Mainnet
Find the following code in the POST request codes
// Solana Blockchain Cluster (Set Mainnet "mainnet-beta" or Devnet "devnet")
    // If your RPC not present, it will use default devnet RPC provided to us via web3.js "clusterApiUrl("devnet")"
    // NOTE: "clusterApiUrl("devnet")" is not for mainnet use - for mainnet production launched Blinks, get your own RPC
    // For testing on mainnet - use "devnet"
    const connection = new Connection(
      process.env.SOLANA_RPC! || clusterApiUrl("mainnet-beta")
    );
And update it to the Solana mainnet cluster:
// Solana Blockchain Cluster (Set Mainnet "mainnet-beta" or Devnet "devnet")
    // If your RPC not present, it will use default devnet RPC provided to us via web3.js "clusterApiUrl("devnet")"
    // NOTE: "clusterApiUrl("devnet")" is not for mainnet use - for mainnet production launched Blinks, get your own RPC
    // For testing on mainnet - use "mainnet-beta"
    const connection = new Connection(
      process.env.SOLANA_RPC! || clusterApiUrl("mainnet-beta")
    );
Every other thing remains the same.
Then retest the first button “Send Memo1”, you should get a similar response with no more failed transaction errors as below:
Test the second button “Send memo2” and you will likely get an error
That is expected because I intentionally did not have full implementation of its actions so that you have something to fix under the Exercise section below to solidify your learning in this guide better:
9.0 Submitting Your Solana Actions to the Official Blinks Registry
Yeah, now that you have your Solana actions successfully working as expected. There are essential steps to take which include hosting it live to move from the local host.
Then, you need to register it with the official Dialect Blinks registry or your actions link might not unfurl successfully on blinks-enabled platforms like X(Twitter).
There are 3 types of Blinks statuses:
- UnRegistered – Blinks not submitted for review by the official Blinks registry team for approval. This causes an orange-colored warning message to also appear to inform the users that your blinks might not be safe to interact with.
- Trusted – these are registered blinks, approved and added to the official Blinks registry and display white color with no error or warning message to users.
- Malicious – this is in red and of course will likely not even unfurl on blinks-enabled platforms to protect users. And if the developer refers users to its actions directly on the Dial.to platform, it will inform users that this is malicious Blinks and dangerous to interact with it.
9.1 Process for Submitting Your Blinks To Official Solana Blinks Registry
It is free and easier to do by following the steps below:
- Ensure your Solana actions work fine without issues
- Ensure your blinks actions conform to the specifications
- Ensure you host on a custom domain (to increase approval chance)
- Do not use sub-domains to host your actions site like “site.vercel.app”
- fill out the Solana Blinks registry application form
10.0 How To Get Solana Blinks Grants and Support for Blinks Developers
The Blinks ecosystem within Solana is growing rapidly and will likely soon be seeing Job vacancies for Solana Blinks developers.
Aside from that, there are multiple grants for Blinks you can try if you are doing any of the following relating to Blinks:
- Building/Developing Blinks
- Building/Developing Blinks tools like Blinks List/Directory/Explorer (I Am building this, so feel free to submit your Blinks there to be featured for FREE)
- Blinks educational content for developers and non-developers
If you fit any of the above categories, then you can apply for any of the grants below (I will likely update the list as I get to discover more):
- Dialect x Superteam Solana Blinks Grant (72hours – 1 week response time)
- Solana Foundation Actions and Blinks Grant: Under “Which funding category are you applying for?” choose “Actions and Blinks” – (1 month response time)
- Superteam Instagrants (72hours – 1 week response time)
11.0 Solana Blinks Guide Project Repository and Exercises
The repo for the project done in this guide can be accessed below (Please remember to give it a STAR):
dPU Solana Blinks Examples Codes Repo
Do the following exercise to solidify your learning:
- Star and fork the above repo
- Clone to your PC
- Create a new branch
- Fix the error in button 2 by implementing Actions for the “Send Memo2” button to work like the “Send Memo1” button but must send a new message not the same message as button1. You are free to use AI for support – it’s AI age and I do encourage dPU students to embrace it and not fight or ignore it.
- Push your changes to the “Main” branch of your own repo from the new branch – Don’t send PR to the dPU repo you forked above, instead push to your own “Main” branch of your forked version of the dPU repo above.
Submission:
Share your experience fixing this alongside your repo link for a check as a comment under this post (do not post it in dPU discord or send me a DM, will not attend to such please).
Remember, after posting as a comment under this post, you can then send me a reminder in the dProgramming University discord server under the “Support” section above in the #Solana channel for me to check your submission ASAP.
12.0 Conclusion
It was an interesting ride and glad you made it to this point.
Congrats👏 once again and it’s time to take positive advantage of the opportunities opened up to developers with the introduction of Solana Actions and Blinks.
WHAT NEXT?
I aim to create intermediate and advanced Solana Blinks development content and share them in future guides with you. Thus, kindly use the social media share button to share this guide if you have found it helpful or will be helpful to some developers in your social media sphere. And join the discord to stay in the loop.
Thanks for your time, it’s been a wonderful ride with you all this while.
SOLOMON FOSKAAY
Founder, dProgramming University (dPU).
Twitter: SolomonFoskaay
13.00 References
https://solana.com/solutions/actions
https://solana.com/docs/advanced/actions
https://dashboard.dialect.to/actions
https://github.com/solana-developers/solana-actions/tree/main/examples/next-js
https://solana-actions.vercel.app/memo
https://www.youtube.com/watch?v=kCht01Ycif0
https://www.youtube.com/watch?v=dLpu6vYsTaI
https://exploresolana.com