
Ultimate Guide To Create Solana SPL (Fungible) Token Program In Solidity With Solang And Anchor
1.0 Introduction🧩
1.1 Overview Of Guide/Tutorial’s Goal
Write, Build and Deploy Solana SPL (Fungible) Token Program In Solidity
In this in-depth step-by-step guide, I will break down what is the Solana SPL Token Program
and take you by hand to show you in a simplified manner on
how you can actually use Solidity to create an SPL token on Solana.
We will also consider a comparison between Ethereum ERC20 and Solana SPL (Fungible) Token Program.
1.1 Target Audience
Considering this guide is focused on Solidity developers transitioning from Ethereum/EVM to Solana,
It is essential to help you understand how the basic but most important aspect of any Blockchain (token) works on Solana differently from Ethereum/EVM Blockchains.
SPL means Solana Program Library.
A collection of smart contracts (programs) written and vetted for deployment on Solana Blockchain similar to Open Zeppelins smart contracts for Ethereum/EVM but in this case, it is officially managed by Solana team not third-party like Ethereum.
1.3 Stuck? Get Support✋
I understand based on experience with developers that things can always break or get difficult to figure out, especially for beginners.
That is why you can join Discord below to get support when you get stuck.
Join dProgrammingUniversity Discord Server – I have created a dedicated channel #Solana (under the BLOCKCHAINS category) to offer support to my Solana developer content readers like this guide. So, feel free to ask questions in there if stuck with this guide.
Follow me on Twitter
DISCLOSURE:
We may hold, invest, trade or receive rewards/grants/bounty/tokens from reviewed/discussed web3 projects/affiliates (before, during or after this content was published).
DISCLAIMER:
All our contents at dProgramming University are for educational purposes only and do not constitute financial, trading, investment or development advice.
Please do your own research (DYOR).
By using or following the whole or part of this content, you agree that we are not liable for any losses that you may suffer thereafter.
2.0 Pre-Requisite For This Guide🤔
There are a few things to check to ensure you can follow this guide.
2.1 Solidity Programming Language
At least basic knowledge. If you are new to Solidity, check out my free beginner course to building your first smart contract with Solidity below:
Smart Contract Development With Solidity For Beginners
2.2 Solang Solidity For Solana
At least basic knowledge of Solang and how it makes it possible to build and deploy Solana programs in Solidity even though Solana is not an EVM-compatible Blockchain. If you are new to Solang, then the best place to start is with my beginner-friendly guide (article and videos):
Ultimate Guide To Solidity For Solana Programs Development with Solang And Anchor
2.3 Setup Solana Development Environment For Solang Solidity
Not to worry, I got you covered with my beginner-friendly step-by-step video on Solana development environment setup for Solidity developers transitioning to Solana below:
Once, you have the above pre-requisite fixed, then you are good to go with me for this guide
LFG🚀🔥
3.0 What Is Solana SPL Token Program And How Does It Work🪙
3.1 What Is Solana SPL Token Program Explained
SPL token program is a smart contract deployed on Solana Blockchain to handle the process of creating any custom token on Solana.
The SPL token program is equivalent to ERC20 and ERC721 standards on Ethereum.
SPL token program handles both Fungible and non-fungible token creation, associated token account setup, minting, burn and lot more other essential features of custom tokens on the Solana Blockchain.
The SPL stands for Solana Program Libraries and these are collections of codes that are written and audited by the Solana team to make it easier for developers to interact with on-chain programs like the SPL Token Program (smart contract).
3.2 How Does Solana SPL Token Program Work Explained
I have done a diagram illustration for you below to help visually understand how the Solana SPL token program actually works considering it is not the same as what you might be used to as a Solidity developer on Solana.
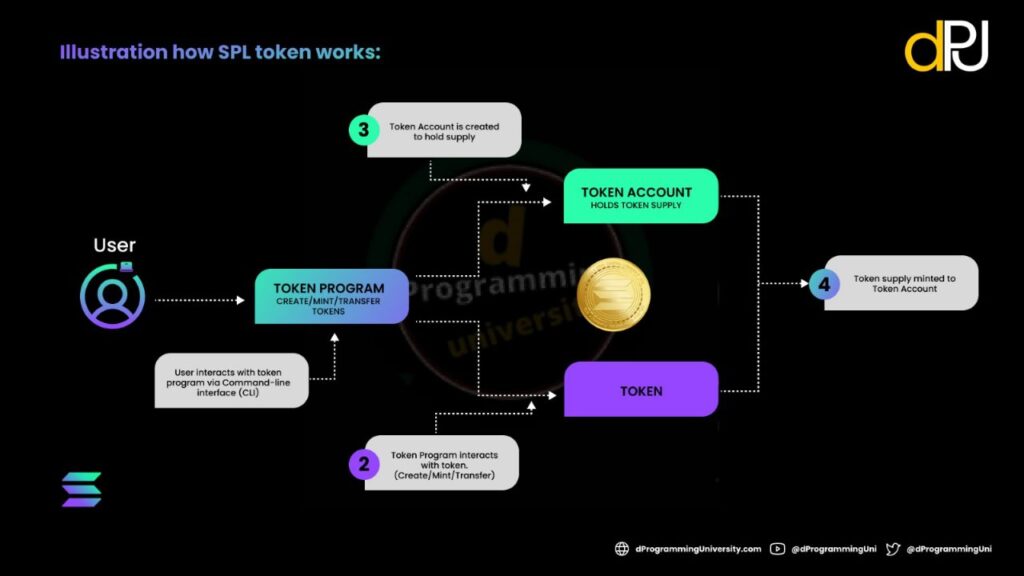
This means a single Solana smart contract (program) was officially deployed on Solana Blockchain known as SPL token program.
This program is what everyone/developers attempting to create an SPL token on Solana need to interact with to create their custom token (Either via Solana CLI, Solidity Solang smart contract of purely via . And it possible to do it this way because Solana seperates smart contract execution code account from actual data account.

Meaning single developer can deploy a Solana on-chain program and other developer can use it without need for manually getting permission - interesting right?

Unlike Ethereum where its everyone for himself/herself because you need to write your ERC20 token contract and deploy it as a whole. No on-chain smart contract to connect to like SPL token on-chain program on Solana.
4.0 Comparison Between Ethereum (ERC20) Token And Solana SPL (Fungible) Token Program⚖️
Before we move into creating SPL Fungible tokens in Solidity on Solana Blockchain.
It is essential for you to have a clearer understanding of how Solana handles tokens differently from how its equivalent fungible token is been handled on Ethereum/EVM Blockchains.
4.1 Similarities Between Ethereum (ERC20) Token And Solana SPL (Fungible) Token Program
Here are some similarities between the ERC20 token and the SPL fungible token:
| Feature | Ethereum ERC20 Token | Solana SPL Fungible Token |
|---|---|---|
| Token Standard | ERC20 | SPL |
| Fungibility | Fungible | Fungible |
| Smart Contract Support | Yes | Yes |
| Ownership Transfer | Supported | Supported |
| Decentralization | Yes | Yes |
| Token Minting | Possible | Possible |
4.2 Differences Between Ethereum (ERC20) Token And Solana SPL (Fungible) Token Program
It is time to now consider checking some of the differences that exist between the Ethereum (ERC20) Token And Solana SPL (Fungible) Token Program in the table below:
| Feature | Ethereum ERC20 Token | Solana SPL Fungible Token |
|---|---|---|
| Blockchain | Ethereum | Solana |
| Consensus Algorithm | Proof of Stake (PoS) | PoS & Proof of History (PoH) |
| Transaction Speed | ~15-45 transactions per second | ~60,000 transactions per second |
| Transaction Cost | Varies (Mostly higher) | Lower |
| Programming Language | Solidity (mostly used), Vyper (rarely used) | Rust, C, Python, Solidity (via Solang) |
| Virtual Machine | Ethereum Virtual Machine (EVM) | Solana Runtime |
| Native Coin | Ether (ETH) | Solana (SOL) |
| Native Token | ETH is not a ERC20 Token | SOL is also an SPL Token Program |
| Pre-Deployed | None (Individual developers deploy their ERC20 token smart contract using libraries like Open Zeppelin to ensure eating required ERC20 standards) | Yes (Makes it easier for anyone to interact with and create their custom SPL token) |
| Cross-Chain Compatibility | Limited | Limited |
By understanding these similarities and differences,
You will most likely find it easier as a Solidity developer transitioning from Ethereum to Solana to grasp the nuances of token development on Solana.
5.0 Three (3) Ways To Create Solana SPL Token🥰
I understand the fact that coming from a Solidity Ethereum background, you expect we should just jump into the SPL token code and start creating custom tokens on Solana.
But, things don’t work that way on Solana😜.
Thus, instead of just going to smart contract code,
We will be taking a different approach to help you understand how the SPL fungible token program works on Solana much better.
Based on my experience I have categorised it into 3 ways to create Solana SPL Token below:
- Solana CLI (via commands)
- Anchor (via Solang Solidity for Solana)
- Frontend (via Web3.js for Solana)
In this guide, I will go through the numbers 1 and 2 above for you to understand how to write, build and deploy the Solana SPL fungible token.
The first is plain CLI commands while
The second part is where we will actually deal with using Solidity via Solang and Anchor.
The third method of creating an SPL token is not included in this guide, but I will be exploring it with you in my following upcoming guide.
So, let us go.
6.0 How To Create Solana SPL (Fungible) Token With Solana CLI🧑💻
It is time to create an SPL fungible token using the Solana CLI (Command Line Interface), which is indeed a straightforward process.
The CLI is the first, easiest and most straightforward way anyone can easily use to create an SPL custom fungible token even if this is your first time attempting Solana development.
NOTE: STEP 1 – STEP 4 are already covered if you followed the Solana development environment setup guide above (in section 2.3).
Thus, I will only list them to make it easier for you to understand the steps involved but will not go into details again.
Kindly check section 2.3 for guidance.
STEP 1: Install Solana CLI Tools
Install Solana Tool Suite which comes with Solana CLI and other essential tools pre-bundled.
STEP 2: Set Solana Network To Devnet
You need to ensure you are on Solana Devnet and not Mainnet.
Usually, when first installed, it defaulted to Mainnet. Since Mainnet requires real money, you don’t want to use it until you actually ready to launch an SPL token live.
To change from the default Mainnet and set the Devnet network, run the following command:
solana config set --url https://devnet.solana.com
STEP 3: Generate a New Solana Wallet
Follow the guide in 2.3 to generate a Solana wallet which is a must-have
Make sure to keep your seed phrase secure and do not share it with anyone if you plan to credit it with real SOL to deploy to Mainnet later in the future.
STEP 4: Fund Your Solana Account Wallet
Creating an SPL token requires paying a transaction fee and rent.
To ensure you are prepared, request a SOL airdrop on devnet (it is free) with the command:
solana airdrop 2
This will airdrop 2 SOL to your wallet🤑 as shown in the screenshot below:

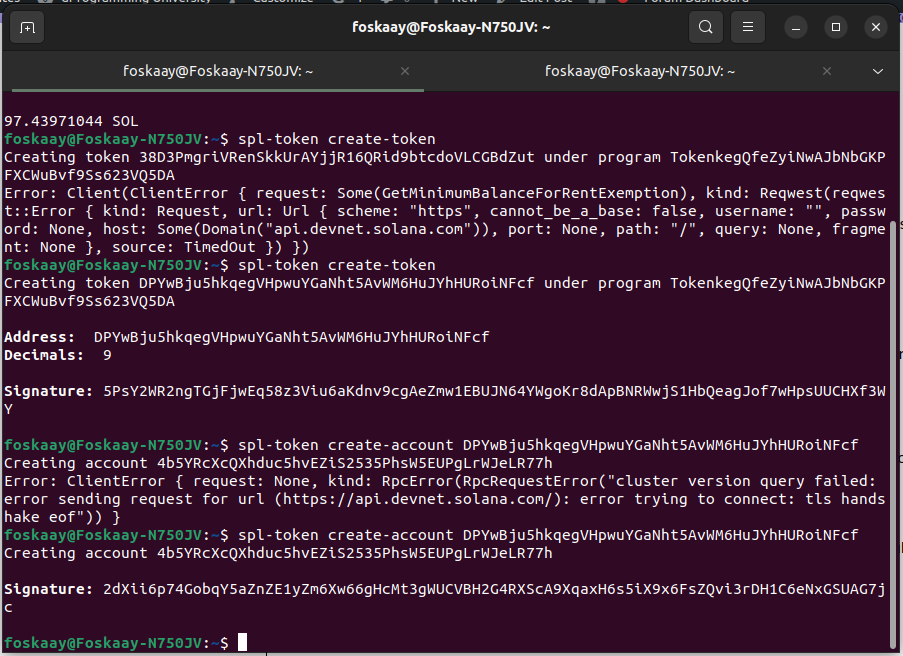
STEP 5: Create the SPL Token
After your wallet has been funded,
you can move ahead to create an SPL token by running the command:
spl-token create-token
This will give an output that contains the mint address of your new SPL token.
Keep this address somewhere safe because you will need it later.
Mint on Solana refers to the SPL token been created and minted

NOTE: You can check this via Solana Explorer here:
https://explorer.solana.com/?cluster=devnet
Put in the mint address as seen below:
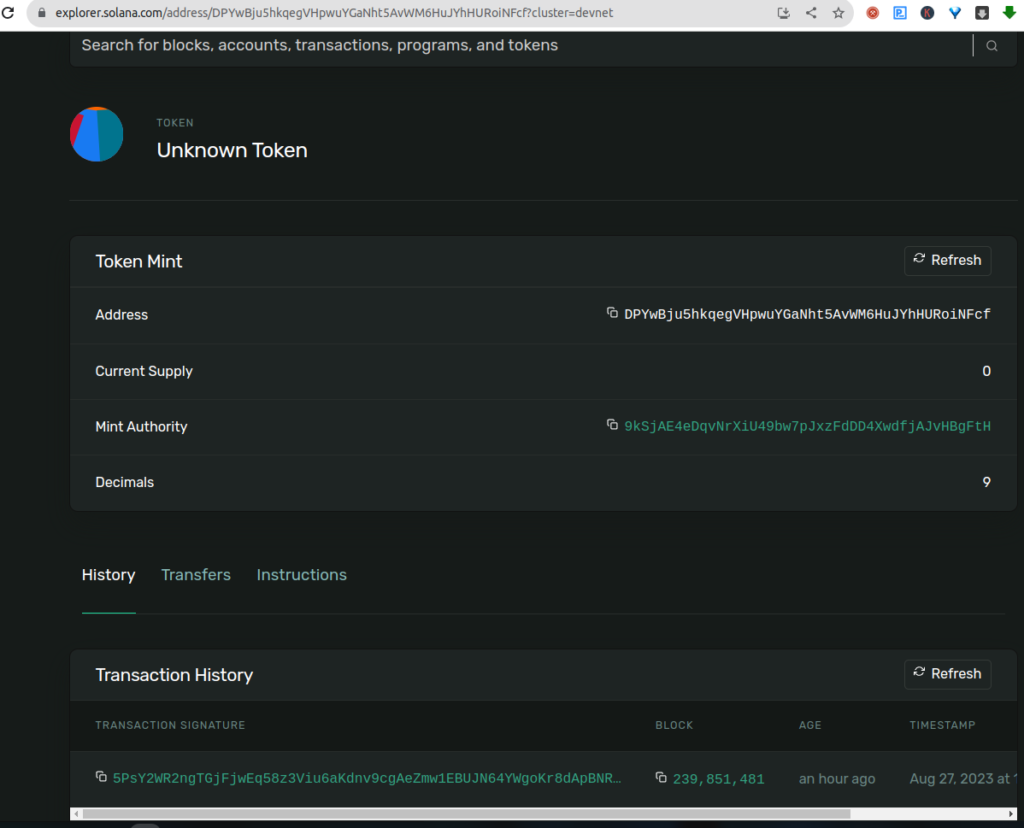
You can directly access the token created in this guide here
https://explorer.solana.com/address/DPYwBju5hkqegVHpwuYGaNht5AvWM6HuJYhHURoiNFcf?cluster=devnet
NOTE:
Current Supply: is 0 tokens
Decimals: default is 9 zeros (1.000000000 = 1token) after the token decimal point unlike Ethereum which usually have 18 zeros (1.000000000000000000 = 1token)
STEP 6: Create An SPL Associated Token Account
Unlike Ethereum where the token can be minted directly into your wallet.
Nope, you can not do the same on Solana. Instead,
You need to create an account specifically for the token to track it which is also known as Associated Token Account
Associated Token Account on Solana is simply equal to mapping within ERC20 token on Ethereum which has a main task of helping to track the custom token and the holders with the amount each user account holds at any given point in time.
– Solomon Foskaay, dProgramming University (dPU)
It also makes it possible to ensure tokens can have things like current supply, maximum supply and related features easy to track.
Without Associated Token Account on Solana, custom tokens will be lost and untrackable because it is actually impossible to track them all in one single account similar to how each Ethereum ERC20 token manages its own mapping.
So, run the following command:
spl-token create-account <TOKEN_MINT_ADDRESS>
Kindly replace <TOKEN_MINT_ADDRESS> with the mint address that you received earlier in STEP 5.
You will get the associated token account address outputted for you like so:
You can confirm the account using the same Solana Explorer as previously used.
To check the token associated account for this guide go here
https://explorer.solana.com/address/4b5YRcXcQXhduc5hvEZiS2535PhsW5EUPgLrWJeLR77h?cluster=devnet
as seen in the screenshot below:

STEP 7: Mint SPL Tokens
Finally, you can now consider minting SPL fungible tokens into the associated token account created in Step 6 above like so:
spl-token mint <TOKEN_MINT_ADDRESS> <AMOUNT>
Kindly replace <TOKEN_MINT_ADDRESS> with your mint address and <AMOUNT> should be replaced with the actual number of tokens you want to mint.
This is a tricky part and you need to ensure you follow the decimal used when creating your SPL token
In our case for this guide, it is 9 decimals and if am to mint 1,025 (One Thousand and Twenty-Five Token Only) guess how do I write it?
Well, if I write 1025 then the token to be minted will end up being
0.000001025 tokens which are less than 1 token (that’s not what we intended to mint right?)
It indeed confusing, handle here with care🤔
So, it will be this instead:
spl-token mint DPYwBju5hkqegVHpwuYGaNht5AvWM6HuJYhHURoiNFcf10250000000001token = 1000000000 11tokens = 11000000000 125tokens = 125000000000 1025tokens = 1025000000000 Hint: Whatever amount you want to mint, just ensure you add the number of zeros equivalent to the token decimal. This was 9 and so has 9 zeros after the amount to be minted.WARNING: Nopes, I was wrong🫣 about the zeros above, this is not Ethereum/EVM😜, Solana seems to have made things much easier for us. Check uder STEP 8 below for details🤔

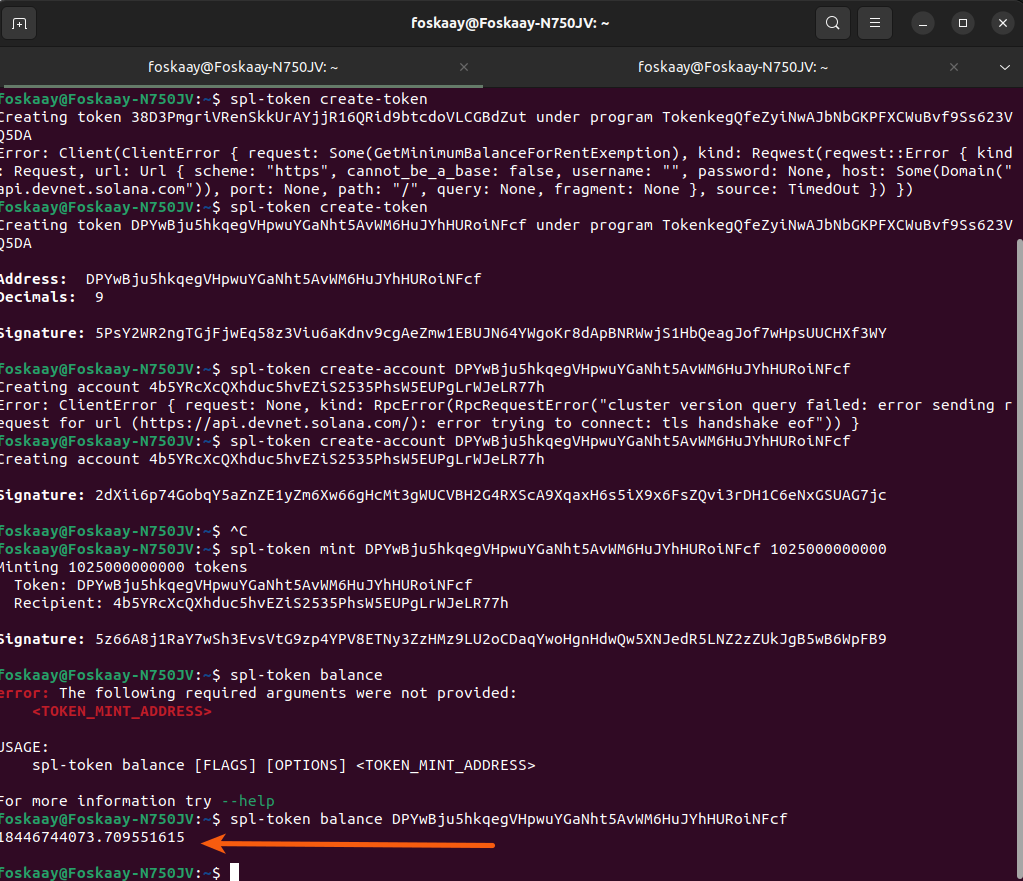
STEP 8: Check Token Balance
To check the minted token balance,
Run this command:
spl-token balance
You will get this in the CLI:
And that gives us this when checked in Solana Explorer after successfully minting it with the right decimal
I got a weild large balance of 18,446,744,073.709551615 (18Billion+) tokens
instead of
Just 1,025 tokens I intended to mint.
So, the troubleshooting started. to figure out why🤣 ?

STEP 9: Burn SPL Fungible Token
Yeah, considering I got a huge token mint current supply than I intended to,
Let us use the opportunity to make use of the burn feature in the SPL token program to burn the token to 0 current supply and retry the minting again.
To burn the SPL token, run the command:
spl-token balance <Associated_Token_Account>
For this guide, it is:
spl-token balance DPYwBju5hkqegVHpwuYGaNht5AvWM6HuJYhHURoiNFcf
If successful, it should now be back to zero as in the below screenshot when rechecking the balance:

Cool, now that we have cleared the mess caused by the zeros, let us re-mint the token using the correct numbers.
STEP 10: Re-Mint SPL Tokens
I figured out that Solana had help handle the decimal zeros in the background which makes it less confusing because the actual number could be inputted.
So, let me correct myself as below and hope you tried above, got the error, fixed it and here we go.
Run the command:
spl-token mint <TOKEN_MINT_ADDRESS> <AMOUNT>
spl-token mint DPYwBju5hkqegVHpwuYGaNht5AvWM6HuJYhHURoiNFcf 1025

1token = 1
11tokens = 11
125tokens = 125
1025tokens = 1025

Hint: Whatever token amount you want to mint, just ensure use it directly without the 9 zeros as previously done. Solana CLI helps handle the decimal zeros👏.
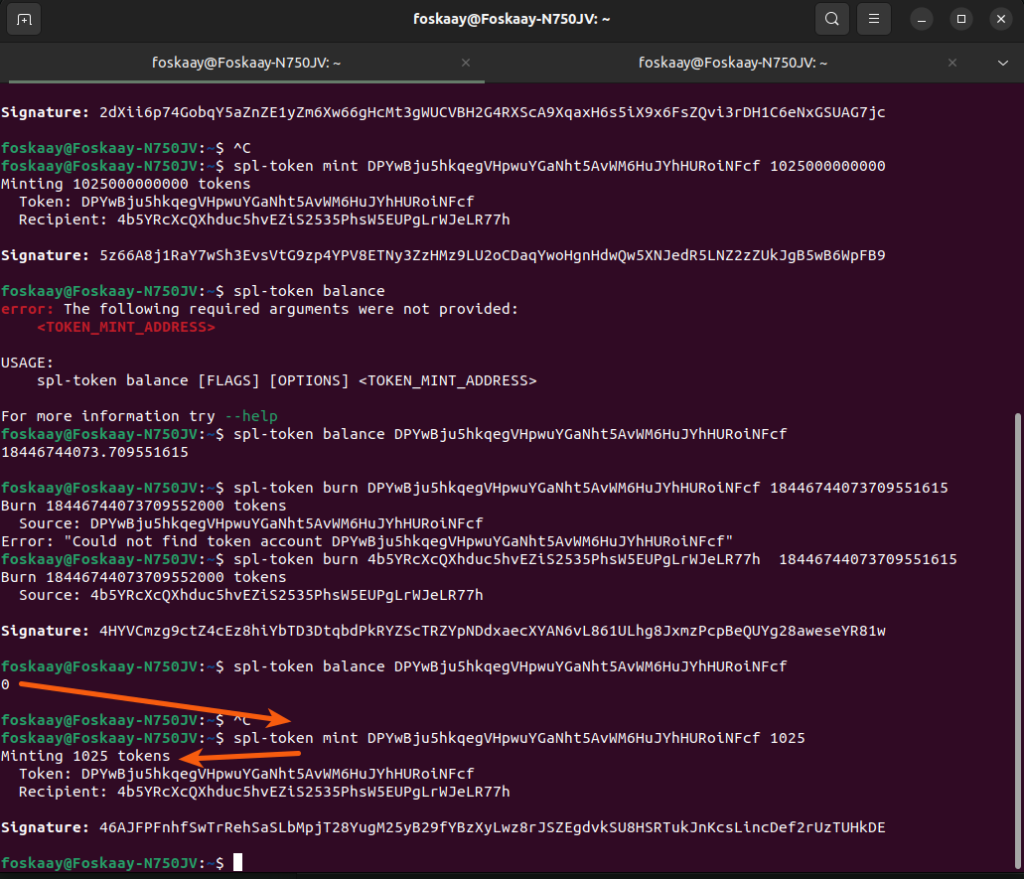
You noticed this time it minted the expected 1,025 tokens
Here are the screenshots of the CLI and Solana Explorer new current supply balance check:


Finally, we made it and now have the accurate number of 1,025 tokens minted as expected.
And there you have achieved it!
You have successfully created an SPL fungible token using the Solana CLI.
Feel free to explore further and remember, if you get stuck, you can always seek help in the dedicated #Solana channel on the dProgrammingUniversity Discord Server.
Time to move to method 2 using Solidity via Solang and Anchor to create SPL fungible token.
LFG🚀🔥
7.0 How To Create Solana SPL (Fungible) Token In Solang Solidity Using Anchor 🔥
Using the Solana CLI to create SPL token has opened you to more inner workings of SPL token program.
Now, let us take it further by actually achieving the same thing using Solang Solidity for Solana.
Also unlike the CLI used above, we will have the ease of having metatada for the SPL fungible token.
Changing it from "unknown token" to "Solidity SPL Fungible Token (SSPLFT)".
STEP 1: Initialize an Anchor Solang Solidity folder
Use the command below to initialize an anchor folder named solidity-spl-fungible-token like so:
anchor init solidity-spl-fungible-token --solidity
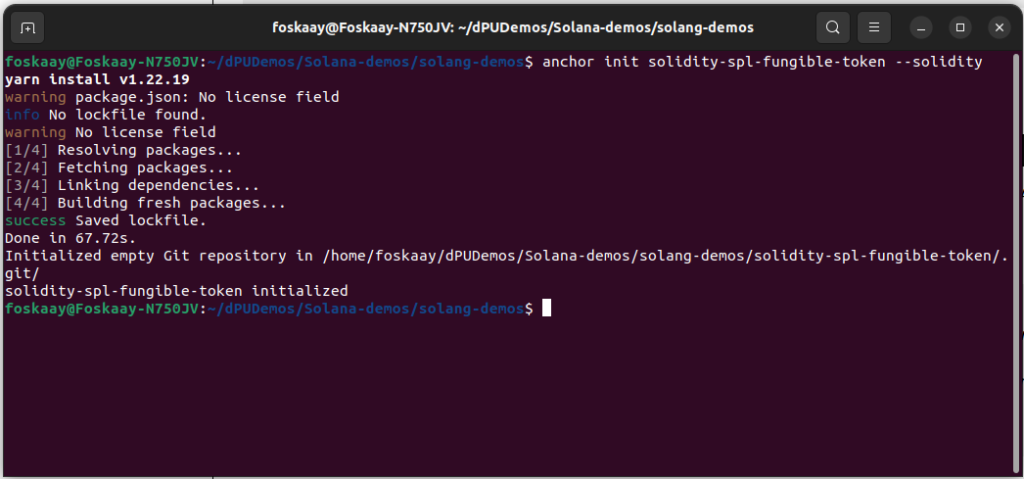
It will create a folder with a lot of folders and files which you should be familiar with by now when working with the Anchor framework if you have gone through the prerequisite content for this guide.
If not kindly go through section 2 above because am sorry🤔, I won’t go over it here again.
--solidity is a flag which tells Anchor to initialize and configure your project as Solang Solidity for Solana and not as Rust project.
If you forget to use the flag, it will initialize default which is Rust, and that is not what we need here.
Then go into the folder with the command:
cd solidity-spl-fungible-token
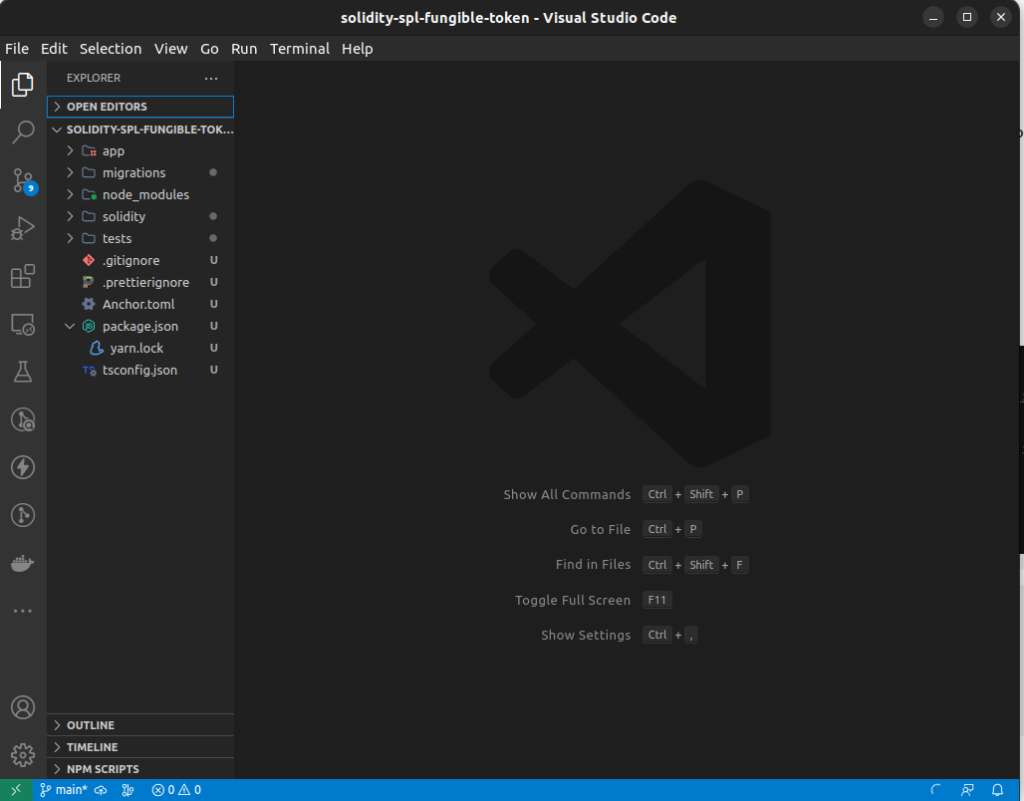
After that, open it in the code editor of choice.
Am using VSCode, If you are too, then run the command below to open the folder in the VSCode editor below:
code .

STEP 2: Add SPL Token Program Libraries For Solidity
To speak to the SPL token program via our Solidity smart contract codes, there needs to be a bridge and that is what the Solidity SPL token program library codes do.
(1) The first thing is to create a folder inside your project named libraries
(2) The second step is to create a file inside the libraries folder named mpl_metadata.sol
Copy and paste the code below in the
solidity-spl-fungible-token/libraries/mpl_metadata.sol
import 'solana';

// Reference: https://github.com/metaplex-foundation/metaplex-program-library/blob/master/token-metadata/program/src/instruction/metadata.rs#L449
// Solidity does not support Rust Option<> type, so we need to handle it manually
// Requires creating a struct for each combination of Option<> types
// If bool for Option<> type is false, comment out the corresponding struct field otherwise instruction fails with "invalid account data"
// TODO: figure out better way to handle Option<> types
library MplMetadata {
	address constant metadataProgramId = address"metaqbxxUerdq28cj1RbAWkYQm3ybzjb6a8bt518x1s";
	address constant systemAddress = address"11111111111111111111111111111111";
    address constant rentAddress = address"SysvarRent111111111111111111111111111111111";

	// Reference: https://github.com/metaplex-foundation/metaplex-program-library/blob/master/token-metadata/program/src/instruction/metadata.rs#L31
	struct CreateMetadataAccountArgsV3 {
        DataV2 data;
        bool isMutable;
        bool collectionDetailsPresent; // To handle Rust Option<> in Solidity
        // CollectionDetails collectionDetails;
    }

	// Reference: https://github.com/metaplex-foundation/metaplex-program-library/blob/master/token-metadata/program/src/state/data.rs#L22
    struct DataV2 {
        string name;
        string symbol;
        string uri;
        uint16 sellerFeeBasisPoints;
        bool creatorsPresent; // To handle Rust Option<> in Solidity
        // Creator[] creators;
        bool collectionPresent; // To handle Rust Option<> in Solidity
        // Collection collection;
        bool usesPresent; // To handle Rust Option<> in Solidity
        // Uses uses;
    }

	// Reference: https://github.com/metaplex-foundation/metaplex-program-library/blob/master/bubblegum/program/src/state/metaplex_adapter.rs#L10
    struct Creator {
        address creatorAddress;
        bool verified;
        uint8 share;
    }

	// Reference: https://github.com/metaplex-foundation/metaplex-program-library/blob/master/bubblegum/program/src/state/metaplex_adapter.rs#L66
    struct Collection {
        bool verified;
        address key;
    }

	// Reference: https://github.com/metaplex-foundation/metaplex-program-library/blob/master/token-metadata/program/src/state/collection.rs#L57
    struct CollectionDetails {
        CollectionDetailsType detailType;
        uint64 size;
    }
    enum CollectionDetailsType {
        V1
    }

	// Reference: https://github.com/metaplex-foundation/metaplex-program-library/blob/master/bubblegum/program/src/state/metaplex_adapter.rs#L43
    struct Uses {
        UseMethod useMethod;
        uint64 remaining;
        uint64 total;
    }

	// Reference: https://github.com/metaplex-foundation/metaplex-program-library/blob/master/bubblegum/program/src/state/metaplex_adapter.rs#L35
    enum UseMethod {
        Burn,
        Multiple,
        Single
    }

	function create_metadata_account(
		address metadata,
		address mint,
		address mintAuthority,
		address payer,
		address updateAuthority,
		string name,
		string symbol,
		string uri
	) public {
        // // Example of how to add a Creator[] array to the DataV2 struct
		// Creator[] memory creators = new Creator[](1);
        // creators[0] = Creator({
        //     creatorAddress: payer,
        //     verified: false,
        //     share: 100
        // });

        DataV2 data = DataV2({
            name: name,
            symbol: symbol,
            uri: uri,
            sellerFeeBasisPoints: 0,
            creatorsPresent: false,
             // creators: creators,
            collectionPresent: false,
            // collection: Collection({
            //     verified: false,
            //     key: address(0)
            // }),
            usesPresent: false
            // uses: Uses({
            //     useMethod: UseMethod.Burn,
            //     remaining: 0,
            //     total: 0
            // })
        });

        CreateMetadataAccountArgsV3 args = CreateMetadataAccountArgsV3({
            data: data,
            isMutable: true,
            collectionDetailsPresent: false
			// collectionDetails: CollectionDetails({
            //     detailType: CollectionDetailsType.V1,
            //     size: 0
            // })
        });

        AccountMeta[7] metas = [
            AccountMeta({pubkey: metadata, is_writable: true, is_signer: false}),
            AccountMeta({pubkey: mint, is_writable: false, is_signer: false}),
            AccountMeta({pubkey: mintAuthority, is_writable: false, is_signer: true}),
            AccountMeta({pubkey: payer, is_writable: true, is_signer: true}),
            AccountMeta({pubkey: updateAuthority, is_writable: false, is_signer: false}),
            AccountMeta({pubkey: systemAddress, is_writable: false, is_signer: false}),
            AccountMeta({pubkey: rentAddress, is_writable: false, is_signer: false})
        ];

        bytes1 discriminator = 33;
        bytes instructionData = abi.encode(discriminator, args);

        metadataProgramId.call{accounts: metas}(instructionData);
    }
}

This is Metaplex library
(probably I will consider writing in-depth guide about this essential dev tool in Solana in future but for now just take it as essential library that help handle metadata for our SPL token)
(3) The third step is to create another file inside the libraries folder named spl_token.sol
Copy and paste the code below in the
solidity-spl-fungible-token/libraries/spl_token.sol
import 'solana';
import 'system_instruction.sol';

library SplToken {
	address constant tokenProgramId = address"TokenkegQfeZyiNwAJbNbGKPFXCWuBvf9Ss623VQ5DA";
	address constant associatedTokenProgramId = address"ATokenGPvbdGVxr1b2hvZbsiqW5xWH25efTNsLJA8knL";
	address constant rentAddress = address"SysvarRent111111111111111111111111111111111";
	enum TokenInstruction {
		InitializeMint, // 0
		InitializeAccount, // 1
		InitializeMultisig, // 2
		Transfer, // 3
		Approve, // 4
		Revoke, // 5
		SetAuthority, // 6
		MintTo, // 7
		Burn, // 8
		CloseAccount, // 9
		FreezeAccount, // 10
		ThawAccount, // 11
		TransferChecked, // 12
		ApproveChecked, // 13
		MintToChecked, // 14
		BurnChecked, // 15
		InitializeAccount2, // 16
		SyncNative, // 17
		InitializeAccount3, // 18
		InitializeMultisig2, // 19
		InitializeMint2, // 20
		GetAccountDataSize, // 21
		InitializeImmutableOwner, // 22
		AmountToUiAmount, // 23
		UiAmountToAmount, // 24
		InitializeMintCloseAuthority, // 25
		TransferFeeExtension, // 26
		ConfidentialTransferExtension, // 27
		DefaultAccountStateExtension, // 28
		Reallocate, // 29
		MemoTransferExtension, // 30
		CreateNativeMint // 31
	}

	/// Initialize a new token account.
	///
	/// @param tokenAccount the public key of the token account to initialize
	/// @param mint the public key of the mint account for this new token account
	/// @param owner the public key of the owner of this new token account
	function initialize_account(address tokenAccount, address mint, address owner) internal{
		bytes instr = new bytes(1);

		instr[0] = uint8(TokenInstruction.InitializeAccount);
		AccountMeta[4] metas = [
			AccountMeta({pubkey: tokenAccount, is_writable: true, is_signer: false}),
			AccountMeta({pubkey: mint, is_writable: false, is_signer: false}),
			AccountMeta({pubkey: owner, is_writable: false, is_signer: false}),
			AccountMeta({pubkey: rentAddress, is_writable: false, is_signer: false})
		];

		tokenProgramId.call{accounts: metas}(instr);
	}

	/// Initialize a new associated token account.
	///
	/// @param payer the public key of the payer to create the associated token account
	/// @param tokenAccount the public key of the token account to initialize
	/// @param mint the public key of the mint account for this new token account
	/// @param owner the public key of the owner of this new token account
    function create_associated_token_account(address payer, address tokenAccount, address mint, address owner) internal {
        AccountMeta[6] metas = [
			AccountMeta({pubkey: payer, is_writable: true, is_signer: true}),
			AccountMeta({pubkey: tokenAccount, is_writable: true, is_signer: false}),
			AccountMeta({pubkey: owner, is_writable: false, is_signer: false}),
			AccountMeta({pubkey: mint, is_writable: false, is_signer: false}),
			AccountMeta({pubkey: SystemInstruction.systemAddress, is_writable: false, is_signer: false}),
			AccountMeta({pubkey: SplToken.tokenProgramId, is_writable: false, is_signer: false})
		];

        bytes instructionData = abi.encode((0));
		associatedTokenProgramId.call{accounts: metas}(instructionData);
    }

	// Initialize mint instruction data
	struct InitializeMintInstruction {
        uint8 instruction;
        uint8 decimals;
        address mintAuthority;
        uint8 freezeAuthorityOption;
        address freezeAuthority;
    }

	/// Initialize a new mint account.
	///
	/// @param mint the public key of the mint account to initialize
	/// @param mintAuthority the public key of the mint authority
	/// @param freezeAuthority the public key of the freeze authority
	/// @param decimals the decimals of the mint
	function initialize_mint(address mint, address mintAuthority, address freezeAuthority, uint8 decimals) internal {
    	InitializeMintInstruction instr = InitializeMintInstruction({
            instruction: 20,
            decimals: decimals,
            mintAuthority: mintAuthority,
            freezeAuthorityOption: 1,
            freezeAuthority: freezeAuthority
        });

		AccountMeta[1] metas = [
			AccountMeta({pubkey: mint, is_writable: true, is_signer: false})
		];

		tokenProgramId.call{accounts: metas}(instr);
	}

	/// Create and initialize a new mint account in one instruction
	///
	/// @param payer the public key of the account paying to create the mint account
	/// @param mint the public key of the mint account to initialize
	/// @param mintAuthority the public key of the mint authority
	/// @param freezeAuthority the public key of the freeze authority
	/// @param decimals the decimals of the mint
	function create_mint(address payer, address mint, address mintAuthority, address freezeAuthority, uint8 decimals) internal {
		// Invoke System Program to create a new account for the mint account
        // Program owner is set to the Token program
        SystemInstruction.create_account(
            payer,   // lamports sent from this account (payer)
            mint,    // lamports sent to this account (account to be created)
            1461600, // lamport amount (minimum lamports for mint account)
            82,      // space required for the account (mint account)
            SplToken.tokenProgramId // new program owner
        );

		InitializeMintInstruction instr = InitializeMintInstruction({
            instruction: 20,
            decimals: decimals,
            mintAuthority: mintAuthority,
            freezeAuthorityOption: 1,
            freezeAuthority: freezeAuthority
        });

		AccountMeta[1] metas = [
			AccountMeta({pubkey: mint, is_writable: true, is_signer: false})
		];

		tokenProgramId.call{accounts: metas}(instr);
	}

	/// Mint new tokens. The transaction should be signed by the mint authority keypair
	///
	/// @param mint the account of the mint
	/// @param account the token account where the minted tokens should go
	/// @param authority the public key of the mint authority
	/// @param amount the amount of tokens to mint
	function mint_to(address mint, address account, address authority, uint64 amount) internal {
		bytes instr = new bytes(9);

		instr[0] = uint8(TokenInstruction.MintTo);
		instr.writeUint64LE(amount, 1);

		AccountMeta[3] metas = [
			AccountMeta({pubkey: mint, is_writable: true, is_signer: false}),
			AccountMeta({pubkey: account, is_writable: true, is_signer: false}),
			AccountMeta({pubkey: authority, is_writable: true, is_signer: true})
		];

		tokenProgramId.call{accounts: metas}(instr);
	}

	/// Transfer @amount token from @from to @to. The transaction should be signed by the owner
	/// keypair of the from account.
	///
	/// @param from the account to transfer tokens from
	/// @param to the account to transfer tokens to
	/// @param owner the publickey of the from account owner keypair
	/// @param amount the amount to transfer
	function transfer(address from, address to, address owner, uint64 amount) internal {
		bytes instr = new bytes(9);

		instr[0] = uint8(TokenInstruction.Transfer);
		instr.writeUint64LE(amount, 1);

		AccountMeta[3] metas = [
			AccountMeta({pubkey: from, is_writable: true, is_signer: false}),
			AccountMeta({pubkey: to, is_writable: true, is_signer: false}),
			AccountMeta({pubkey: owner, is_writable: true, is_signer: true})
		];

		tokenProgramId.call{accounts: metas}(instr);
	}

	/// Burn @amount tokens in account. This transaction should be signed by the owner.
	///
	/// @param account the acount for which tokens should be burned
	/// @param mint the mint for this token
	/// @param owner the publickey of the account owner keypair
	/// @param amount the amount to transfer
	function burn(address account, address mint, address owner, uint64 amount) internal {
		bytes instr = new bytes(9);

		instr[0] = uint8(TokenInstruction.Burn);
		instr.writeUint64LE(amount, 1);

		AccountMeta[3] metas = [
			AccountMeta({pubkey: account, is_writable: true, is_signer: false}),
			AccountMeta({pubkey: mint, is_writable: true, is_signer: false}),
			AccountMeta({pubkey: owner, is_writable: true, is_signer: true})
		];

		tokenProgramId.call{accounts: metas}(instr);
	}

	/// Approve an amount to a delegate. This transaction should be signed by the owner
	///
	/// @param account the account for which a delegate should be approved
	/// @param delegate the delegate publickey
	/// @param owner the publickey of the account owner keypair
	/// @param amount the amount to approve
	function approve(address account, address delegate, address owner, uint64 amount) internal {
		bytes instr = new bytes(9);

		instr[0] = uint8(TokenInstruction.Approve);
		instr.writeUint64LE(amount, 1);

		AccountMeta[3] metas = [
			AccountMeta({pubkey: account, is_writable: true, is_signer: false}),
			AccountMeta({pubkey: delegate, is_writable: false, is_signer: false}),
			AccountMeta({pubkey: owner, is_writable: false, is_signer: true})
		];

		tokenProgramId.call{accounts: metas}(instr);
	}

	/// Revoke a previously approved delegate. This transaction should be signed by the owner. After
	/// this transaction, no delgate is approved for any amount.
	///
	/// @param account the account for which a delegate should be approved
	/// @param owner the publickey of the account owner keypair
	function revoke(address account, address owner) internal {
		bytes instr = new bytes(1);

		instr[0] = uint8(TokenInstruction.Revoke);

		AccountMeta[2] metas = [
			AccountMeta({pubkey: account, is_writable: true, is_signer: false}),
			AccountMeta({pubkey: owner, is_writable: false, is_signer: true})
		];

		tokenProgramId.call{accounts: metas}(instr);
	}

	/// Get the total supply for the mint, i.e. the total amount in circulation
	/// @param mint the mint for this token
	function total_supply(address mint) internal view returns (uint64) {
		AccountInfo account = get_account_info(mint);

		return account.data.readUint64LE(36);
	}

	/// Get the balance for an account.
	///
	/// @param account the account for which we want to know a balance
	function get_balance(address account) internal view returns (uint64) {
		AccountInfo ai = get_account_info(account);

		return ai.data.readUint64LE(64);
	}

	/// Get the account info for an account. This walks the transaction account infos
	/// and find the account info, or the transaction fails.
	///
	/// @param account the account for which we want to have the acount info.
	function get_account_info(address account) internal view returns (AccountInfo) {
		for (uint64 i = 0; i < tx.accounts.length; i++) {
			AccountInfo ai = tx.accounts[i];
			if (ai.key == account) {
				return ai;
			}
		}

		revert("account missing");
	}

	/// This enum represents the state of a token account
	enum AccountState {
		Uninitialized,
		Initialized,
		Frozen
	}

	/// This struct is the return of 'get_token_account_data'
	struct TokenAccountData {
		address mintAccount;
		address owner;
		uint64 balance;
		bool delegate_present;
		address delegate;
		AccountState state;
		bool is_native_present;
		uint64 is_native;
		uint64 delegated_amount;
		bool close_authority_present;
		address close_authority;
	}

	/// Fetch the owner, mint account and balance for an associated token account.
	///
	/// @param tokenAccount The token account
	/// @return struct TokenAccountData
	function get_token_account_data(address tokenAccount) public view returns (TokenAccountData) {
		AccountInfo ai = get_account_info(tokenAccount);

		TokenAccountData data = TokenAccountData(
			{
				mintAccount: ai.data.readAddress(0),
				owner: ai.data.readAddress(32),
			 	balance: ai.data.readUint64LE(64),
				delegate_present: ai.data.readUint32LE(72) > 0,
				delegate: ai.data.readAddress(76),
				state: AccountState(ai.data[108]),
				is_native_present: ai.data.readUint32LE(109) > 0,
				is_native: ai.data.readUint64LE(113),
				delegated_amount: ai.data.readUint64LE(121),
				close_authority_present: ai.data.readUint32LE(129) > 10,
				close_authority: ai.data.readAddress(133)
			}
		);

		return data;
	}

	// This struct is the return of 'get_mint_account_data'
	struct MintAccountData {
		bool authority_present;
		address mint_authority;
		uint64 supply;
		uint8 decimals;
		bool is_initialized;
		bool freeze_authority_present;
		address freeze_authority;
	}

	/// Retrieve the information saved in a mint account
	///
	/// @param mintAccount the account whose information we want to retrive
	/// @return the MintAccountData struct
	function get_mint_account_data(address mintAccount) public view returns (MintAccountData) {
		AccountInfo ai = get_account_info(mintAccount);

		uint32 authority_present = ai.data.readUint32LE(0);
		uint32 freeze_authority_present = ai.data.readUint32LE(46);
		MintAccountData data = MintAccountData( {
			authority_present: authority_present > 0,
			mint_authority: ai.data.readAddress(4),
			supply: ai.data.readUint64LE(36),
			decimals: uint8(ai.data[44]),
			is_initialized: ai.data[45] > 0,
			freeze_authority_present: freeze_authority_present > 0,
			freeze_authority: ai.data.readAddress(50)
		});

		return data;
	}

	// A mint account has an authority, whose type is one of the members of this struct.
	enum AuthorityType {
		MintTokens,
		FreezeAccount,
		AccountOwner,
		CloseAccount
	}

	/// Remove the mint authority from a mint account
	///
	/// @param mintAccount the public key for the mint account
	/// @param mintAuthority the public for the mint authority
	function remove_mint_authority(address mintAccount, address mintAuthority) public {
		AccountMeta[2] metas = [
			AccountMeta({pubkey: mintAccount, is_signer: false, is_writable: true}),
			AccountMeta({pubkey: mintAuthority, is_signer: true, is_writable: false})
		];

		bytes data = new bytes(9);
		data[0] = uint8(TokenInstruction.SetAuthority);
		data[1] = uint8(AuthorityType.MintTokens);
		data[3] = 0;

		tokenProgramId.call{accounts: metas}(data);
	}
}

This spl_token.sol code is a library representing an interface between the on-chain Solana SPL token program and our Solidity contract
to be able to access its features like creating mint (token), creating associated token accounts, minting new tokens and a lot more.
The code should be used as it is and does not need to be modified.
(4) The fourth step is to create another file inside the libraries folder named system_instruction.sol
Copy and paste the code below in the
solidity-spl-fungible-token/libraries/system_instruction.sol
// SPDX-License-Identifier: Apache-2.0

// Disclaimer: This library provides a bridge for Solidity to interact with Solana's system instructions. Although it is production ready,
// it has not been audited for security, so use it at your own risk.

import 'solana';

library SystemInstruction {
    address constant systemAddress = address"11111111111111111111111111111111";
    address constant recentBlockHashes = address"SysvarRecentB1ockHashes11111111111111111111";
    address constant rentAddress = address"SysvarRent111111111111111111111111111111111";
    uint64 constant state_size = 80;

    enum Instruction {
        CreateAccount,
        Assign,
        Transfer,
        CreateAccountWithSeed,
        AdvanceNounceAccount,
        WithdrawNonceAccount,
        InitializeNonceAccount,
        AuthorizeNonceAccount,
        Allocate,
        AllocateWithSeed,
        AssignWithSeed,
        TransferWithSeed,
        UpgradeNonceAccount // This is not available on Solana v1.9.15
    }

    /// Create a new account on Solana
    ///
    /// @param from public key for the account from which to transfer lamports to the new account
    /// @param to public key for the account to be created
    /// @param lamports amount of lamports to be transfered to the new account
    /// @param space the size in bytes that is going to be made available for the account
    /// @param owner public key for the program that will own the account being created
    function create_account(address from, address to, uint64 lamports, uint64 space, address owner) internal {
        AccountMeta[2] metas = [
            AccountMeta({pubkey: from, is_signer: true, is_writable: true}),
            AccountMeta({pubkey: to, is_signer: true, is_writable: true})
        ];

        bytes bincode = abi.encode(uint32(Instruction.CreateAccount), lamports, space, owner);

        systemAddress.call{accounts: metas}(bincode);
    }

    /// Create a new account on Solana using a public key derived from a seed
    ///
    /// @param from public key for the account from which to transfer lamports to the new account
    /// @param to the public key for the account to be created. The public key must match create_with_seed(base, seed, owner)
    /// @param base the base address that derived the 'to' address using the seed
    /// @param seed the string utilized to created the 'to' public key
    /// @param lamports amount of lamports to be transfered to the new account
    /// @param space the size in bytes that is going to be made available for the account
    /// @param owner public key for the program that will own the account being created
    function create_account_with_seed(address from, address to, address base, string seed, uint64 lamports, uint64 space, address owner) internal {
        AccountMeta[3] metas = [
            AccountMeta({pubkey: from, is_signer: true, is_writable: true}),
            AccountMeta({pubkey: to, is_signer: false, is_writable: true}),
            AccountMeta({pubkey: base, is_signer: true, is_writable: false})
        ];

        uint32 buffer_size = 92 + seed.length;
        bytes bincode = new bytes(buffer_size);
        bincode.writeUint32LE(uint32(Instruction.CreateAccountWithSeed), 0);
        bincode.writeAddress(base, 4);
        bincode.writeUint64LE(uint64(seed.length), 36);
        bincode.writeString(seed, 44);
        uint32 offset = seed.length + 44;
        bincode.writeUint64LE(lamports, offset);
        offset += 8;
        bincode.writeUint64LE(space, offset);
        offset += 8;
        bincode.writeAddress(owner, offset);

        systemAddress.call{accounts: metas}(bincode);
    }

    /// Assign account to a program (owner)
    ///
    /// @param pubkey the public key for the account whose owner is going to be reassigned
    /// @param owner the public key for the new account owner
    function assign(address pubkey, address owner) internal {
        AccountMeta[1] meta = [
            AccountMeta({pubkey: pubkey, is_signer: true, is_writable: true})
        ];
        bytes bincode = abi.encode(uint32(Instruction.Assign), owner);

        systemAddress.call{accounts: meta}(bincode);
    }

    /// Assign account to a program (owner) based on a seed
    ///
    /// @param addr the public key for the account whose owner is going to be reassigned. The public key must match create_with_seed(base, seed, owner)
    /// @param base the base address that derived the 'addr' key using the seed
    /// @param seed the string utilized to created the 'addr' public key
    /// @param owner the public key for the new program owner
    function assign_with_seed(address addr, address base, string seed, address owner) internal {
        AccountMeta[2] metas = [
            AccountMeta({pubkey: addr, is_signer: false, is_writable: true}),
            AccountMeta({pubkey: base, is_signer: true, is_writable: false})
        ];


        uint32 buffer_size = 76 + seed.length;
        bytes bincode = new bytes(buffer_size);
        bincode.writeUint32LE(uint32(Instruction.AssignWithSeed), 0);
        bincode.writeAddress(base, 4);
        bincode.writeUint64LE(uint64(seed.length), 36);
        bincode.writeString(seed, 44);
        bincode.writeAddress(owner, 44 + seed.length);

        systemAddress.call{accounts: metas}(bincode);
    }

    /// Transfer lamports between accounts
    ///
    /// @param from public key for the funding account
    /// @param to public key for the recipient account
    /// @param lamports amount of lamports to transfer
    function transfer(address from, address to, uint64 lamports) internal {
        AccountMeta[2] metas = [
            AccountMeta({pubkey: from, is_signer: true, is_writable: true}),
            AccountMeta({pubkey: to, is_signer: false, is_writable: true})
        ];

        bytes bincode = abi.encode(uint32(Instruction.Transfer), lamports);

        systemAddress.call{accounts: metas}(bincode);
    }

    /// Transfer lamports from a derived address
    ///
    /// @param from_pubkey The funding account public key. It should match create_with_seed(from_base, seed, from_owner)
    /// @param from_base the base address that derived the 'from_pubkey' key using the seed
    /// @param seed the string utilized to create the 'from_pubkey' public key
    /// @param from_owner owner to use to derive the funding account address
    /// @param to_pubkey the public key for the recipient account
    /// @param lamports amount of lamports to transfer
    function transfer_with_seed(address from_pubkey, address from_base, string seed, address from_owner, address to_pubkey, uint64 lamports) internal {
        AccountMeta[3] metas = [
            AccountMeta({pubkey: from_pubkey, is_signer: false, is_writable: true}),
            AccountMeta({pubkey: from_base, is_signer: true, is_writable: false}),
            AccountMeta({pubkey: to_pubkey, is_signer: false, is_writable: true})
        ];

        uint32 buffer_size = seed.length + 52;
        bytes bincode = new bytes(buffer_size);
        bincode.writeUint32LE(uint32(Instruction.TransferWithSeed), 0);
        bincode.writeUint64LE(lamports, 4);
        bincode.writeUint64LE(seed.length, 12);
        bincode.writeString(seed, 20);
        bincode.writeAddress(from_owner, 20 + seed.length);

        systemAddress.call{accounts: metas}(bincode);
    }

    /// Allocate space in a (possibly new) account without funding
    ///
    /// @param pub_key account for which to allocate space
    /// @param space number of bytes of memory to allocate
    function allocate(address pub_key, uint64 space) internal {
        AccountMeta[1] meta = [
            AccountMeta({pubkey: pub_key, is_signer: true, is_writable: true})
        ];

        bytes bincode = abi.encode(uint32(Instruction.Allocate), space);

        systemAddress.call{accounts: meta}(bincode);
    }

    /// Allocate space for an assign an account at an address derived from a base public key and a seed
    ///
    /// @param addr account for which to allocate space. It should match create_with_seed(base, seed, owner)
    /// @param base the base address that derived the 'addr' key using the seed
    /// @param seed the string utilized to create the 'addr' public key
    /// @param space number of bytes of memory to allocate
    /// @param owner owner to use to derive the 'addr' account address
    function allocate_with_seed(address addr, address base, string seed, uint64 space, address owner) internal {
        AccountMeta[2] metas = [
            AccountMeta({pubkey: addr, is_signer: false, is_writable: true}),
            AccountMeta({pubkey: base, is_signer: true, is_writable: false})
        ];

        bytes bincode = new bytes(seed.length + 84);
        bincode.writeUint32LE(uint32(Instruction.AllocateWithSeed), 0);
        bincode.writeAddress(base, 4);
        bincode.writeUint64LE(seed.length, 36);
        bincode.writeString(seed, 44);
        uint32 offset = 44 + seed.length;
        bincode.writeUint64LE(space, offset);
        offset += 8;
        bincode.writeAddress(owner, offset);

        systemAddress.call{accounts: metas}(bincode);
    }

    /// Create a new nonce account on Solana using a public key derived from a seed
    ///
    /// @param from public key for the account from which to transfer lamports to the new account
    /// @param nonce the public key for the account to be created. The public key must match create_with_seed(base, seed, systemAddress)
    /// @param base the base address that derived the 'nonce' key using the seed
    /// @param seed the string utilized to create the 'addr' public key
    /// @param authority The entity authorized to execute nonce instructions on the account
    /// @param lamports amount of lamports to be transfered to the new account
    function create_nonce_account_with_seed(address from, address nonce, address base, string seed, address authority, uint64 lamports) internal {
        create_account_with_seed(from, nonce, base, seed, lamports, state_size, systemAddress);

        AccountMeta[3] metas = [
            AccountMeta({pubkey: nonce, is_signer: false, is_writable: true}),
            AccountMeta({pubkey: recentBlockHashes, is_signer: false, is_writable: false}),
            AccountMeta({pubkey: rentAddress, is_signer: false, is_writable: false})
        ];

        bytes bincode = abi.encode(uint32(Instruction.InitializeNonceAccount), authority);
        systemAddress.call{accounts: metas}(bincode);
    }

    /// Create a new account on Solana
    ///
    /// @param from public key for the account from which to transfer lamports to the new account
    /// @param nonce the public key for the nonce account to be created
    /// @param authority The entity authorized to execute nonce instructions on the account
    /// @param lamports amount of lamports to be transfered to the new account
    function create_nonce_account(address from, address nonce, address authority, uint64 lamports) internal {
        create_account(from, nonce, lamports, state_size, systemAddress);

        AccountMeta[3] metas = [
            AccountMeta({pubkey: nonce, is_signer: false, is_writable: true}),
            AccountMeta({pubkey: recentBlockHashes, is_signer: false, is_writable: false}),
            AccountMeta({pubkey: rentAddress, is_signer: false, is_writable: false})
        ];

        bytes bincode = abi.encode(uint32(Instruction.InitializeNonceAccount), authority);
        systemAddress.call{accounts: metas}(bincode);
    }

    /// Consumes a stored nonce, replacing it with a successor
    ///
    /// @param nonce_pubkey the public key for the nonce account
    /// @param authorized_pubkey the publick key for the entity authorized to execute instructins on the account
    function advance_nonce_account(address nonce_pubkey, address authorized_pubkey) internal {
        AccountMeta[3] metas = [
            AccountMeta({pubkey: nonce_pubkey, is_signer: false, is_writable: true}),
            AccountMeta({pubkey: recentBlockHashes, is_signer: false, is_writable: false}),
            AccountMeta({pubkey: authorized_pubkey, is_signer: true, is_writable: false})
        ];

        bytes bincode = abi.encode(uint32(Instruction.AdvanceNounceAccount));
        systemAddress.call{accounts: metas}(bincode);
    }

    /// Withdraw funds from a nonce account
    ///
    /// @param nonce_pubkey the public key for the nonce account
    /// @param authorized_pubkey the public key for the entity authorized to execute instructins on the account
    /// @param to_pubkey the recipient account
    /// @param lamports the number of lamports to withdraw
    function withdraw_nonce_account(address nonce_pubkey, address authorized_pubkey, address to_pubkey, uint64 lamports) internal {
        AccountMeta[5] metas = [
            AccountMeta({pubkey: nonce_pubkey, is_signer: false, is_writable: true}),
            AccountMeta({pubkey: to_pubkey, is_signer: false, is_writable: true}),
            AccountMeta({pubkey: recentBlockHashes, is_signer: false, is_writable: false}),
            AccountMeta({pubkey: rentAddress, is_signer: false, is_writable: false}),
            AccountMeta({pubkey: authorized_pubkey, is_signer: true, is_writable: false})
        ];

        bytes bincode = abi.encode(uint32(Instruction.WithdrawNonceAccount), lamports);
        systemAddress.call{accounts: metas}(bincode);
    }

    /// Change the entity authorized to execute nonce instructions on the account
    ///
    /// @param nonce_pubkey the public key for the nonce account
    /// @param authorized_pubkey the public key for the entity authorized to execute instructins on the account
    /// @param new_authority
    function authorize_nonce_account(address nonce_pubkey, address authorized_pubkey, address new_authority) internal {
        AccountMeta[2] metas = [
            AccountMeta({pubkey: nonce_pubkey, is_signer: false, is_writable: true}),
            AccountMeta({pubkey: authorized_pubkey, is_signer: true, is_writable: false})
        ];

        bytes bincode = abi.encode(uint32(Instruction.AuthorizeNonceAccount), new_authority);
        systemAddress.call{accounts: metas}(bincode);
    }

    /// One-time idempotent upgrade of legacy nonce version in order to bump them out of chain domain.
    ///
    /// @param nonce the public key for the nonce account
    // This is not available on Solana v1.9.15
    function upgrade_nonce_account(address nonce) internal {
        AccountMeta[1] meta = [
            AccountMeta({pubkey: nonce, is_signer: false, is_writable: true})
        ];

        bytes bincode = abi.encode(uint32(Instruction.UpgradeNonceAccount));
        systemAddress.call{accounts: meta}(bincode);
    }
}

The system_instruction.sol code does not also need modification, just used as is
It is an essential interface between the Solang Solidity program and the Solana Blockchain
giving access to things like accounts and other essential Solana features.
STEP 3: Write Solidity SPL Fungible Token Code
The next step is to move into the folder named solidity and
then open the file solidity-spl-fungible-token.sol
You should be familiar with Solidity for Solana smart contract (program) code if you have gone through the prerequisite guide in section 2 above. If not, kindly go through it as I will assume you understand it moving forward.
Thus, let’s just clear the default code that was created for us by the anchor during the initialization stage.
Then replace it with the following code (some explanation of the code below) in
solidity-spl-fungible-token/solidity/solidity-spl-fungible-token.sol
import "../libraries/spl_token.sol";
import "../libraries/mpl_metadata.sol";

@program_id("GbWt4JoWpfAXEeNEkrDyinpkwz3tPB3KCUY98abFTXr4")
contract spl_token_minter {
    @payer(payer)
    constructor() {}

    function createTokenMint(
        address payer, // payer account
        address mint, // mint account to be created
        address mintAuthority, // mint authority for the mint account
        address freezeAuthority, // freeze authority for the mint account
        address metadata, // metadata account to be created
        uint8 decimals, // decimals for the mint account
        string name, // name for the metadata account
        string symbol, // symbol for the metadata account
        string uri // uri for the metadata account
    ) public {
        // Invoke System Program to create a new account for the mint account and,
        // Invoke Token Program to initialize the mint account
        // Set mint authority, freeze authority, and decimals for the mint account
        SplToken.create_mint(
            payer,            // payer account
            mint,            // mint account
            mintAuthority,   // mint authority
            freezeAuthority, // freeze authority
            decimals         // decimals
        );

        // Invoke Metadata Program to create a new account for the metadata account
        MplMetadata.create_metadata_account(
            metadata, // metadata account
            mint,  // mint account
            mintAuthority, // mint authority
            payer, // payer
            payer, // update authority (of the metadata account)
            name, // name
            symbol, // symbol
            uri // uri (off-chain metadata json)
        );
    }

    function mintTo(address mintAuthority, address tokenAccount, address mint, uint64 amount) public {
        // Mint tokens to the token account
        SplToken.mint_to(
            mint, // mint account
            tokenAccount, // token account
            mintAuthority, // mint authority
            amount // amount
        );
    }
}
The above code Solang Solidity code has two (2) major functions
The first one createTokenMint() which handles the token (mint) creations, and associated token account creation with custom metadata powered by Metaplex.
The second function mintTo() is to mint some tokens.
At the end of the day your full code will be as below:

STEP 4: Write A Test for The Solidity Solana SPL Fungible Token Program
It is time to write a test for the contract to use it to create our token with custom metadata
Go to the folder tests
and clear the demo code in the test file solidity-spl-fungible-token.ts
Paste the below code test into it.
solidity-spl-fungible-token/tests/solidity-spl-fungible-token.ts
import * as anchor from "@coral-xyz/anchor";
import { Program } from "@coral-xyz/anchor";
import { SplTokenMinter } from "../target/types/spl_token_minter";
import { PublicKey, SystemProgram, SYSVAR_RENT_PUBKEY } from "@solana/web3.js";
import { Metaplex } from "@metaplex-foundation/js";
import {
  ASSOCIATED_TOKEN_PROGRAM_ID,
  getOrCreateAssociatedTokenAccount,
  TOKEN_PROGRAM_ID,
} from "@solana/spl-token";

describe("spl-token-minter", () => {
  // Configure the client to use the local cluster.
  const provider = anchor.AnchorProvider.env();
  anchor.setProvider(provider);

  // Generate a new keypair for the data account for the program
  const dataAccount = anchor.web3.Keypair.generate();
  // Generate a mint keypair
  const mintKeypair = anchor.web3.Keypair.generate();
  const wallet = provider.wallet as anchor.Wallet;
  const connection = provider.connection;

  const program = anchor.workspace.SplTokenMinter as Program<SplTokenMinter>;

  // Metadata for the Token
  const tokenTitle = "Solidity SPL Fungible Token";
  const tokenSymbol = "SSPLFT";
  const tokenUri =
    "https://raw.githubusercontent.com/dProgrammingUniversity/solidity-spl-fungible-token/main/spl-token.json";

  it("Is initialized!", async () => {
    // Initialize data account for the program, which is required by Solang
    const tx = await program.methods
      .new()
      .accounts({ dataAccount: dataAccount.publicKey })
      .signers([dataAccount])
      .rpc();
    console.log("Your transaction signature", tx);
  });

  it("Create an SPL Token!", async () => {
    // Get the metadata address for the mint
    const metaplex = Metaplex.make(connection);
    const metadataAddress = await metaplex
      .nfts()
      .pdas()
      .metadata({ mint: mintKeypair.publicKey });

    // Create the token mint
    const tx = await program.methods
      .createTokenMint(
        wallet.publicKey, // payer
        mintKeypair.publicKey, // mint
        wallet.publicKey, // mint authority
        wallet.publicKey, // freeze authority
        metadataAddress, // metadata address
        9, // decimals
        tokenTitle, // token name
        tokenSymbol, // token symbol
        tokenUri // token uri
      )
      .accounts({ dataAccount: dataAccount.publicKey })
      .remainingAccounts([
        {
          pubkey: wallet.publicKey,
          isWritable: true,
          isSigner: true,
        },
        { pubkey: mintKeypair.publicKey, isWritable: true, isSigner: true },
        {
          pubkey: new PublicKey("metaqbxxUerdq28cj1RbAWkYQm3ybzjb6a8bt518x1s"), // Metadata program id
          isWritable: false,
          isSigner: false,
        },
        { pubkey: metadataAddress, isWritable: true, isSigner: false },
        { pubkey: SystemProgram.programId, isWritable: false, isSigner: false },
        { pubkey: SYSVAR_RENT_PUBKEY, isWritable: false, isSigner: false },
      ])
      .signers([mintKeypair])
      .rpc({ skipPreflight: true });
    console.log("Your transaction signature", tx);
  });

  it("Mint some tokens to your wallet!", async () => {
    // Wallet's associated token account address for mint
    const tokenAccount = await getOrCreateAssociatedTokenAccount(
      connection,
      wallet.payer, // payer
      mintKeypair.publicKey, // mint
      wallet.publicKey // owner
    );

    const tx = await program.methods
      .mintTo(
        wallet.publicKey, // payer
        tokenAccount.address, // associated token account address
        mintKeypair.publicKey, // mint
        new anchor.BN(1025000000000) // amount to mint
      )
      .accounts({ dataAccount: dataAccount.publicKey })
      .remainingAccounts([
        {
          pubkey: wallet.publicKey,
          isWritable: true,
          isSigner: true,
        },
        { pubkey: tokenAccount.address, isWritable: true, isSigner: false },
        { pubkey: mintKeypair.publicKey, isWritable: true, isSigner: false },
        {
          pubkey: SystemProgram.programId,
          isWritable: false,
          isSigner: false,
        },
        { pubkey: TOKEN_PROGRAM_ID, isWritable: false, isSigner: false },
        {
          pubkey: ASSOCIATED_TOKEN_PROGRAM_ID,
          isWritable: false,
          isSigner: false,
        },
      ])
      .rpc({ skipPreflight: true });
    console.log("Your transaction signature", tx);
  });
});
Some things to adjust in this code are:
1. Token Title (Solidity SPL Fungible Token)
2. Token Name (SSPLFT)
3. Token URI

4. Amount of tokens to mint (1,025)

Since the Solidity contract is set to 9 decimals, you need to add nine zeros at the end of whatever we want to mint in contrast to when using the Solana CLI which already sorted that for us in the first part of this guide.
We are to mint 1,025 SSPLFT tokens which means it will become 1,025,000,000,000
and written as 1025000000000
Other aspects of the test code can be left as it is because they are already written to interact with all functions in the Soldity SPL token code when deployed on-chain.
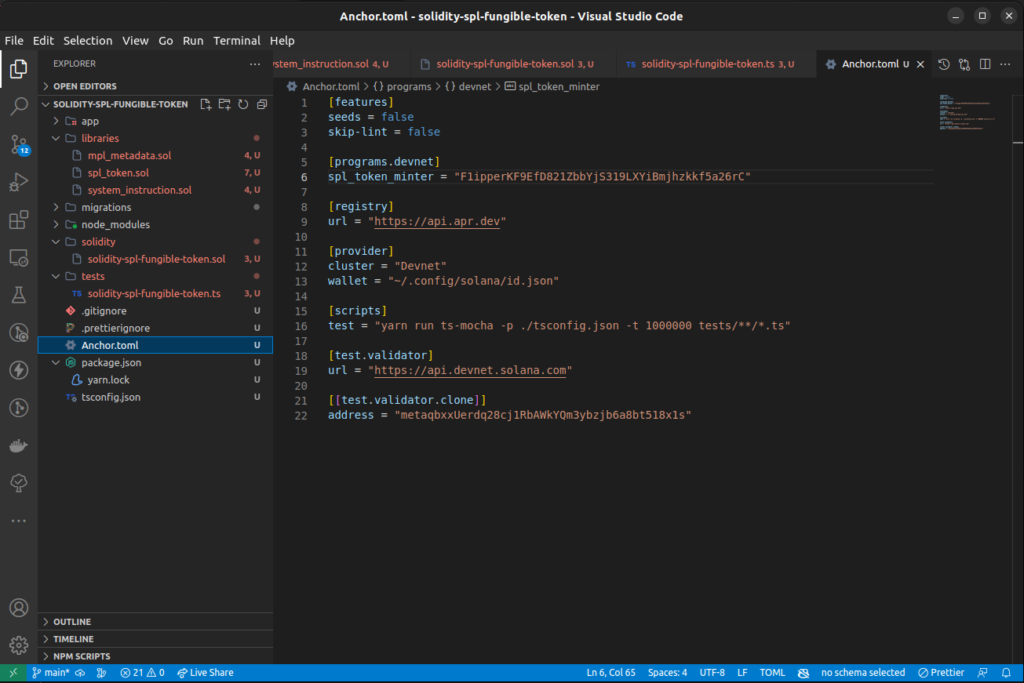
STEP 5: Update Anchor Toml File
Yeah, still a couple more files to work on.
The next in line is the anchor.toml file.
Open it and replace the default code with this updated version below:
solidity-spl-fungible-token/anchor.toml
[features]
seeds = false
skip-lint = false

[programs.devnet]
spl_token_minter = "GbWt4JoWpfAXEeNEkrDyinpkwz3tPB3KCUY98abFTXr4"

[registry]
url = "https://api.apr.dev"

[provider]
cluster = "Devnet"
wallet = "~/.config/solana/id.json"

[scripts]
test = "yarn run ts-mocha -p ./tsconfig.json -t 1000000 tests/**/*.ts"

[test.validator]
url = "https://api.devnet.solana.com"

[[test.validator.clone]]
address = "metaqbxxUerdq28cj1RbAWkYQm3ybzjb6a8bt518x1s"
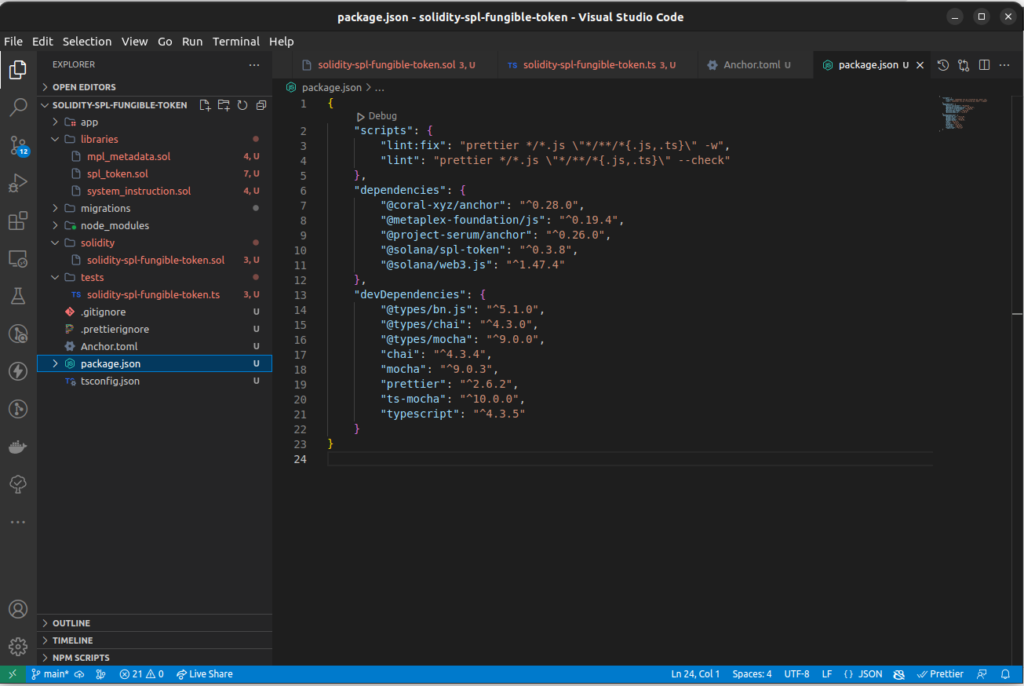
STEP 6: Update Package JSON File
Let us move on to edit the package.json with the code below:
solidity-spl-fungible-token/package.json
{
    "scripts": {
        "lint:fix": "prettier */*.js \"*/**/*{.js,.ts}\" -w",
        "lint": "prettier */*.js \"*/**/*{.js,.ts}\" --check"
    },
    "dependencies": {
        "@coral-xyz/anchor": "^0.28.0",
        "@metaplex-foundation/js": "^0.19.4",
        "@project-serum/anchor": "^0.26.0",
        "@solana/spl-token": "^0.3.8",
        "@solana/web3.js": "^1.47.4"
    },
    "devDependencies": {
        "@types/bn.js": "^5.1.0",
        "@types/chai": "^4.3.0",
        "@types/mocha": "^9.0.0",
        "chai": "^4.3.4",
        "mocha": "^9.0.3",
        "prettier": "^2.6.2",
        "ts-mocha": "^10.0.0",
        "typescript": "^4.3.5"
    }
}
STEP 7: Install Dependencies For Solidity Solana SPL Token Program
Time to install the dependencies by running the command below:
yarn install
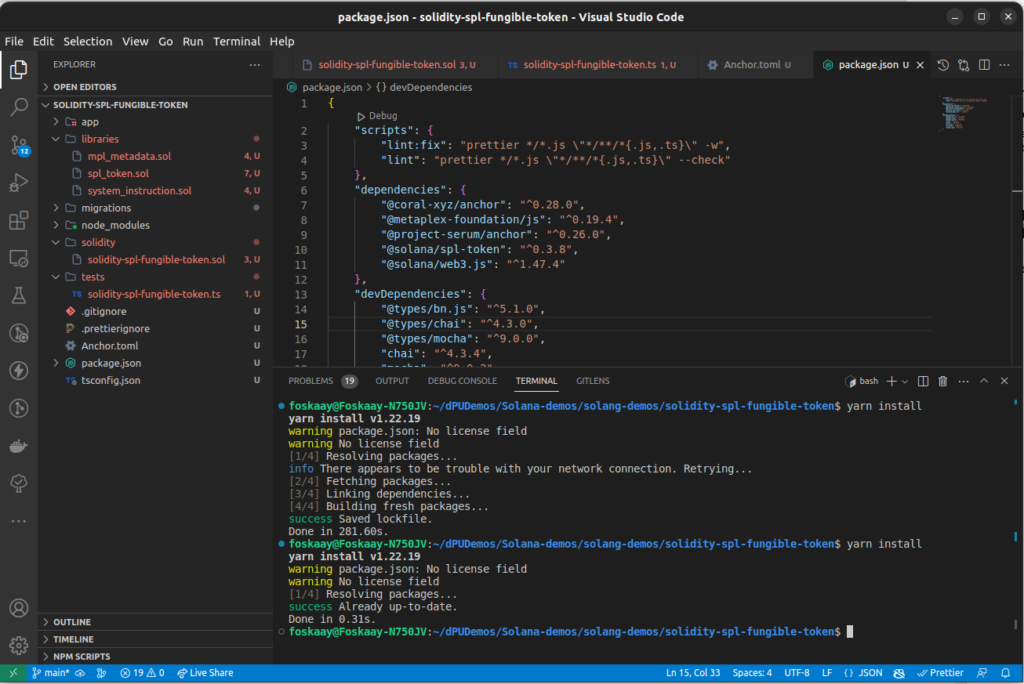
HINT: You can repeat the command twice if any error or just to be sure it installed all the dependencies successfully.
STEP 8: How To Create SPL Token JSON Object To Customize SPL Token Metadata
I decided to add this section to ensure I leave nothing essential untouched in this ultimate guide
What is this SPL token JSON Object for?
SPL token JSON object is used as part of the metadata for your SPL token during deployment to Solana Blockchain
It is very important because it contains your token icon and other on-chain metadata that help people understand what your Fungible SPL token is about once deployed on-chain
To customize it, Let me take you through how I created mine for this guide instead of using generic tokens in the official Solang and Solana example codes which leaves you limited to easy customization of the JSON object
To create an SPL Fungible token JSON object, follow these steps
(1) Create a new file named spl-token.json within our solidity-spl-fungible-token
(2) Copy the code below into it:
solidity-spl-fungible-token/package.json
{
    "name": "Solidity SPL Fungible Token",
    "symbol": "SSPLFT",
    "description": "A fungible Solana SPL token written in Solidity Solang:)",
    "image": "https://w7.pngwing.com/pngs/153/594/png-transparent-solana-coin-sign-icon-shiny-golden-symmetric-geometrical-design.png"
}
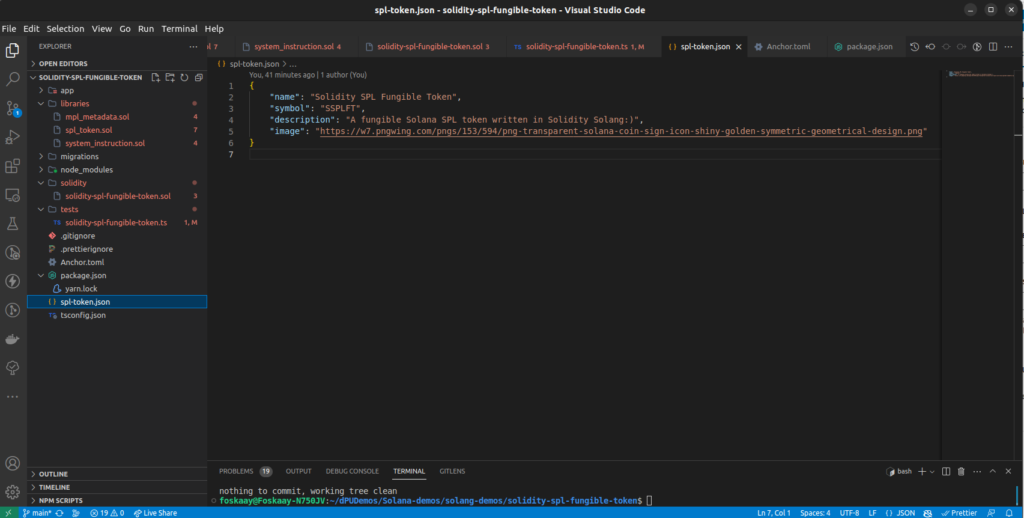
(3) Customize the metadata as desired to suit your token name, and description and also host the PNG transparent image somewhere, then reference it there.
(4) Remember that the same metadata must be used in the solidity-spl-fungible-token.ts file as seen in the screenshot below to prevent conflicting on-chain metadata:
(5) Push your project folder to GitHub
First, create an empty GitHub repo (means when creating it do not mark the initialize README box. leave it unmarked). See the screenshot below for how the empty repo will look when set up and did you noticed no file or folder in it yet.
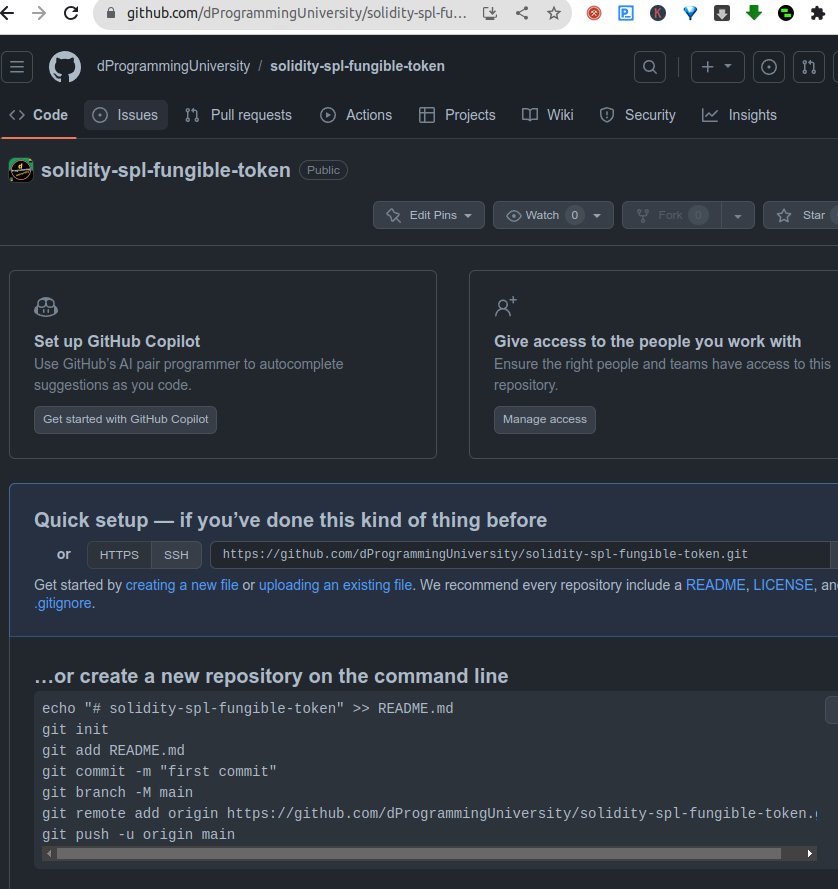
Then add the URL following the guide on the empty repo page to add it as the remote URL inside your Solidity SPL fungible token project
Finally, add to git, make a commit and then push it to GitHub (mean to the empty GitHub repo).
(6) Then go to the GitHub repo in your browser and navigate to the spl-token.json code page.

(7) Click the Raw option at the top.
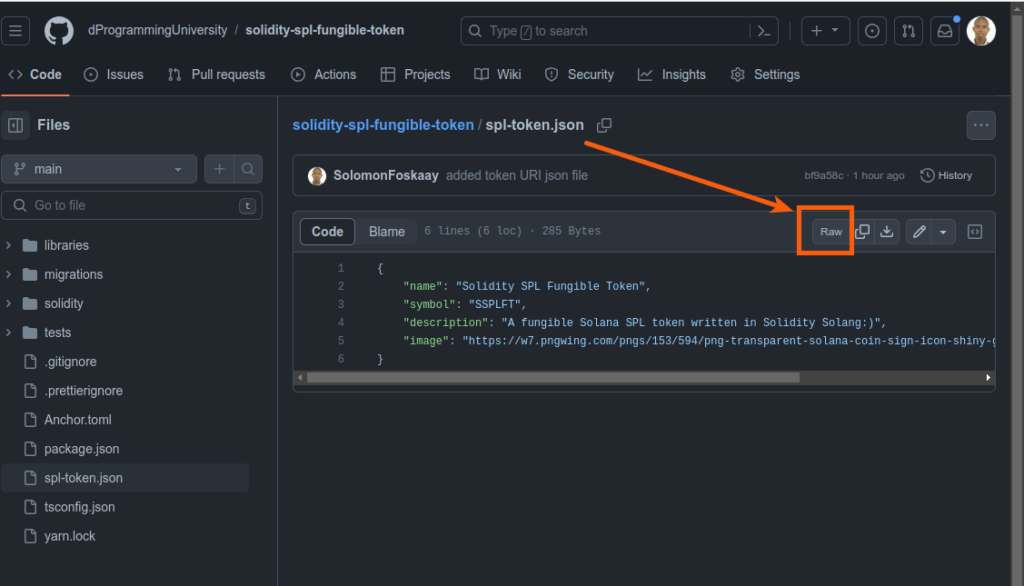
(8) It will reload the page and display it as a raw JSON object like so:

(9) Copy the URL in your browser which will look like this (as pointed out by arrows in the above screenshot):
https://raw.githubusercontent.com/dProgrammingUniversity/solidity-spl-fungible-token/main/spl-token.json
(10) You can then use it to replace the const tokenUri = variable value in the solidity-spl-fungible-token.ts code.
I just thought of slotting this section quickly in🤭
Hopefully, it helps someone customize their SPL token metadata better and is not a distraction to what we are doing (Kindly do let me know✋ in the dedicated #Solana support channel in the dPU discord server)
So, let us get back to the main project steps🚀
STEP 9: Generate Types And IDL For The Solidity Solana Program
To successfully deploy and interact with the Solidity program on Solana via test or frontend, we need to have the Types and IDL.
Don’t worry, we are not writing another code.
Instead, Anchor comes to our rescue to auto-generate both the IDL and Types that match our Solidity smart contract code.
It will also place them right where they are needed for our project automatically in the project root folder named target.
Wondering why this is important?
See the screenshot below.
It shows the code editor complaining about missing module in the test file of our solidity program code due to the missing Types and IDL that this module is referencing not being generated yet.

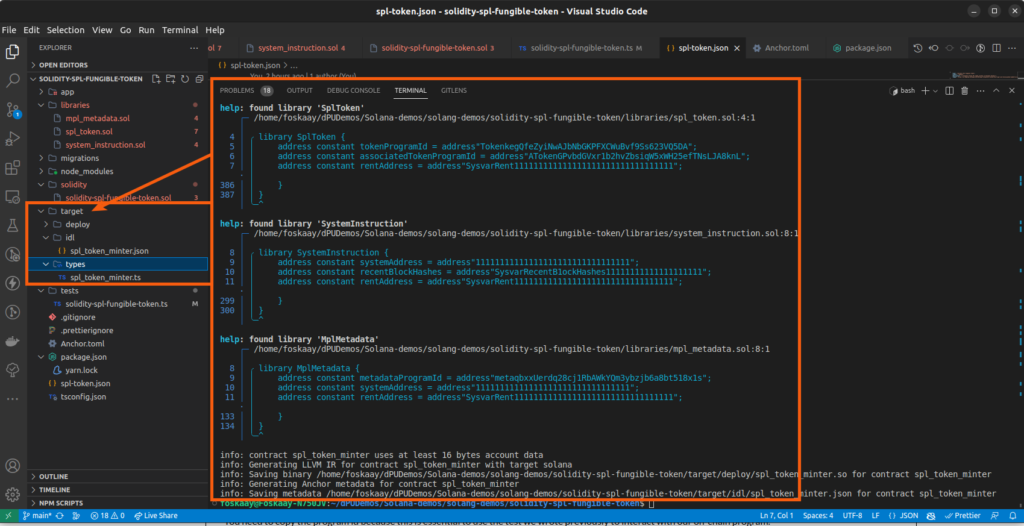
To generate the Types and IDL, run the command:
anchor build
Once built successfully, it will auto-generate the target folder
which will contain the idl and types folder (as seen in the screenshot below)
You will notice that the error will be resolved and the module is now found.
STEP 10: [OPTIONAL] Run Solana Test Validator To Deploy Solidity SPL Token
Considering we are not deploying to the Mainnet for test sake,
There is a need to run a local Devnet validator to facilitate our Solidity contract deployment on Solana.
To do that simply run this command:
solana-test-validator
UPDATE:
I tested STEP 11 skipping this step 10 entirely about 3 times and was still able to deploy successfully to Solana Devnet without actually running any local test validator.
That’s why I struck it out.
You can skip it too and give it a try, if you have errors, then come back and retry it.
After that try redeploying again to see if that fixes your error relating to validator/block hash issues.
STEP 11: Deploy Solidity SPL Fungible Token Program On-Chain
Yeah, it is time to deploy the token program on-chain (it is Devnet) and similar for Mainnet with minor adjustments.
To deploy, you need a token and if you followed the section 2 pre-requisite, I believe you have the following ready:
- Your Solana wallet on your computer
- You have your Solana CLI set to Devnet (that’s ideal or you risk losing money if on Mainnet connected to a wallet where you have real Mainnet SOL in – don’t do that please👌)
- You have some devnet SOL in it (if not use the command:
solana airdrop 4) to claim 4SOL because this will fail to deploy without SOL to pay for it.
If all above is ready, LFG🏃♀️
Then run the command:
anchor deploy
You need to copy the program id because this is essential to use the test we wrote previously to interact with our on-chain program.
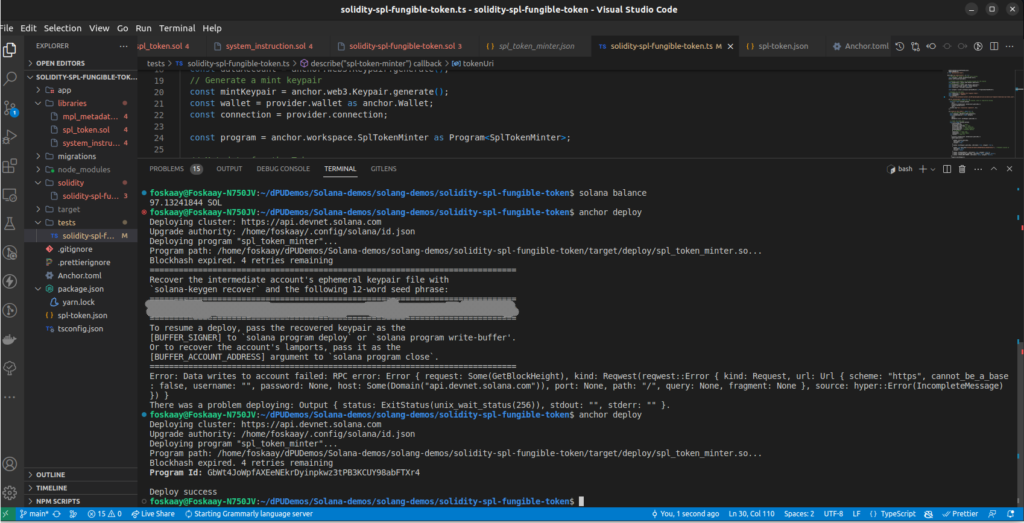
NOTE:
You may need to retry several times if in a location with a slow internet connection (It could be frustrating but don’t give up👍).
As a matter of fact, the screenshot above with the successfully deployed message came after about 3-4 failed deployment attempts as you can see one of the failed attempts was before the last one that eventually deployed successfully.
STEP 12: Fix Program ID In Solidity Solang Smart Contract
Once you have the on-chain program id for your deployed Solidity Solana SPL fungible token above,
Fix it where you have program id in the Solidity code we wrote in previously as seen in the below screenshot
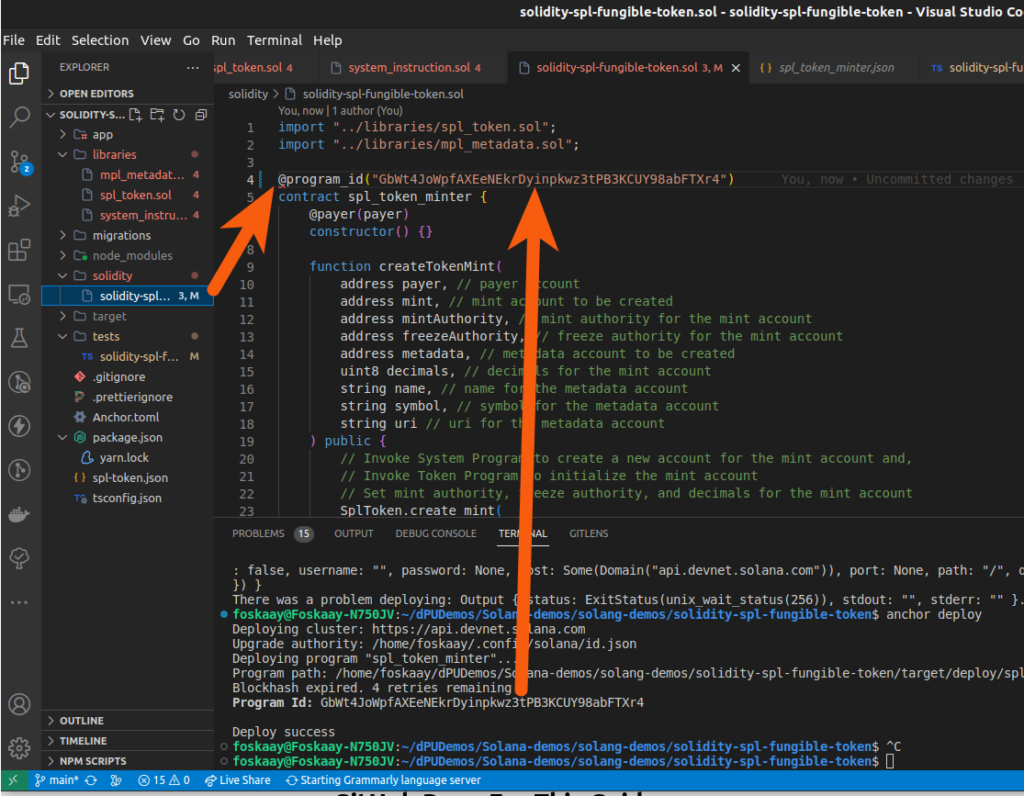
And also fix it in the anchor.toml file where you have the project name.
as seen in the below screenshots

STEP 13: How To Mint Your Custom Solidity SPL Fungible Token
After all the steps were successful, it’s time to finally test by the Solidity SPL minting a token using the test file we wrote earlier.
Normally, you need to rebuild the solidity contract again for the update done to the program id but never mind, Anchor’s test command will do it automatically, re-deploy to the same program id and then run the test too.
So, let us run the command to mint 1,025 SSPLFT:
anchor test

STEP 14: How To Check Solidity SPL Fungible Token On Solana Explorer
After running the test to mint new tokens, let us check the created token on Solana Explorer
Go to https://explorer.solana.com/
Switch from Mainnet to Devnet where we deployed our Solidity SPL Fungible Token Program (smart contract).
Then paste your wallet used for the deployment in the search box
For this guide, it will be:
Scroll to view the token owned by the wallet and It will display the details of the tokens as seen in the screenshots below:

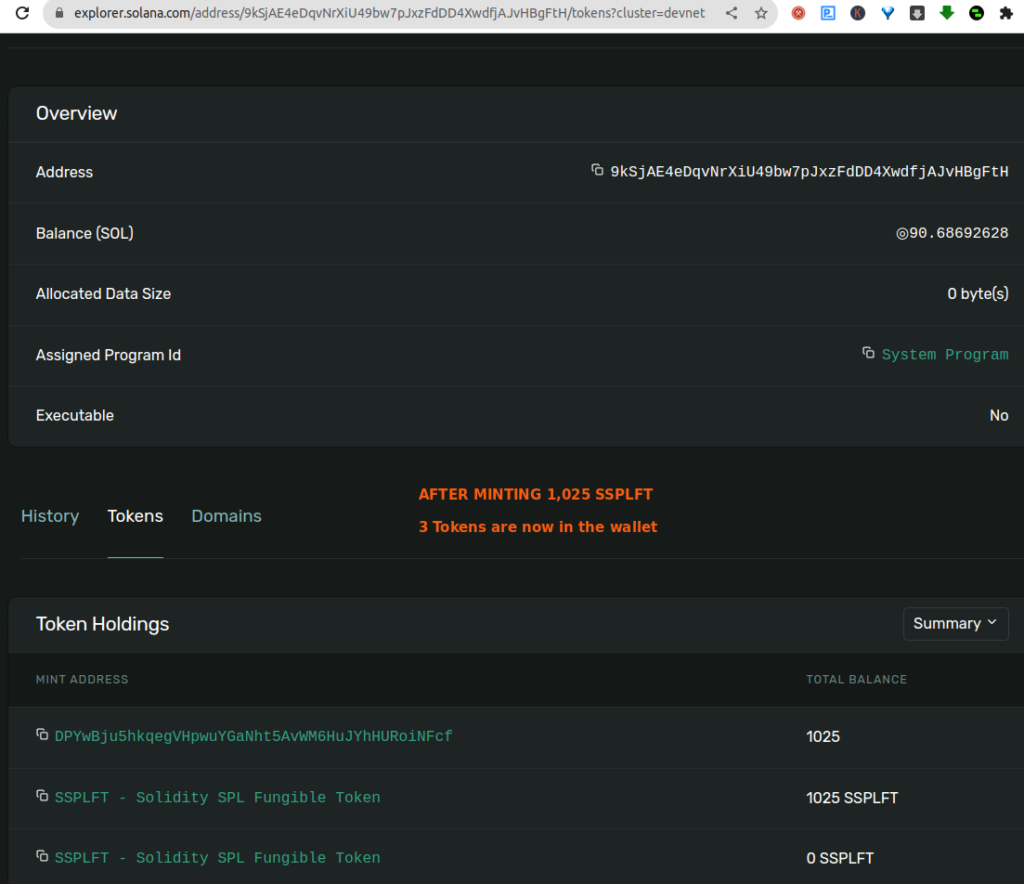
Did you notice in the screenshot above that we have got 2 tokens in the wallet,
After minting, it became 3 tokens (Kindly ignore the SSPLFT token with 0 token, it was a test I did before this guide, focus on the one with 1025SPLFT tokens)
Click on the new minted token and you will see the details page with the images and other custom metadata we create via the spl-tone JSON file.

CONGRATS YOU MADE IT AND FINALLY DEPLOYED A SOLIDITY POWERED SOLANA SPL FUNGIBLE TOKEN WITH CUSTOM DATA.
Next is…
8.0 Build & Deploy Full Stack dApp For Solidity SPL Fungible Token Program🚄
The 3 way to create an SPL fungible token program is via a frontend and that is what this will focus on.
So, watch out for this guide as part of my series of upcoming Solang Solidity for Solana guides and courses.
9.0 GitHub Repo For This Guide📖
You can access all the codes used for this guide in the repo below:
https://github.com/dProgrammingUniversity/solidity-spl-fungible-token
Kindly remember to give it a star🌟 if you found the repo helpful🤩
10.0 WHAT NEXT?🚀
I aim to create helpful Web3/Solana content like this and share them in future guides with you.
Thus, kindly use the social media share button to share this guide if you have found it helpful or will be helpful to some developers in your social media sphere.
Kindly join the dPU discord for support on this content and also to stay in the loop.
Thanks for your time, it’s been a wonderful ride with you all this while.
SOLOMON FOSKAAY
Founder, dProgramming University (dPU).
Twitter: SolomonFoskaay
See you in the next series.
11.0 REFERENCES
SPL vs ERC20 Tokens – Comparing Solana and Ethereum
Are SPL-Token similar to ERC20?
ERC20 vs. TRC20 vs. BSC vs. SPL vs. ERC 721 vs. ERC 1155
Solana Vs Ethereum – What Is the Difference?


2 Comments