Ultimate Guide To Solidity For Solana Programs Development with Solang And Anchor
1.0 Introduction
1.1 Overview Of Guide/Tutorial’s Goal
Helping Ethereum developers transition to Solana with Solidity
In this ultimate guide for Ethereum developers transitioning to Solana, I will take you by hand to guide on how to expand your Solidity programming language knowledge beyond Ethereum and other EVM compatible/equivalent Blockchains like BNB chain, Polygon, Avalanche etc to Non-EVM Blockchain specifically Solana.
Yeah at the end of this guide, you will go from zero knowledge of Solana Development to deploying your first Program (Smart Contract) on Solana Blockchain with Solidity (Not Rust) with minor adjustments using Solang and Anchor.
Don’t worry if you have never heard of any or some of those aforementioned tech stacks before (nothing to fear 😀). I will cover them step by step with you all the way.
So, what are you waiting for? Grab your Solidity Dev hat and let Dev away (lol 🤨).
Meanwhile, even if you have never coded in Solidity before and just starting entirely. You are also covered under the dedicated Intro to Solidity section.
1.2 Introduction to Solana and Its Appeal to Developers
Solana is among to top Blockchains in the Web3 ecosystem by market capitalization but is not usually the go-to for new developers entering the Blockchain development space due to that being overshadowed by Ethereum (Mother of all smart contract blockchains).
It is a smart and timely move by Solana team to have enabled Solidity, the programming language of Ethereum developers to be used to develop smart contracts on Solana as well.
– Solomon Foskaay, dProgramming University (dPU)
Solana is fast, cheap and more scalable in terms of handling huge transactions than Ethereum (Though with some ups and downs but seems been stabilized and gradually gotten better than before). That’s like comparing 65,000TPS (Solana) to 30 TPS (Ethereum) based on their transaction processing capabilities without even factoring in smart contracts processing which is usually more computationally demanding and slower to process – it is clear Solana has the win over Ethereum in that regard.
Thus, it is a no-brainer that more Ethereum developers will start flocking to test out Solana and this is the main reason I put this guide together to be the starting point for such Eth developers.
1.3 Stuck? Get Support✋
I understand based on experience with developers that things can always break or get difficult to figure out, especially for beginners.
That is why you can join Discord below to get support if get stuck.
Join dProgrammingUniversity Discord Server – I have created a dedicated channel #Solana (under the BLOCKCHAINS category) to give support to my Solana developer content like this guide. So, feel free to ask questions in there if stuck with this guide.
Follow me on Twitter
DISCLOSURE:
We may hold, invest, trade or receive rewards/grants/bounty/tokens from reviewed/discussed web3 projects/affiliates (before, during or after this content was published).
DISCLAIMER:
All our contents at dProgramming University are for educational purposes only and do not constitute financial, trading, investment or development advice.
Please do your own research (DYOR).
By using or following the whole or part of this content, you agree that we are not liable for any losses that you may suffer thereafter.
2.0 Solidity Basics
Let us take a quick dive into Solidity.
2.1 What is Solidity Explained for Beginners
Solidity is a high-level statically-typed programming language used to write smart contracts on Ethereum Blockchain and other EVM-compatible Blockchains.
It is the:
1. First smart contract programming language widely used by Ethereum developers and other EVM blockchains.
2. Due to being a high-level language, it requires being compiled to byte codes to be processed by EVM before it can be executed on Ethereum
3. It is the most used and most popular programming language of choice for Web3/Blockchain developers
2.2 Key Differences Between Ethereum and Solana Smart Contract Development with Solidity
Even though the core of the Solidity programming language remains the same on Ethereum or on Solana, using Solidity on Solana requires a bit of tweaking to make it work with Solana Blockchain and can’t be used 100% copy-pasted directly from Ethereum.
Spoiler alert for copy-past Solidity Ethereum developers🤭🤔😜
You will get to learn the different adjustments needed for them as we move on in this guide. I just decided to pinpoint this here for you to keep in mind as we move further.
2.3 Solidity Tools and Resources for Solana Development
There are a lot of existing tools to help you get better at Solidity as a Blockchain developer.
I will only mention 4 here:
- Free Solidity For Beginners Course – Yeah, as promised earlier if you are totally new to web3 and Blockchain development. I have a full smart contract development with Solidity course for you. Don’t be scared🫣, it is simplified both in video and exercises and interestingly it is 100% free🤑 to access. Interested enrol for it here Smart Contract Development With Solidity For Beginners Course
- Solidity Documentation – Take a little time to check out the official Solidity documentation
- Solang – we will get into this fully below.
- Anchor – we use it later in this guide as well
3.0 Exploring Solang: The Solidity Compiler for Solana
Yeah, let us do a bit of digging into Solang and why it is needed for Solidity on Solana.
Watch me explain what is Solang in detail in this video:
3.1 What is Solang and Its Role in Solana Development
Solang is a Solidity compiler used to compile Solidity programming language code to BPF or SBF bytecode that can run on Solana Blockchain.
To simplify this, have decided to create a diagram below and hope that can help understand it much deeper and better than a word would.
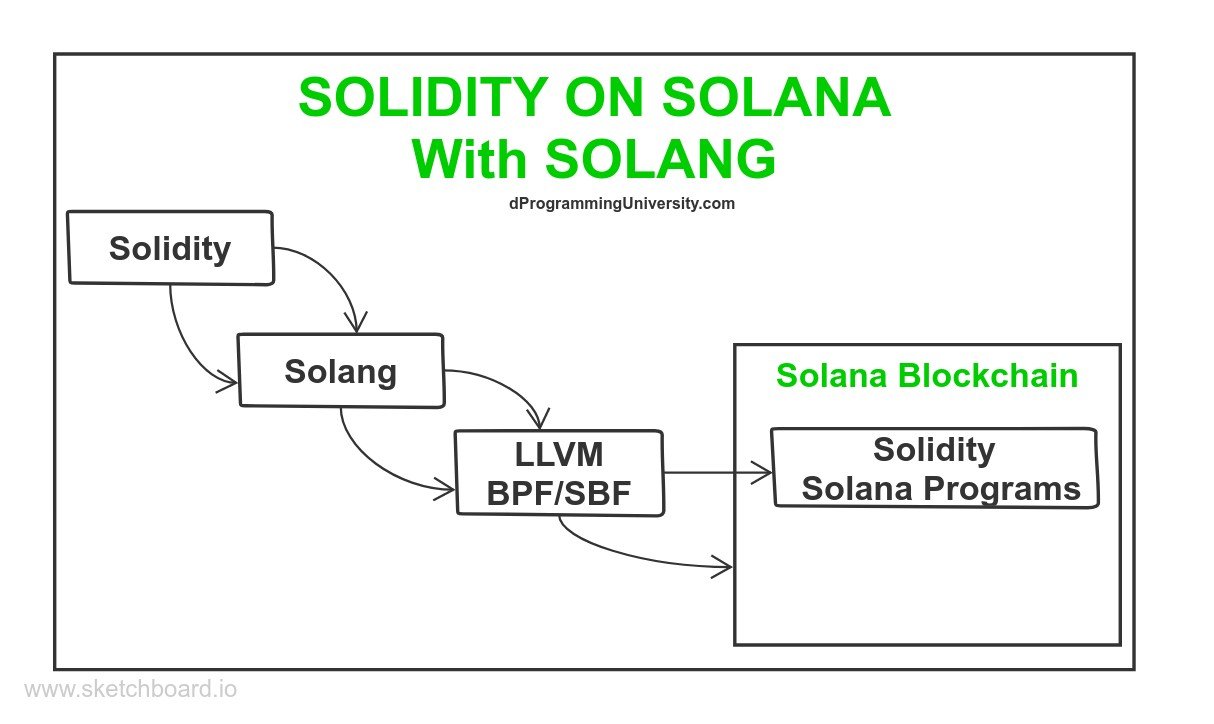
The above diagram shows a high-level simplified process for a Solana on-chain program which gives the opportunity to develop on Solana in any programming language as long as there is a compiler that can accurately compile the programming language down to BPF or SBF bytecode via LLVM to make it processable by Solana Blockchain.
BPF means Barkley Packet Filter.
Summary of the step are:
1. Solidity programming language is used to write a smart contract
2. Solidity smart contract compiled by Solang into BPF or SBF byte code via LLVM
3. BPF or SBF byte code is deployed to Solana Blockchain as a Solana program
4. Solidity Solana program is now executed within Solana Blockchain.
Solana SBF isn't the same as the dysfunctioned FTX exchange founder, though it sounds the same🤔.
SBF Program actually means Solana Bytecode Format, a successor of BPF's eBPF.
Getting more confused? Nope - This WTF is SBFv2 and how Solana runs arbitrary code on-chain got your back👍

Side Note:
Solana is gradually moving away from pure BPF to its eBPF derivatives which is powering the SBF. That means by the time you may be reading this article in the future, SBF may have totally replace BPF on the surface entirely.
3.2 Benefits and Advantages of Using Solang with Solidity For Solana Programs Development
Considering the previous explanation of what Solang does. It is a no-brainer to understand how crucial and important Solang is to the achievement of having Solidity run smoothly on Solana Blockchain similar to Ethereum and other EVM Blockchains.
Below are some benefits and advantages of using Solang to compile your Solidity smart contract for deployment on the Solana blockchain:
- Compile Solidity code to LLVM BPF or SBF bytecode to run on Solana Blockchain
- Compatible with Solidity version 8
- Enhance Solidity smart contract with CPI
- Easily build native Solana programs similar to using Rust or other Solana-compatible programming languages like C, C++, Python etc.
- Works with existing Solana development tools and frameworks like Anchor to easily build and deploy Solidity-based Solana programs
CPI means Cross Program Invocation in Solana, which refers to giving a Solana program capability to call and interact with other Solana on-chain programs easily.
3.3 Solang Solidity For Solana Vs Solidity For Ethereum
As aforementioned, I promised under the Solidity section to share some differences between Solidity on Solana and Solidity on Ethereum/EVM Blockchains.
One major cause of why Solidity purely as known on Ethereum isn’t possible to just port 100% to Solana comes down to one main thing,
The main difference between Ethereum Blockchain and Solana Blockchain is the Blockchains Architecture.
Yeah, Ethereum and Solana may be Blockchain but that’s where it ends, try checking under the hood and you will soon realise that they are not of the same architecture purposely by design. This single factor is the obstacle that made it a not easy feast to have Solidity run natively on Solana.
Let us see some differences between Solidity for Ethereum and Solidity for Solana below:
- Ethereum wallet is usually 40 characters + 0x prefix while Solana wallet address could vary like 44 characters without fixed prefix.
- Solidity on Ethereum recognizes wallet address 40 character format but is not valid in Solang Solidity for Solana
- Solidity for Ethereum has a function for gas but is not available in Solidity for Solana.
- Solidity for Ethereum has a “msg.sender” (sender’s wallet) but it is not available in Solidity for Solana
- Revert and error messages present in Solidity for Ethereum are not available to Solang Solidity for Solana
That’s just a few and you may check out the full list of Solang Solidity incompatibilities on Ethereum vs on Solana here.
4.0 Understanding the Solana Account Model for Solidity Ethereum Developers
As aforementioned, the Blockchain architectural difference between Ethereum and Solana comes in different aspects but the most notable of it all that is essential for Ethereum developers transitioning to Solana development is the “Account Model” used by Solana Blockchain.
So, let us dive into it in detail as simplified as I can to get you up to speed.
If you prefer video, then watch me explain Solana Account Model in the video below:
4.1 Overview of the Solana Account Model
The Solana account model is a very deep and broad topic but a must for developers to understand because it determines how your Solana program will be handled after being deployed on-chain.
Therefore, am currently working on a detailed guide separately for it and would link to it here later when done. But for now, let me give you a briefing on it so we can move on.
4.2 How Solana Account Model Differs from Ethereum Account Model
The Solana account model involves how data and codes are stored and executed on the Blockchain. Solana Blockchain typically has 2 types of accounts just like Ethereum. But, that is on the surface. At the core, they behave differently from each other as seen below:
Solana Account Types :
- Executable Account
- Non-Executable Account
Let us see this in the diagram below to understand better:
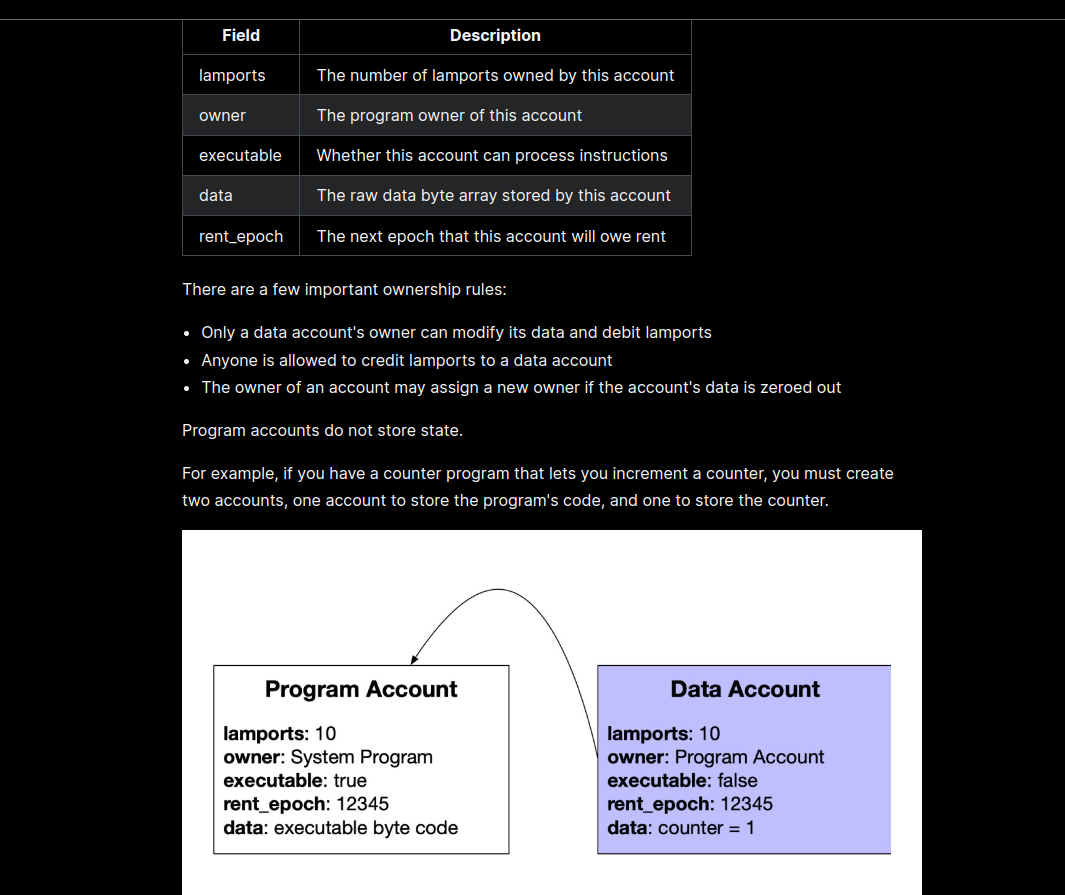
From the above diagram we can derive the following explanation and summary:
Solana Executable Account can store data but it is limited to smart contract bytecodes only. It does not store its state data and thus rely on the non-executable account to keep its state data.
WHILE
Solana Non-Executable Account can as well store data but does not store executable programs bytecodes like the executable account. In addition, the executable account need it to help store its state data.
Ethereum Account Model:
- Ethereum Executable Account – Smart contract account: Store bytecode and its state data not shared with other accounts like Solana executable account.
- Ethereum Non-Executable Account – Mainly serves as a wallet for transactions and more but has nothing to do with storing data for executable accounts like it does on Solana. It is not meant to store data as well. All data needed by the executable account state are stored already in the smart contract itself.
As I said previously, there is more to the Solana account model than can just dive deep in here but the basic above is okay to give you clarity that, unlike Ethereum which has 2 types as well, they are different in operation and execution.
4.3 How Solang Integrates Solidity with the Solana Account Model
Considering the fact that these two Blockchains have different account model architectures. It is so difficult to have Solidity code which was actually built for Ethereum (and has all its account models factored in, in its design) deployed as-is to Solana.
Solang integrates Solidity with the Solana account model by adjusting some code patterns and incorporating new ones not found in vanilla Solidity to achieve this herculean task.
No wonder, one of the Solang team lead in an interview I watched said it took them years of consistent development and rigorous testing and auditing to finally come to this stage of getting Solang Solidity work seamlessly as a native on-chain program on Solana Blockchain.
– Solomon Foskaay, dProgramming University (dPU)
There is a lot of room to grow and looking forward to future improvement on Solang Solidity for Solana development.
5.0 Introduction To Solana Programs
I have been interchangeably using the term “Solana Programs” and “Solidity Smart Contract”.
Let us clarify things a bit before we move on in this section.
Watch the video explaining what are Solana programs below:
5.1 What Are Solana Programs (Smart Contracts)
Solana programs are codes written in programming languages like Rust, C, Python and now Solidity that are deployed as an on-chain executable bytecode to Solana Blockchain.
Simply put Solana Program is the same as saying Ethereum Smart Contract. So, the Solidity smart contract on Ethereum is referred to as the Solidity program on Solana.
5.2 Comparing Ethereum Smart Contract Vs Solana Programs (Smart Contract) Architecture
I won’t be going in-depth here again because we have looked at their differences from different points previously.
The only essential thing I will remind you of as a Solidity developer on Ethereum in transitioning process to Solana is to always ensure you keep in mind the incompatibilities that still exist between Solidity on both platforms to ensure your smart contract is secure and not exposed to exploit.
It is worth deep diving into Solana programs security as well which is not covered in this guide but may consider looking into it in future articles.
6.0 Anchor Framework
As promised earlier that I will look into Anchor and why it’s an essential tool to add to your toolbox as a Solidity developer for Solana Blockchain.
Now it is time to have a brief discussion about it.
Shall we?🤔
I will prefer video format, check out the Anchor framework video below:
6.1 What is Anchor and Its Role in Solana Development
Anchor is a framework for building and deploying Solana programs (smart contracts) on Solana Blockchain with ease using a CLI (Command Line Interface) tool suite.
When you say a framework, it simply means it is not the actual programming language, but a battle-tested structured layer on it to make building with the actual underlaying programming language much easier, following a set of tested and proven rules. Think of React on Javascript
– Solomon Foskaay, dProgramming University (dPU)
6.2 Leveraging Anchor and Solang for Solidity-based Solana Programs
Solang as a Solidity compiler for Solana can be used directly when building and deploying your Solidity program on Solana but you might not want to go that route when you have a helping hand, Anchor help extract away a lot of things making it much easier.
As we progress to the actual building and deployment section of this guide, we will surely explore how to use Anchor, including setting it up and more.
Enough of theory🫣, let us get into the practical below.👇
7.0 Setting Up Solang Solidity And Solana Development Environment
Yeah, let us get our hands directly into Solidity code for Solana powered by Solang and Anchor.
Windows users – it is recommended to have Windows Subsystem for Linux (WSL) installed and completely setup to avoid bottleneck issues following this Solana development environment setup to develop a smart contract with Solidity using Solang and Anchor framework.
Watch the video on how to set up the Solana development environment for Solang Solidity development on Solana Blockchain below:
7.1 Installing and Configuring Rust For Solidity on Solana Development (Linux, MacOS & Windows)
Don’t be scared😱😜, we are actually not going to be developing or writing any Rust programming language code.
It is just an essential pre-requisite because Rust powers the core of other tools like Anchor that will be used and even Solana itself.
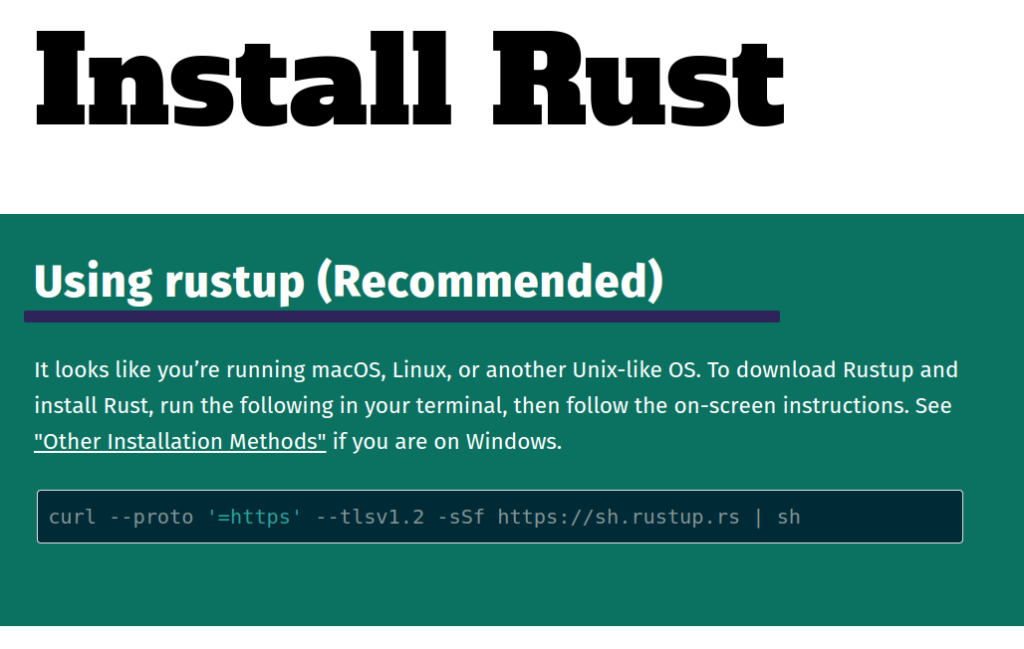
To install Rust for Windows, Linux or MacOS, kindly follow the official Rust installation instruction here
7.2 Installing and Configuring Node.js For Solidity on Solana Development (Linux, MacOS & Windows)
We need Node.js alongside the Anchor setup.
So let’s fix that first if you don’t have it installed already.

NOTE: It is recommended to install the LTS (Long Time Support) version over the current version as seen in the above screenshot.
To install Node.js for Windows, Linux or MacOS, kindly follow the official Node.js installation instruction here
7.3.0 Installing and Configuring Solana Tools Suite For Solidity on Solana Development (Linux, MacOS & Windows)
Let’s set up and install Solana Tools Suite.
This contains multiple tools essential for Solana program development. We are concerned about 2 major tools in it which are:
- Solana CLI
- Solang CLI
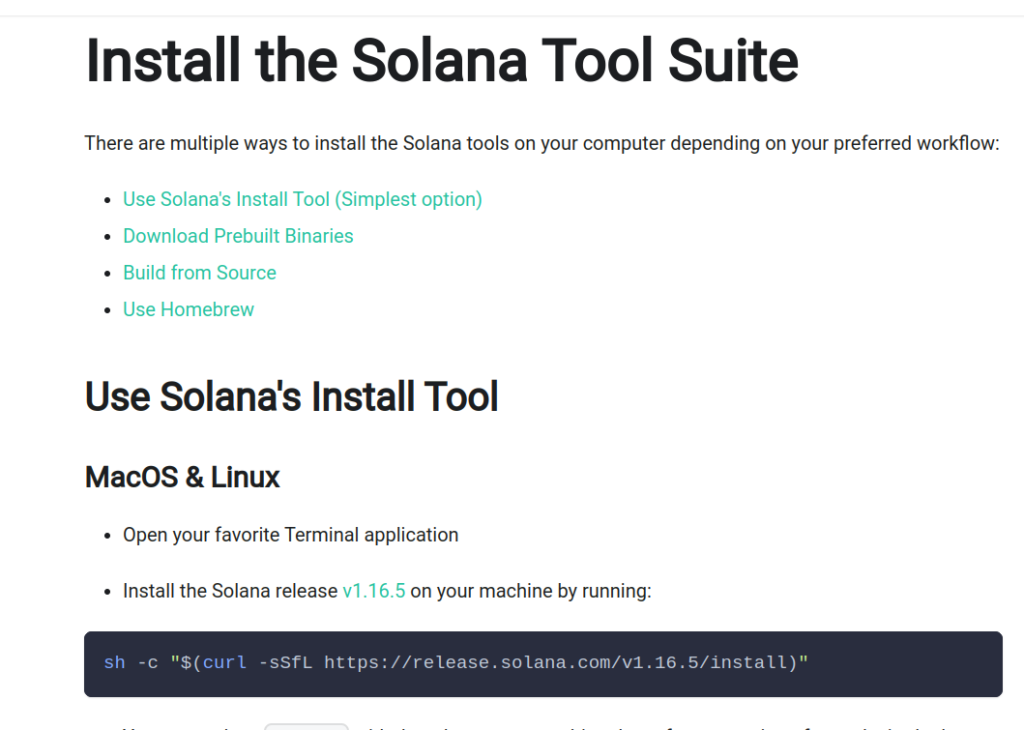
Follow this official Solana Tools Suite installation guide.
7.3.1 Differences Between Solana Mainnet, Devnet and Testnet
Considering as a Solidity Ethereum developer, you are already familiar with the concept of Mainet and Testnet. In Solana, you may initially get a bit confused discovering 3 existed instead of 2 ( I was too at my first encounter🫣🫣🫣).
Thus, let me quickly clarify their differences for you to resolve any confusion.
Solana Blockchain Cluster Types:
1. Mainnet: The actual real Solana Blockchain with real SOL and everything cost real money to deploy and interact with Solana programs.
Solana Mainnet state (register) is immutable, meaning it can not be reset/wiped out (yeah, you can not lose all you have deployed there in future).
2. Devnet: This is where you will spend most of your time when finally transitioned to building on Solana with Solidity. It is for developers to test their Solana programs before deploying them on the Mainnet. No real money spent, SOL is free via airdrop (will guide you on how to get it below).
Solana Devnet state (register) is mutable, meaning it can be reset/wiped out (meaning you can lose all you have deployed there someday/any day).
3. Testnet: This is similar to Devnet except for the fact that it is only been used by Solana core developers. You will only need to interact with this if you are dealing with Solana protocol directly. No real money spent, SOL is free via airdrop.
Solana Testnet state (register) is mutable, meaning it can be reset/wiped out (meaning you can lose all you have deployed there someday/any day – that is even if you will ever deploy anything in there in the first place😅🤣😂).
7.3.2 How To Create a Wallet Account to Use for Future Deployment on Solana Devnet
After installing Solana Tool Suite which has the (Solana CLI), let’s confirm if the installation was successful with the following command:
solana --version
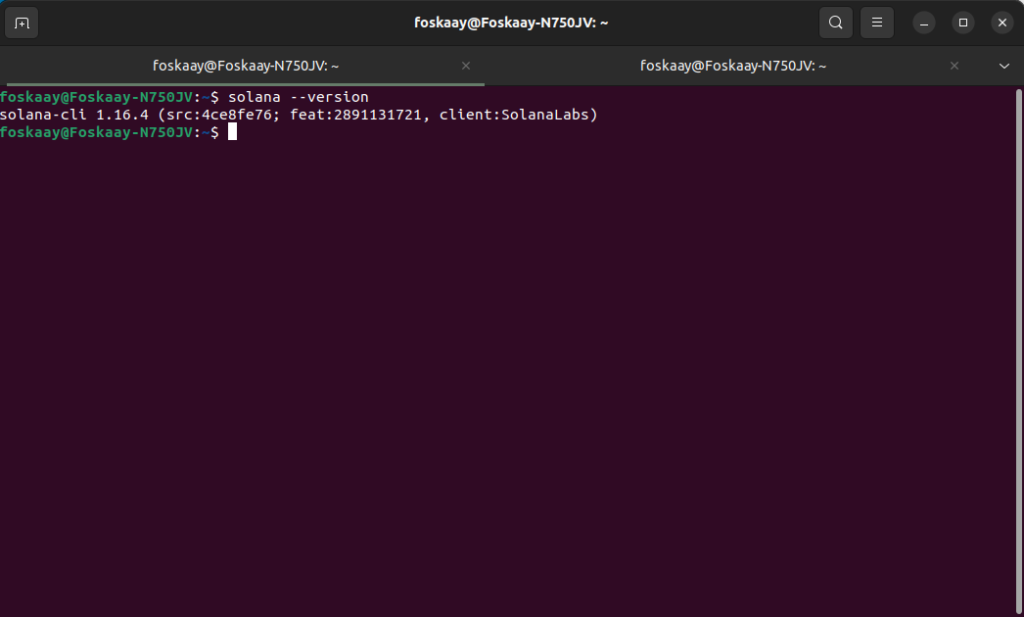
The next step is to create a Solana wallet without which we can’t deploy and manage our Solana programs on-chain on Mainnet or Devnet.
To create a Solana wallet run the following command in your terminal:
solana-keygen new
Note: Copy-paste your generated wallet public key and the seed phrase for your future use.
Meanwhile, avoid sharing with others if you plan to keep some real SOL in it for Mainnet deployment down the line.
7.3.3 How To Request for Solana “Free SOL” Airdrop For Development on Solana Devnet
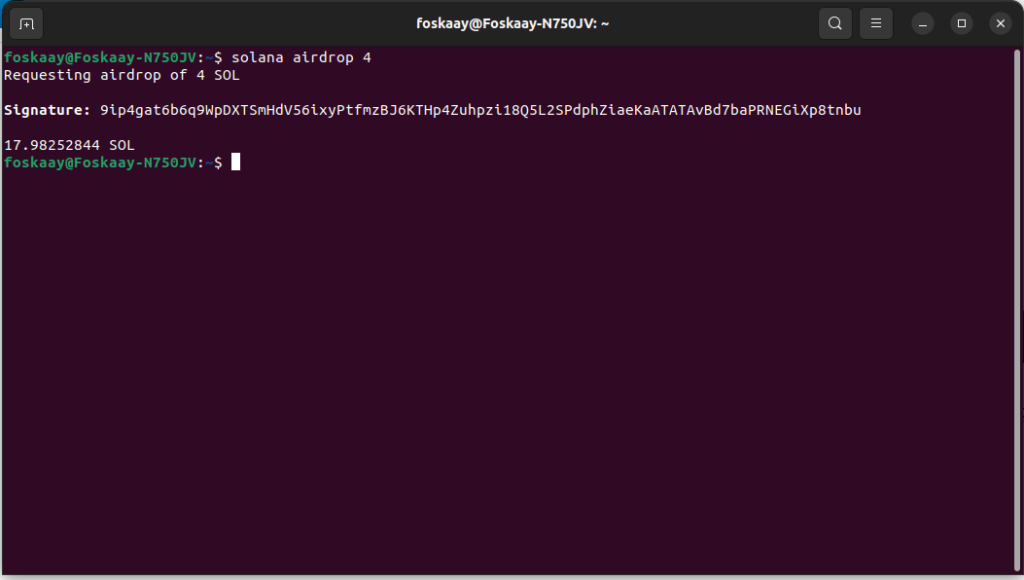
Now that we have the Solana CLI successfully confirmed working, you need to have some SOL to pay for transactions either on Mainnet or Devnet (Mainnet cost real money, Devnet is free non-real money).
To get a free SOL airdrop, run the following command:
solana airdrop 4
7.4 Installing and Configuring Solang For Solidity on Solana Development (Linux, MacOS & Windows)
Installing Solang is straightforward and you don’t need to lift your finger any longer.
Why?
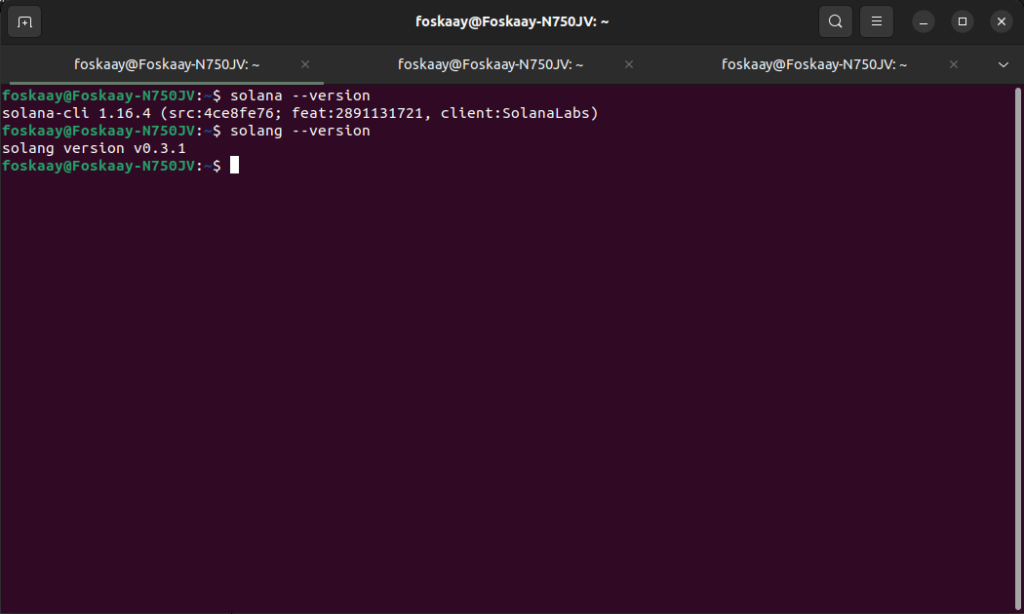
Because the latest Solang version is pre-bundled with the Solana Tools Suite previously installed and should now work fine alongside Solana CLI.
You can confirm Solang successful installation with this command
solang --version
7.5 Installing and Configuring Anchor Framework For Solidity on Solana Development (Linux, MacOS & Windows)
It is time to install the Anchor framework.
To install the Anchor framework for Windows, Linux or MacOS, kindly follow the official Anchor installation instruction here
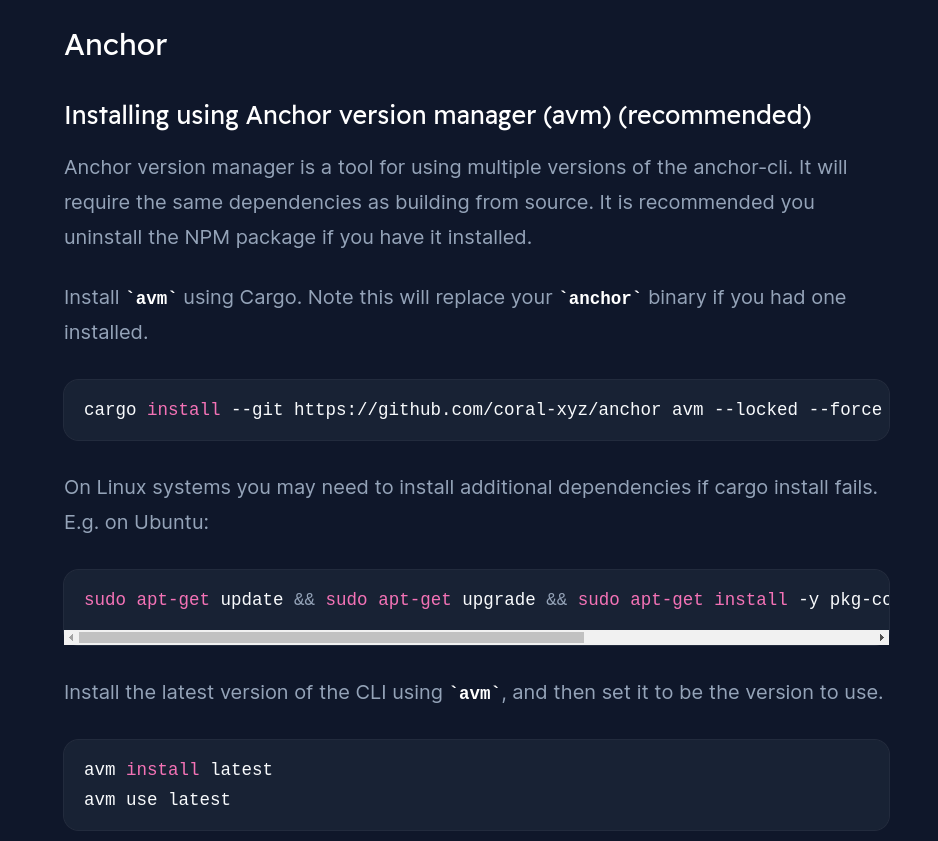
NOTE: Optionally, I prefer to first install AVM (Anchor Version Manager similar to Node Version Manager – NVM). Then use it to install and manage multiple Anchor CLI installations based on individual project demand. But, as said, it’s totally optional, you can just install Anchor CLI directly with AVM.
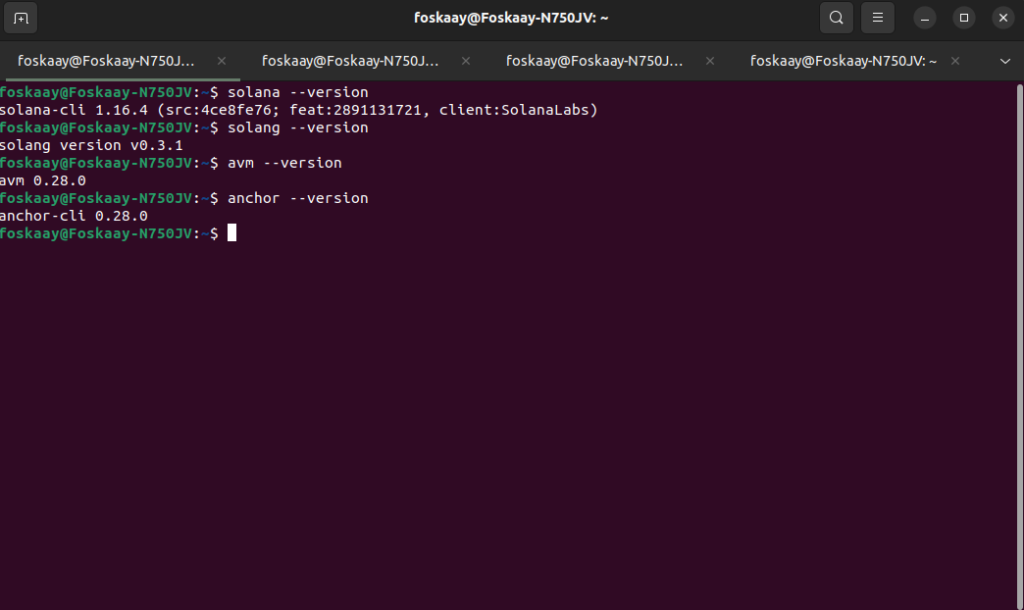
Confirm AVM and Anchor CLI installation by running the command below:
avm --version
anchor --version
7.6 Installing and Configuring Code Editor (VSCode) For Solidity on Solana Development (Linux, MacOS & Windows)
This is absolutely optional, you can use any code editor of your choice but for the sake of this guide, am using VSCode and will only guide on it.
To install the VSCode editor for Windows, Linux or MacOS, kindly follow the official VSCode installation instruction here.
7.7 Installing and Configuring Solang VSCode Extension For Solidity on Solana Development (Linux, MacOS & Windows)
Just before you go to actually writing Solidity code for the Solana program, let’s install one more thing, the Solang VS Code extension to help with Solang Solidity syntax highlighting and a lot more.
Open VSCode after installation above.
- Click on the Extention icon
- Then search for “Solang”
- Install the Solang extension as seen below screenshot:

8.0 Building and Deploying Your First Solidity Smart Contract on Solana
Yeah, the part you have most likely been waiting excitedly for is here. Let’s get into building and deploying your first Solana program with Solidity, Solang and Anchor.
You can follow me step-by-step in this video to build and deploy your first Solang Solidity Solana program:
8.1 Initialize Solang Solidity Solana Program Folder via Anchor
Let’s initialize Anchor powered Solidity smart contract folder.
NOTE: I am using Linux (Ubuntu) for this guide but similar if you have WSL on Windows. It should also work fine with MacOS users.
STEP 1: Create a folder and open the folder in your Terminal like below.
I created the “solang-demos” folder, right-clicked it and selected “Open in Terminal” to see below:

STEP 2: Initialize with Anchor
You can run the following command to initialize the Anchor folder:
anchor init hello-solana-world --solidity
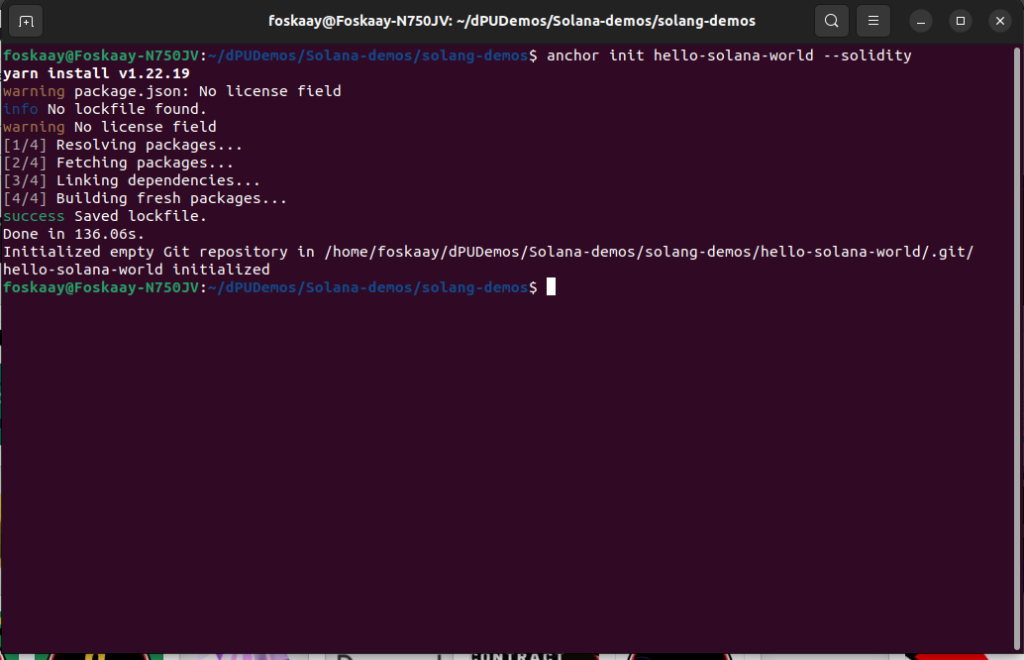
NOTE: Be patient as it could typically take 1-3minutes or more depending on your internet connection speed because it is setting up a lot of things in there including Yarn, Typescript, Solidity, Solang etc.
Aside, from the above, it will also auto-initialize the whole folder as an empty git repo. You will discover how this help makes pushing to GitHub later a breeze.
STEP 3: Open the folder in VSCode (or your preferred code editor)
You can run shortcut code from the terminal already in use for the folder as follows:
cd hello-solana-world
code .

8.2 Solidity Solana on-chain Programs Folder Overview
Before we continue, let’s get familiar with the Solidity-based Solana program folder setup by Anchor.
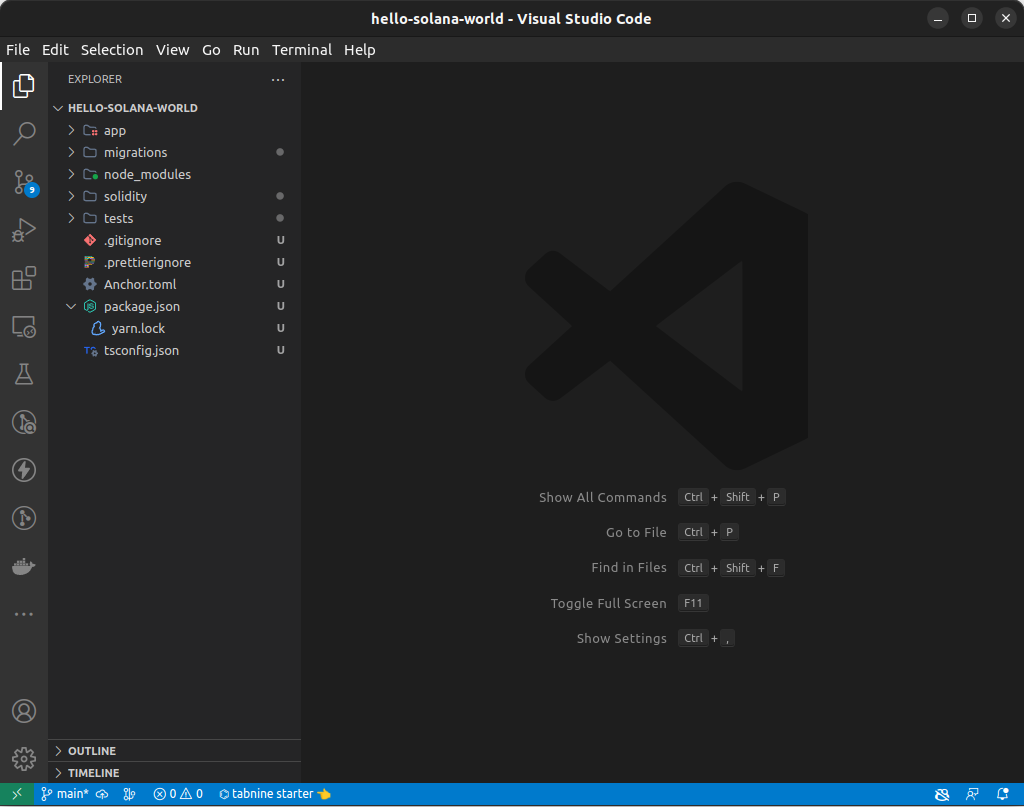
Folder breakdown (explained essential one only):
- app: folder to keep frontend code if plan to build frontend and host it in same repo later
- migrations: kindly ignore
- node_modules: kindly ignore
- solidity: actual folder that contains the Solidity “.sol” smart contract file (and it where you will write your Solidity for Solana programs code)
- tests: test folder which is essential to have a feel how your contract perform as expected or not when interacted with. This is essential to help build, deploy and test the Solidity Solana program.
- .gitignore: this is to ignore things you won’t like to commit and push to GitHub repo later
- .prettierignore: kindly ignore
- anchor.toml: this is similar to package.json if you have ever worked with a node.js app before. it is useful to track things like dependencies your project runs/uses and other essential Anchor configurations. To read and work with this file easily in VSCode, you can search for toml VScode extension and install it.
- package.json: kindly ignore
- tsconfig.json: kindly ignore
In total, you have about 5 folders and files to work with moving forward.
Before exploring the starter code we are working on provided inside the “solidity” folder, lets push this folder to GitHub.
8.3 Setup and push to Github
To push to GitHub, you can follow the steps below.
Meanwhile, if you want to have the repo for this guide check it here
– Hello-Solana-World Solidity Solana program repo
STEP 4: Setup GitHub repo and push
1. Go to GitHub and create an empty repo (mean when setting it up don’t initialize README.md or any file/folder in it) – name it the same as the Anchor project we initialized.
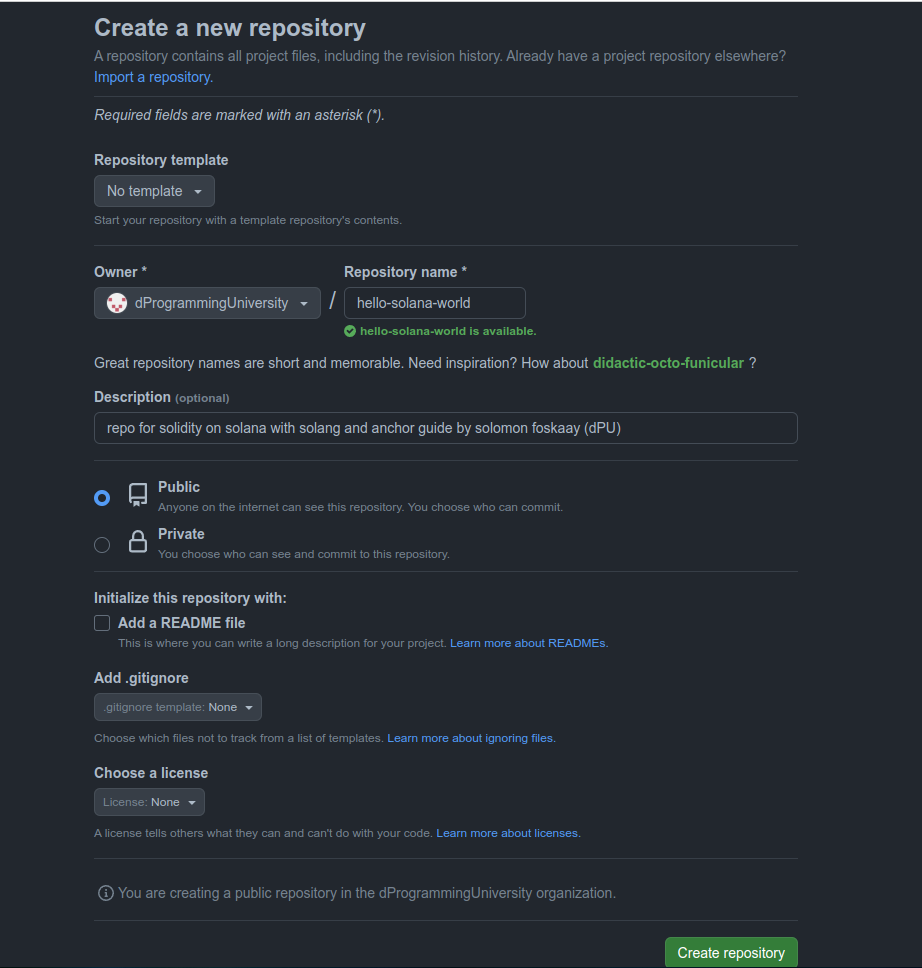
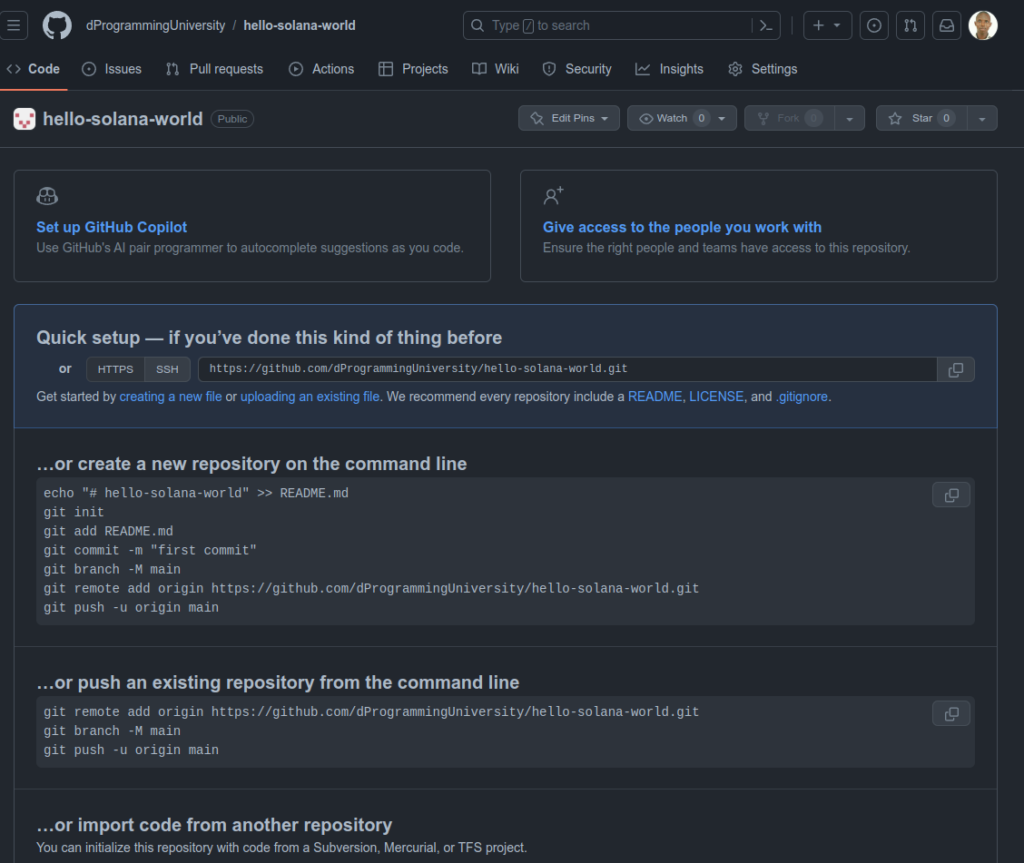
2. Copy the repo URL and assign it as the remote URL in the “hello-solana-world” folder on your computer.

3. Add and commit your Anchor folder
4. Finally, push it to GitHub – that cool – job weldone👏👍
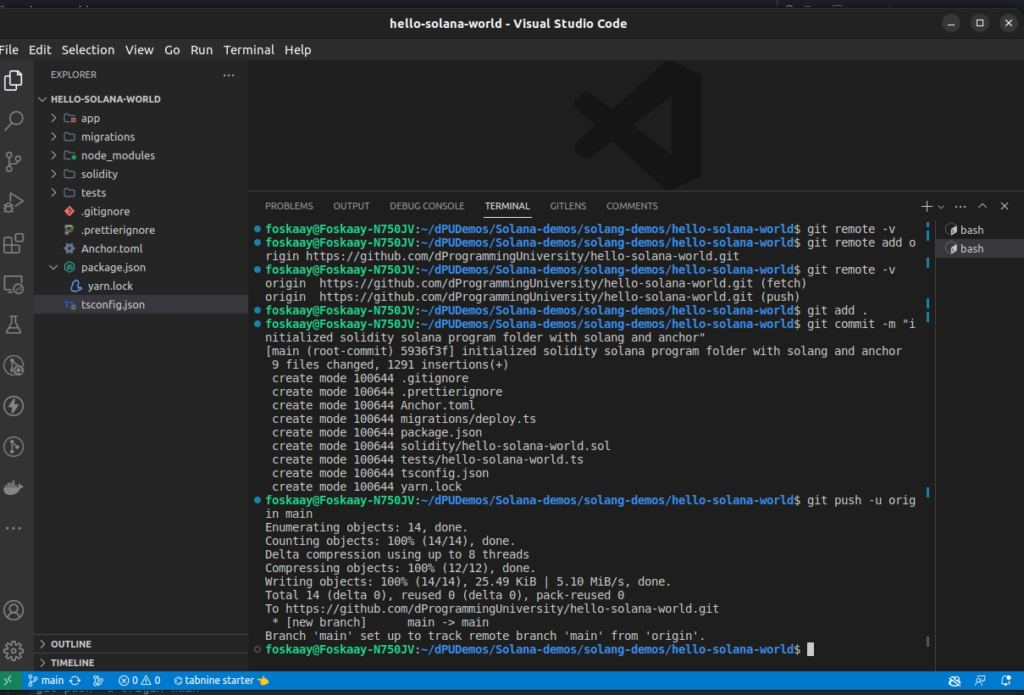
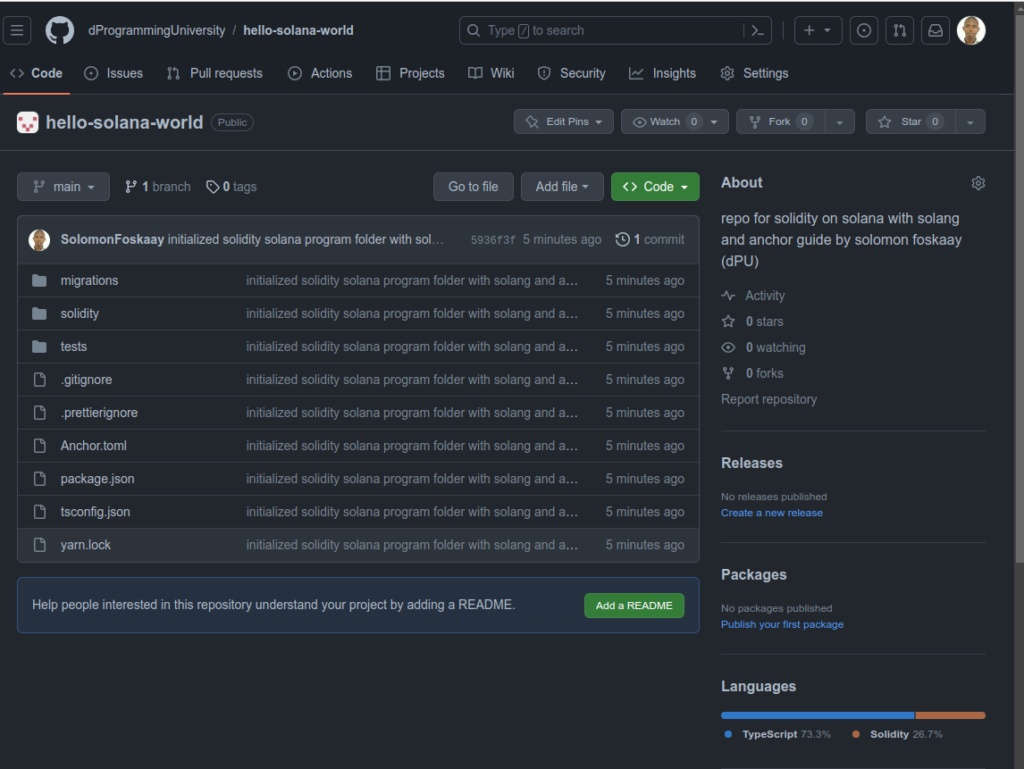
8.4 Deploy your Solidity Solana on-chain program
Yeah, let’s get back to the Solidity smart contract and get it ready for deployment and testing.
But before that let us check in the “solidity” folder.
Inside you will see “hello-solana-world.sol“.
If you have been working with Solana on Ethereum earlier then it becomes clear, this is actually a Solidity smart contract with some adjustments to accommodate the Solana account model and architecture not found on Ethereum.
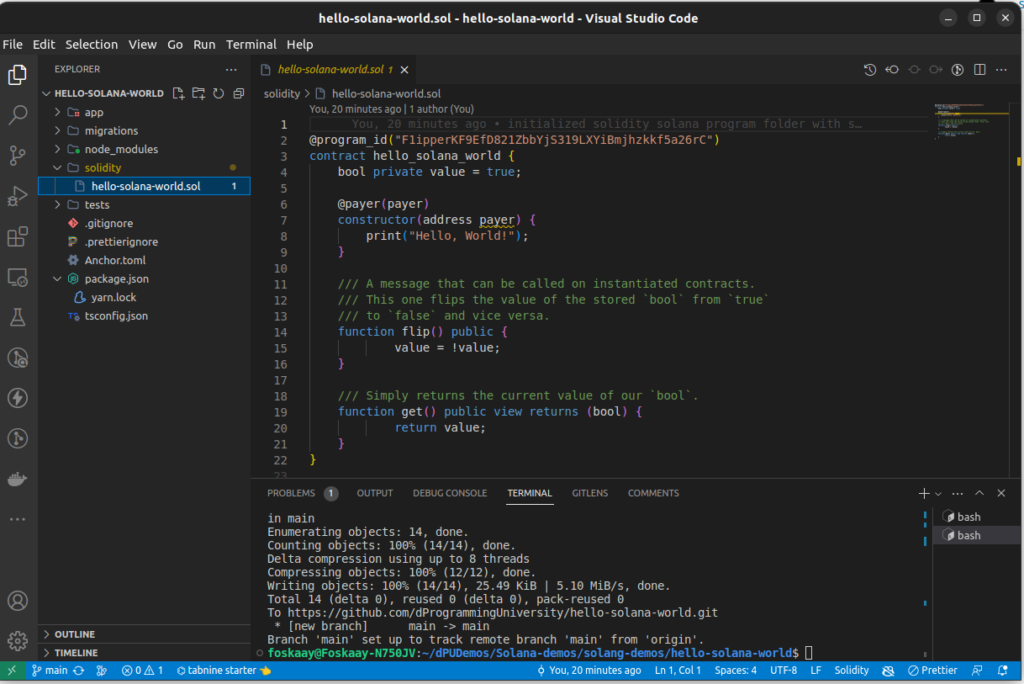
A brief about the Solidity smart contract and what it does.
1. It contains a “constructor” which has a “print” function.
Constructor in Solidity is a piece function-like of code that is run only once in the smart contract life cycle and that is only when it is first deployed, which makes it suitable to use to initialize the immutable state of a smart contract on the Blockchain.
Though in this case it is expected to print to log a message that simply says “Hello, World!” after successful deployment on-chain (you will change this later but let’s move on for now).
2. It contains a “flip” function which simply serves as a switch to flip the state variable “value” on/off or true/false depending on the state it was before been called and executed.
Did you notice it does not have some extras like “view” “pure” etc like the next function?
It is simply because it’s a setter function that changes the state of the smart contract on the blockchain. Need more info, check the Solidity section above for my full free Solidity for Beginners Course.
3. Lastly, it also contains a “get” function which is to read the current state of the “value” variable and return it to the user when executed.
Did you also notice about 2 major adjustments in the Solidity code itself?
Yeah, it contains “@program_id (“F1ipperKF9EfD821ZbbYj S319LXYiBmjhzkkf5a26rC”)” which is an essential requirement for all Solana programs. It is the smart contract/program address.
The second one is the “payer“. unlike Ethereum under the Solana account model section discussed in previous sections above. Storing data on the Solana Blockchain cluster cost money in SOL (either Mainnet – real SOL or Devnet, free fake SOL) and there has to be an account that pays for it and should be specified.
Meanwhile, before deploying and testing the smart contract, let’s have a brief check on another important file inside the “test” folder.
The “hello-solana-world.ts” contains Typescript code which is majorly helping to configure the local cluster and then run the Solidity smart contract code to test and ensure the functions are working as expected.
Finally, it’s time to deploy the contract but before that, let’s change the message from “Hello, World!” to “Hello, Solana World” in the constructor.
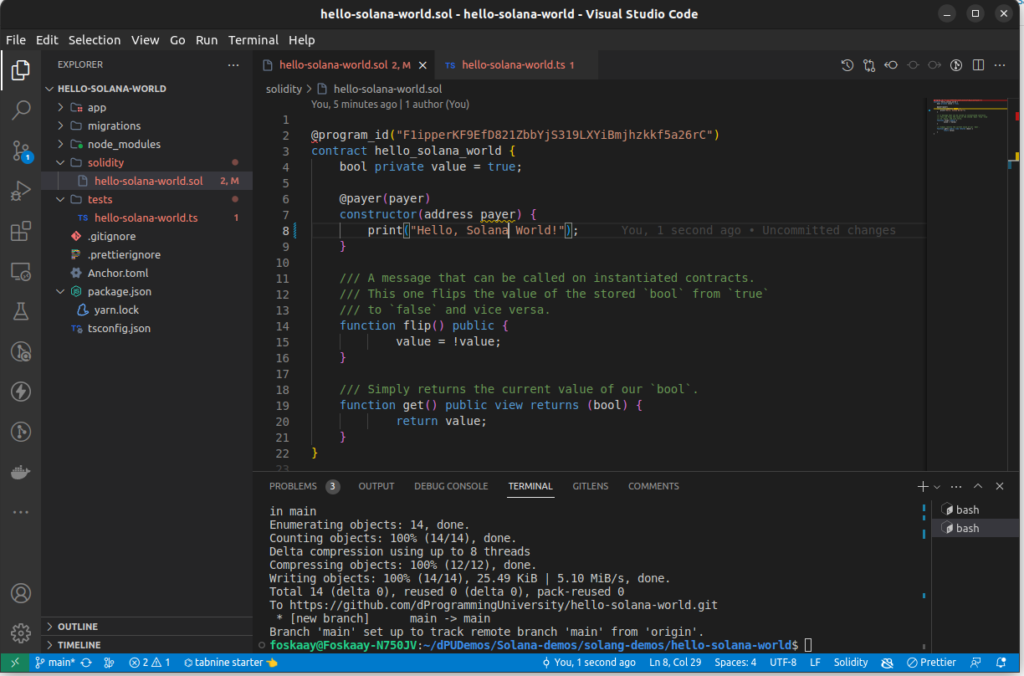
8.5 Deployment Steps for Solidity Smart Contract On Solana
Usually, the deployment steps look like this:
- Start Solana validator (in this case we will be using a local validator)
- Build and then deploy the Solidity smart contract to the Solana validator
- Once successful, run the test file to confirm all functions and essential features of the Solidity smart contract works as intended after deployment to Solana Blockchain.
The good news is that Anchor provides us with a single command that executes all the above steps one after the other.
It is the test command, so run in the terminal below:
anchor test
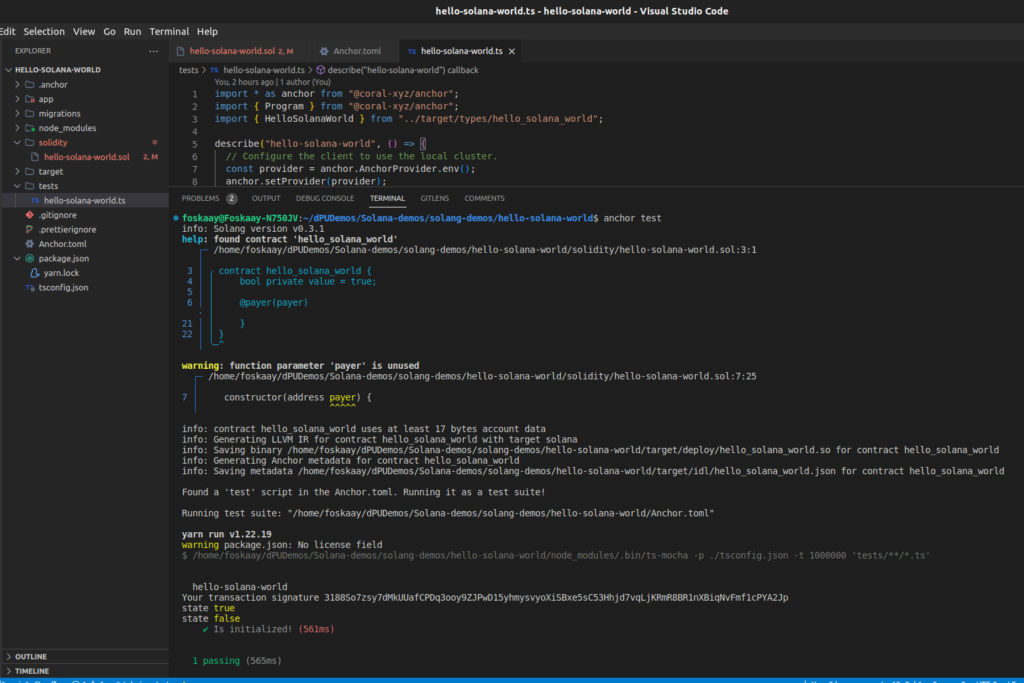
CONGRATULATIONS 😍😘👏👍 - You have successfully built and deployed your first Solidity smart contract not on Ethereum but on Solana Blockchain.
Let us check one more thing, which is our “Hello, Solana World!” message not visible in the terminal screenshot above like the “value” variable which flipped from ‘true‘ to ‘false‘ when the “flip” function was successfully executed during the test.
To see the log, go inside the “.anchor” folder that was auto-generated during the build process by Anchor. Then, select the “program-logs” folder.
Right there you will see a file with the name same as the “program id” in the Solidity contract code.
Click it and you will see the “Hello, Solana World!” been logged as shown in the screenshot below:
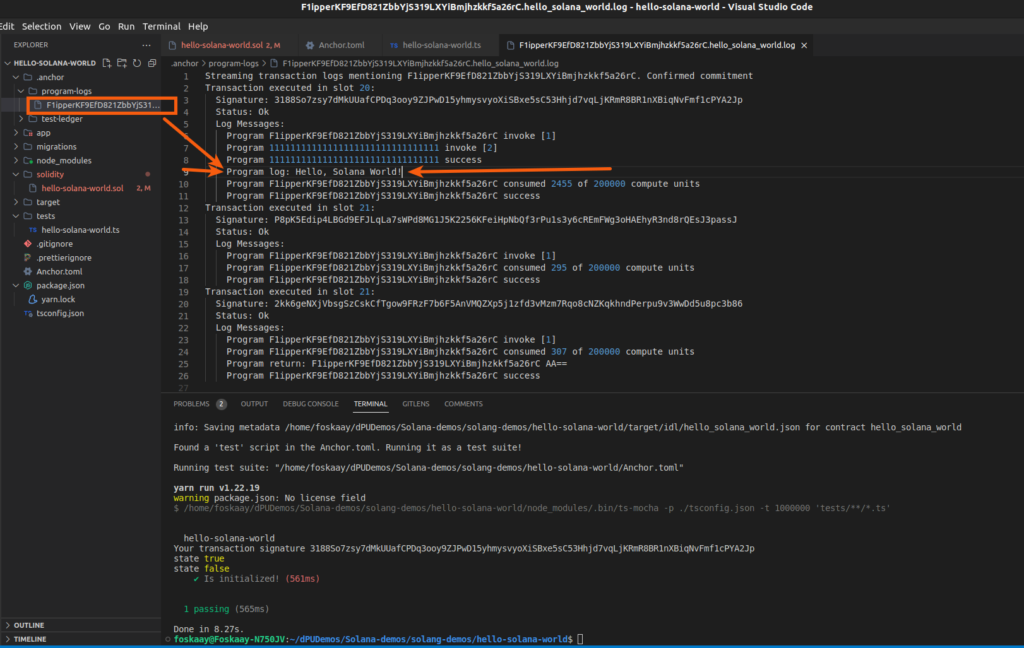
8.6 Problems Encountered and Solutions
I will be updating this section with problems I encountered myself and those reported in our discord channel during the deployment and testing of the Solidity Solana program following this guide.
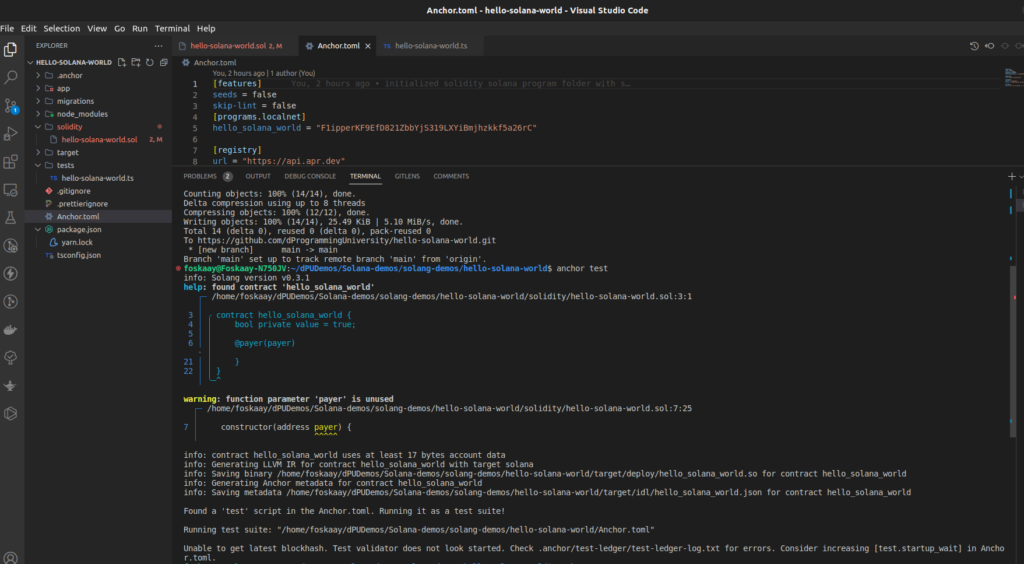
(1) Problem:
Unable to get latest blockhash. Test validator does not look started. Check .anchor/test-ledger/test-ledger-log.txt for errors. Consider increasing [test.startup_wait] in Anchor.toml.
Fix:
Simply wait a few minutes and then rerun the "anchor test" command. this fix it for me.
9 Exercises
Do the following exercise to solidify your learning:
- Initialize a new Anchor Solidity for Solana folder with your name or GitHub name or discord name (must be either of the 3)
- Change the Solidity constructor function log greeting from “Hello, World!” to “Hello, dProgramming University From Your_name_here” (the name should be the same as 1 above)
- Change the state variable “value” from “true” to “false” before next step is done.
- Build & deploy it to Solana local validator.
Submission:
- Submit the 2 screenshots (1 showing the flip function been executed successfully and 2 showing the log message)
- And the GitHub repo
All to the dProgramming university discord server under the “Support” section above in the #Solana channel.
10.0 Conclusion
It was an interesting ride and glad you made it to this point.
Congrats👏 once again and it’s time to take positive advantage of the opportunities opened up to Ethereum developers with the integration of Solidity on the Solana blockchain.
WHAT NEXT?
I aim to create advanced Solidity-based Solana programs and share them in future guides with you. Thus, kindly use the social media share button to share this guide if you have found it helpful or will be helpful to some developers in your social media sphere. And join the discord to stay in the loop.
Thanks for your time, it’s been a wonderful ride with you all this while.
SOLOMON FOSKAAY
Founder, dProgramming University (dPU).
Twitter: SolomonFoskaay
11.00 References
https://solana.com/developers//solang-getting-started
https://solang.readthedocs.io////solana.html
https://docs.neonfoundation.io////spl_tokens
https://www.quicknode.com///solana-account-model
https://solanacookbook.com//accounts.html
https://www.rareskills.io//solana-smart-contract


Way cool! Some extremely valid points! I appreciate you writing this write-up and also the
rest of the site is also very good.
Thanks!