
“Checking Accounts” Solana Program Codes Walkthrough – Solang Solidity Solana Programs Walkthrough Ep2
1.0 Introduction
In this second walkthrough guide, I will be taking you by hand to examine the “Checking Accounts” Solana program codebase written in Solidity with Solang.
The essence of this “Checking Accounts” Solang Solidity smart contract walkthrough is actually to help Solidity developers understand some security features that can be implemented in their Solana programs to ensure security and invariants in their Solang Solidity smart contract remain uncompromised.
Invariant refers to the conditions and properties that a Solana program (smart contract) written in Solang Solidity is expected to hold true and held unchanged through out the execution of the program.
Any deviation from such is considered a security concern for the smart contract.
Example:
Account "A" hold 5SOL and send 4SOL to account "B".
After Solana program execute the transaction, account "A" should have balance of 1SOL.
The state of the account "A" 1SOL balance is the required "invariant" that must hold true through out the remaining life circle of this program transaction execution".

But if account "A" has more than 1SOL balance, then something is not working as expected and "invariant" invalidated (false).
So, the transaction terminates and unroll entirely, cancelling the transfer totally.
Head up:
If you have gone through any of my previous Solang Solidity Solana Program Examples Walkthrough articles, then you can just skip to section 4 step 3 as every other thing before that remains the same across the articles. I believe you would have needed the Solana development environment setup for Solang Solidity done already.
But if this is your first article in the Solang Solidity Solana Program Examples walkthrough series, then will advise you to read and follow step by step without skipping any part to avoid getting stuck later down the line.
1.1 Why Walkthrough Codes As A Developer😜
One of the best ways to solidify your understanding of any programming language and development process is to go through real-life example codes to see how things are actually implemented for real.
That’s why, I will be going through the official Solana Labs program examples repo in the series to help you get a better understanding of your journey to becoming a Solidity developer on Solana.
1.3 Get Stuck? Get Support✋
I understand based on experience with developers that things can always break or get difficult to figure out, especially for beginners.
That is why you can join Discord below to get support if get stuck.
Join dProgrammingUniversity Discord Server – I have created a dedicated channel #Solana (under the BLOCKCHAINS category) to give support to my Solana developer content like this guide. So, feel free to ask questions in there if stuck with this guide.
Follow me on Twitter
DISCLOSURE:
We may hold, invest, trade or receive rewards/grants/bounty/tokens from reviewed/discussed web3 projects/affiliates (before, during or after this content was published).
DISCLAIMER:
All our contents at dProgramming University are for educational purposes only and do not constitute financial, trading, investment or development advice.
Please do your own research (DYOR).
By using or following the whole or part of this content, you agree that we are not liable for any losses that you may suffer thereafter.
2.0 Pre-Requisite For This Code Walkthrough Guide🤔
Let’s get into the codes right away. But, before that, there are a few things to check to ensure you can follow this guide.
1. Solidity programming language:
At least basic knowledge. If you are new to Solidity, check out my free beginner course to building your first smart contract with Solidity below:
Smart Contract Development With Solidity For Beginners
2. Solang:
At least basic knowledge of Solang and how it makes it possible to build and deploy Solana programs in Solidity even though Solana is not an EVM-compatible Blockchain. If you are new to Solang, then the best place to start is with my beginner-friendly guide (article and videos):
Ultimate Guide To Solidity For Solana Programs Development with Solang And Anchor
3. Setup Solana development environment for Solang Solidity:
Not to worry, I got you covered with my beginner-friendly step-by-step video on Solana development environment setup for Solidity developers transitioning to Solana below:
Once, you have the above pre-requisite fixed, then you are good to go with me for the live Solang Solidity Solana program code.
LFG🚀🔥
3.0 VIDEO: Checking Accounts Solang Solidity Solana Program Example Codes Walkthrough🚶
I have a step-by-step- video for this Solang Solidity smart contract walkthrough.
Watch me go through the Checking Account Solana program code walkthrough in the video below:
4.0 TEXT: Checking Accounts Solang Solidity Solana Program Example Codes Walkthrough🚶
I will break it into simplified steps to follow. Let us go:
STEP 1: Open Solana Program Examples Repo
The first step is to locate the Solana program examples repo on Solana Labs’s official GitHub account.
https://github.com/solana-developers/program-examples
STEP 2: Clone the Repo and Open it in a Code Editor
The next step is to clone the full Solana Example repo on your computer (am using Linux Ubuntu) but this works fine too for MacOS and Windows (via WSL).
After cloning, run the command in the same terminal:
cd program-examples
And then if using VS code as your code editor, run:
code .
This will open the cloned “program-examples” folder in VS code.

STEP 3: Select the “basics” folder
In the code editor, open the “basics” folder
STEP 4: Select “checking-accounts” example program folder
Open the “checking-accounts” example program folder. That is the precise Solana program example I will be walking you through the code in this series, and in future posts, will touch on others too.
STEP 5: Select the “solang” folder
Considering the focus is on Solidity smart contract and not Rust, Python and others. Kindly click the “solang” folder to unveil the actual Solidity smart contract code we will be working with.
STEP 6: Explore the files and folder and what they do
The most important files and folder in the “solang” folder is the “.sol“, “test” and “Anchor.toml“.
Want to learn more, watch the walkthrough video of this article above.

STEP 7: Explore the “solidity” smart contract folder
To access the actual Solang Solidity smart contract code, you need to open the “solidity” folder to access the “checking-accounts.sol” file.
Before we move on, let’s do a brief analysis of what the Solang Solidity smart contract code in the “checking-accounts.sol” does.
import "solana";

@program_id("F1ipperKF9EfD821ZbbYjS319LXYiBmjhzkkf5a26rC")
contract checking_accounts {

    // The dataAccount is unused in this example, but is a required account when using Solang
    @payer(payer) // "payer" is the account that pays to create the dataAccount
    constructor() {}

    function checkAccounts(address accountToChange, address accountToCreate) public view {
        print("Number of Accounts Provided: {:}".format(tx.accounts.length));

        // Find the accounts we are looking for and perform checks on them
        for (uint64 i = 0; i < tx.accounts.length; i++) {
            if (tx.accounts[i].key == accountToChange) {
                print("Found Account To Change");
                programOwnerCheck(tx.accounts[i]);
            }
            if (tx.accounts[i].key == accountToCreate) {
                print("Found Account To Create");
                notInitializedCheck(tx.accounts[i]);
                signerCheck(tx.accounts[i]);
            }
        }

        // (Create account...) (unimplemented)
        // (Change account...) (unimplemented)
    }

    function programOwnerCheck(AccountInfo account) internal pure {
        print("Progam Owner Check");
        // The owner of this account should be this program
        require(account.owner == type(checking_accounts).program_id, "Account to change does not have the correct program id.");
    }

    function notInitializedCheck(AccountInfo account) internal pure {
        print("Check Account Not Initialized");
        // This account should not be initialized (has no lamports)
        require(account.lamports == 0, "The program expected the account to create to not yet be initialized.");
    }

    function signerCheck(AccountInfo account) internal pure {
        print("Check Account Signed Transaction");
        // This account should be a signer on the transaction
        require(account.is_signer, "Account required to be a signer");
    }
}
Let me explain the above Solang Solidity code:
import "solana";
Importing Solana.
@program_id("F1ipperKF9EfD821ZbbYjS319LXYiBmjhzkkf5a26rC")
Declaring the Solana program id which is an essential requirement for all Solana smart contracts.
// The dataAccount is unused in this example, but is a required account when using Solang
@payer(payer) // "payer" is the account that pays to create the dataAccount
constructor() {}
Another requirement of any Solana Program is the payer to be specified.
The constructor runs once when a smart contract is deployed on Solana but this time around it’s empty and does nothing.
function checkAccounts(address accountToChange, address accountToCreate) public view {
        print("Number of Accounts Provided: {:}".format(tx.accounts.length));

        // Find the accounts we are looking for and perform checks on them
        for (uint64 i = 0; i < tx.accounts.length; i++) {
            if (tx.accounts[i].key == accountToChange) {
                print("Found Account To Change");
                programOwnerCheck(tx.accounts[i]);
            }
            if (tx.accounts[i].key == accountToCreate) {
                print("Found Account To Create");
                notInitializedCheck(tx.accounts[i]);
                signerCheck(tx.accounts[i]);
            }
        }

        // (Create account...) (unimplemented)
        // (Change account...) (unimplemented)
    }
A “checkAccounts()” getter (view) Solidity function, which basically does not make changes to the state of the Solana program. It does the following checks to confirm things work as expected:
- Takes in two arguments/parameters named “accountToChange” and “accountToCreate” of type “address“
- It has a “for loop” which helps to loop through all the “accounts” addresses involved in the transaction (they are stored in “tx.accounts“) and does two main things depending on if the account exists in the transaction or not.
- If the “accountToChange” address is found, it triggers the execution of “programOwnerCheck()” function.
- If the “accountToCreate” address is found, it triggers the “notInitializedCheck()” and the “signerCheck()” functions.
- Print out the checks result stage by stage to understand whats going on within the function code execution stages.
The remaining 3 functions are internal helper functions.
They are marked with an “internal” Solidity modifier meaning no outside contract can call it except calls within its own contract “checking_accounts” or contracts that inherit from the current contract.
The addition of a “pure” modifier means they do not make changes that can impact the state of the contract itself.
This ensures the functions are at no point mistakingly executed with side effects on the contract. It’s a good Solidity development practice to keep the contract from unintended side effects from interacting with any of the 3 “pure” functions.
    function programOwnerCheck(AccountInfo account) internal pure {
        print("Progam Owner Check");
        // The owner of this account should be this program
        require(account.owner == type(checking_accounts).program_id, "Account to change does not have the correct program id.");
    }
The “programOwnerCheck()” function to help verify the account passed to it from “checkAccounts()” is actually the current Solana program using “require” checks which if not met fail and roll back the whole transaction.
    function notInitializedCheck(AccountInfo account) internal pure {
        print("Check Account Not Initialized");
        // This account should not be initialized (has no lamports)
        require(account.lamports == 0, "The program expected the account to create to not yet be initialized.");
    }
The “notInitializedCheck()” function ensure the account to be created is not a pre-existing Solana account.
How does it check?
Well, it’s simple, using the “require” to check if the account holds a tiny fraction of “SOL” coin in it or not (known as “lamports”).
The way the Solana contract account work is that it requires paying for “rent” and to pay, there has to be a deposit of “SOL” to cover the cost. So, the check uses this to determine if the account exists already or not. if it does it returns an error message.
    function signerCheck(AccountInfo account) internal pure {
        print("Check Account Signed Transaction");
        // This account should be a signer on the transaction
        require(account.is_signer, "Account required to be a signer");
    }
}
The last function “signerCheck()” is actually there to use “require” to check and confirm if the account address passed from the “checkAccounts()” function is a signer of the current transaction or not.
STEP 8: Select the “tests” folder
To test if the Solidity smart contract is working after deployment as a Solana program, the test file is needed to execute the test script.
STEP 9: Select the “Anchor.toml”
The “Anchor.toml” is an essential Anchor framework config file to handle the building, deployment and testing of the “checking-accounts” Solidity Solana program.
STEP 10: Install dependencies
It is essential to ensure installing all needed dependencies by running the command:
yarn install
STEP 11: Build, Deploy and Test the Solang Solidity Solana Program
To build, deploy and test the “checking accounts” program, run the Anchor test command:
anchor test
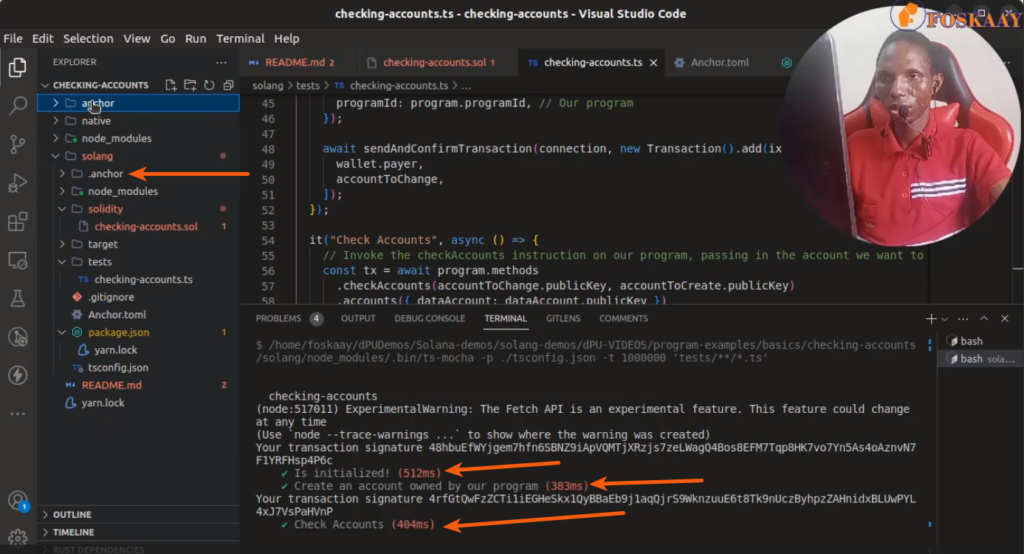
STEP 12: To see the log message after a successful deployment
The last thing to do is check for the log to see the Solana program message send via the Solidity smart contract.
To see that, open the auto-generated “.anchor” folder to check the log file inside “program-logs” based on the program id.
Congratulations, we just completed a Solang Solidity Solana “Checking Accounts” program walkthrough.
We built, deploy and tested it successfully.
5.0 Exercises
Do the following exercise to solidify your learning:
- Follow the walkthrough video above
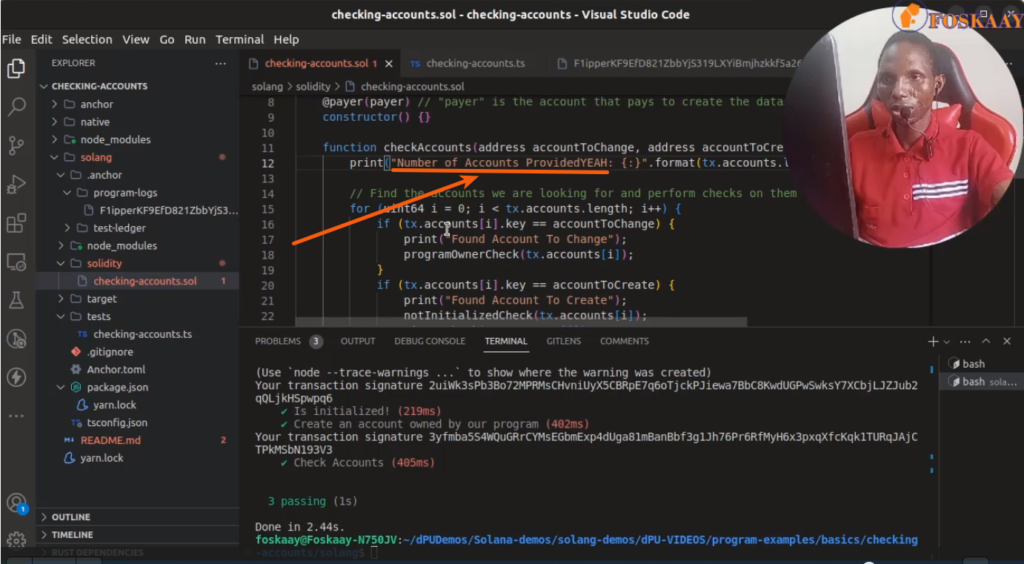
- Change the Solidity “checkAccounts” function print message “Number of Accounts Provided” to “Number of Accounts Provided by dPU by YOUR DISCORD NAME” (the name must be your discord username that you will use to submit the exercise)
- Build & deploy it to Solana local validator.
Submission:
- Submit the 2 screenshots (1 showing the anchor test executed successfully in your terminal and 2 showing the log message)
- Post the screenshots in the dedicated #Solana channel in the dProgramming University discord server.
All to the dProgramming university discord server in the #Solana channel.
6.0 Conclusion👍
It was an interesting ride and glad you made it to this point.
Congrats👏 once again and it’s time to take positive advantage of the opportunities opened up to Ethereum developers with the integration of Solidity on the Solana blockchain.
6.1 WHAT NEXT?🚀
I aim to create advanced Solidity-based Solana programs and share them in future guides with you. Thus, kindly use the social media share button to share this guide if you have found it helpful or will be helpful to some developers in your social media sphere. And join the discord to stay in the loop.
Thanks for your time, it’s been a wonderful ride with you all this while.
SOLOMON FOSKAAY
Founder, dProgramming University (dPU).
Twitter: SolomonFoskaay
See you in the next series.


It’s actually a niice aand helpful piuece off info.
I am hqppy that you jjst shared ths elpful infto ith us.
Pease styay uus up tto datfe like this. Thanks forr sharing.